First Uke Finally Off The Ground

Talk about musical instrument construction, setup and repair.

Moderators: kiwigeo, Jeremy D

User avatar
Hippety Hop
Blackwood
Posts: 175
Joined: Wed Apr 30, 2008 11:18 am
Location: Moorabbin

First Uke Finally Off The Ground

Post by Hippety Hop » Sat Nov 29, 2008 7:43 pm

After all this time I got my first sides bent.

I'll let the pictures tell the story.

Image
Image
Image
Image
Image
Image

Found a suitable thermostat for the blanket, but haven't figured how to connect it yet.

The operation went surprisingly smooth. Fast and easy. Didn't disturb the smoke alarm either.

Cheers Hip.

User avatar
Kim
Admin
Posts: 4376
Joined: Wed Sep 26, 2007 8:32 pm
Location: South of Perth WA

Post by Kim » Sat Nov 29, 2008 8:49 pm

How freak'in cool is that Hip :D

Congrats mate, your set up looks superb, well done. 8)

Cheers

Kim

User avatar
Allen
Blackwood
Posts: 5252
Joined: Thu Oct 11, 2007 5:39 pm
Location: Cairns, Australia
Contact:

Post by Allen » Sat Nov 29, 2008 10:48 pm

Mate! I'm so impressed with that. I'm going to chuck my bending form in the bin. Yours rules. :cl :cl :cl
Allen R. McFarlen
https://www.brguitars.com
Facebook
Cairns, Australia

User avatar
kiwigeo
Admin
Posts: 10594
Joined: Sat Sep 29, 2007 5:57 pm
Location: Adelaide, Sth Australia

Post by kiwigeo » Sat Nov 29, 2008 10:50 pm

Looking good there Hip......nice work on the bending form.

User avatar
Hippety Hop
Blackwood
Posts: 175
Joined: Wed Apr 30, 2008 11:18 am
Location: Moorabbin

Post by Hippety Hop » Sun Nov 30, 2008 9:29 am

Thanks fellas.

I guess I am rather proud of this little achievement. It was a slow process, and now I have to make up the same style jigs for the standard soprano size. I already have a heat blanket for it.

I've tracked down some thermocouple plugs & jacks so I can use the thermostat on either blanket.

Need some brass shim. This steel shim stock is too springy.

Cheers Hip.

User avatar
kiwigeo
Admin
Posts: 10594
Joined: Sat Sep 29, 2007 5:57 pm
Location: Adelaide, Sth Australia

Post by kiwigeo » Sun Nov 30, 2008 9:33 am

Hey Hip,

Be careful using brass...its got copper in it which can colour up some woods (Koa, Blackwood etc) if it gets in contact with same. See posts on this in here and over on OLF forum.

Cheers Martin

User avatar
Bob Connor
Admin
Posts: 3132
Joined: Mon Jul 09, 2007 9:43 pm
Location: Geelong, Australia
Contact:

Post by Bob Connor » Sun Nov 30, 2008 9:52 am

Looking good Hip.

What's the ETA on the finished product.
Bob, Geelong
_______________________________________

Mainwaring and Connor Guitars

User avatar
Kim
Admin
Posts: 4376
Joined: Wed Sep 26, 2007 8:32 pm
Location: South of Perth WA

Post by Kim » Sun Nov 30, 2008 8:27 pm

Hippety Hop wrote:
Need some brass shim. This steel shim stock is too springy.

Cheers Hip.
How thick is your shim stock Hip? I use .010 and it is just fine in a solid bending form for an acoustic guitar.

Cheers

Kim

gratay
Blackwood
Posts: 186
Joined: Sat Oct 27, 2007 8:33 pm

Post by gratay » Mon Dec 01, 2008 10:43 am

thats an ingenius bending form....I like it . good thinking

User avatar
Hippety Hop
Blackwood
Posts: 175
Joined: Wed Apr 30, 2008 11:18 am
Location: Moorabbin

Post by Hippety Hop » Sat Dec 13, 2008 9:05 pm

Latest pictures of the concert uke.

Image
Image
Image

The neck surfaces aren't quite true. I'm working on it. Can you hear the brain ticking over?

Also can anyone tell me what the screw-bolts that are used on bed base legs are called?

Hip?

jeffhigh
Blackwood
Posts: 1536
Joined: Thu Feb 07, 2008 5:50 am
Location: Caves Beach, NSW
Contact:

Post by jeffhigh » Sat Dec 13, 2008 9:29 pm

Lookin good, I like that seamless butt.
Don't know for sure what they call the screw bolts "leg bolts" ? think they are in the furniture assembly hardware section of bunnings away from the rest of the nuts and bolts, sure I have seen them there.
I use the threaded insert in the neck heel/ hex key bolt from the inside arrangement on mine but I am sure the leg bolt will work fine too

User avatar
Kim
Admin
Posts: 4376
Joined: Wed Sep 26, 2007 8:32 pm
Location: South of Perth WA

Post by Kim » Sat Dec 13, 2008 10:00 pm

Hip, I think the ones that have a coach bolt thread for half and a bolt thread the other are called lag screws, and yes you can get them from that pimple face palace called bunnings.

As for your neck, with the sides squared to the fretboard surface use a sanding board on the fretboard surface to get it flat and level. Then draw a line with a SHARP pencil and a machinist square across the fretboard surface just a tad back from the back edge of the peghead surface. Using a good SHARP block plane, flatten the peghead back to the line and your done.

If you are getting close to the line and things are still not right, as long as you have enough material to sacrifice down the neck block end, you can re-sand the fretboard surface and start again. Push comes to shove, you can always revert to the sanding board to level the peghead back to the line if you think this will give you better control.

Oh and by the way, 16mm melamine off cuts make superb sanding boards, good and FLAT and you can get the old abrasive off easy and clean up for the fresh stuff is a breeze. Cut a piece that will take exactly 1/2 a sheet of emery cloth and use spray contact on both surfaces to glue 80 grit one side and 120 grit on the other.

Good luck.

Kim

User avatar
Hippety Hop
Blackwood
Posts: 175
Joined: Wed Apr 30, 2008 11:18 am
Location: Moorabbin

Post by Hippety Hop » Sat Dec 13, 2008 10:46 pm

Thanks. My mate Mark bought a campfire mandolin kit from StewMac, and it had one of those lag screws already inserted in the neck.

It's a pleasure to go to Bunnings after the arrogance I've encountered at other places.

... where lower prices generally mean lesser quality.
[img]http://planetsmilies.net/not-tagged-smiley-10140.gif[/img][img]http://planetsmilies.net/person-smiley-1062.gif[/img]
Hippus Erectus

User avatar
Hippety Hop
Blackwood
Posts: 175
Joined: Wed Apr 30, 2008 11:18 am
Location: Moorabbin

Post by Hippety Hop » Fri Dec 19, 2008 9:43 pm

Yes I got some lag screws. 1/4" whitworth was the smallest I could get at Bunnings. They'll do. I've enlarged the hole. We put the back on last Sunday, and the neck ought to be ready for finishing next weekend.

We'll do the body with tung oil, and the neck with shellac. I wouldn't dare call it french polishing, because the first few coats will be brushed on. The entire uke is blackwood except for the braces, blocks, lining & purfling. The bridge, fretboard and headstock veneer will be blackwood too.

Top radius is 15', back is 12'. Pearl dot markers. 13 frets to body join. 19 frets total.

I've never made a bridge before, so I can see this thing taking a couple more weeks yet. I just realised I have only got white/nickel tuning pegs, so will have to order some amber/gold and pearl/gold from Hana Lima Ia.

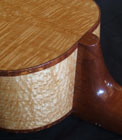
Haven't got a picture of the finished body, because my landlord borrowed his camera off me, but he's bringing it back tomorrow. Here are the pictures from last Sunday.
Image
Image
Image

No binding intended, but I'm thinking about a headstock inlay. The uke is for my mate Mark, who has put a bit of work into it - mainly dish sanding and gluing in the liners. He prefers to play concert ukes, while I prefer the soprano.

Cheers Hip.
[img]http://planetsmilies.net/not-tagged-smiley-10140.gif[/img][img]http://planetsmilies.net/person-smiley-1062.gif[/img]
Hippus Erectus

User avatar
Hippety Hop
Blackwood
Posts: 175
Joined: Wed Apr 30, 2008 11:18 am
Location: Moorabbin

Post by Hippety Hop » Fri Dec 19, 2008 9:44 pm

I was planing the neck with the Wagner, and it felt a bit rough, so I sharpened it, but noticed no improvement. Must be the hardness/brittleness of the wood. It did a good enough job. Ready to start carving.
[img]http://planetsmilies.net/not-tagged-smiley-10140.gif[/img][img]http://planetsmilies.net/person-smiley-1062.gif[/img]
Hippus Erectus

User avatar
Localele
Moderator
Posts: 373
Joined: Tue Aug 12, 2008 6:54 am
Location: Corndale,NSW
Contact:

Post by Localele » Fri Dec 19, 2008 10:30 pm

Hello Hip, The first few coats of shellac that are brushed on are all part of the process.It is called "bodying".The idea is to get plenty of shellac on in thin coats quickly and then let it settle.Cutting back to level and then bringing up the finish is where the polishing comes in.For the finish you need on the neck the whole thing can be done with a good brush and some careful cutting back with wet sanding.A bit of burnishing at the end and it's all beautiful.Cheers.

User avatar
Hippety Hop
Blackwood
Posts: 175
Joined: Wed Apr 30, 2008 11:18 am
Location: Moorabbin

Post by Hippety Hop » Sun Dec 21, 2008 6:40 pm

Just prior to the first coat of Wattyl Tung Oil

Image
Image
Image

Mark sanded it down to 400, spongeing and allowing to dry between grits.
He's following the instructions from the Hana Lima 'Ia 'Ukulele Construction Manual, which explains how to finish a uke using Tru-Oil.
[img]http://planetsmilies.net/not-tagged-smiley-10140.gif[/img][img]http://planetsmilies.net/person-smiley-1062.gif[/img]
Hippus Erectus

User avatar
DarwinStrings
Blackwood
Posts: 1877
Joined: Thu Nov 13, 2008 10:27 pm
Location: Darwin

Post by DarwinStrings » Sun Dec 21, 2008 8:24 pm

Hi Hip

Looks great mate. I like the one piece sides and looks like the top is not joined either.

That last post states "Just prior to the first coat of Wattyl Tung Oil" so I am assuming you oil it before you glue the bridge. Do you mask the bridge position or are you confident that you can scrape enough oil off to get a good bond for the bridge.

Also how do you find that brand of Tung Oil. I use Pure Tung Oil and build it up cutting the first coats with Gum Turps 50/50 then reducing the ratio with each coat till using it uncut on the final few coats.

Jim

User avatar
Hippety Hop
Blackwood
Posts: 175
Joined: Wed Apr 30, 2008 11:18 am
Location: Moorabbin

Post by Hippety Hop » Sun Dec 21, 2008 9:09 pm

Presumably this is polymerized tung oil. It doesn't say pure on the can. We're treating it as if it is, and applying according to the instructions for Tru-oil. I told Mark to ignore the instructions on the can, except for drying time.

Mark bought the tung oil about a year ago, and refreshed the finish on his Cole Clark uke. Just using what we had. I'm on the hunt for some Tru-oil, but can't seem to find any in Vic.

The bridge? Screw the bridge! :D With screws - that is. Perhaps cover them with pearl dots. The top is 1.8 mm and the bridge patch is 2mm blackwood. Ought to be strong enough to hold.

We'll screw the neck on without glueing the fretboard extension to the top. I just hope it lays flat. The top has been radiused.

Cheers Hip.
[img]http://planetsmilies.net/not-tagged-smiley-10140.gif[/img][img]http://planetsmilies.net/person-smiley-1062.gif[/img]
Hippus Erectus

User avatar
DarwinStrings
Blackwood
Posts: 1877
Joined: Thu Nov 13, 2008 10:27 pm
Location: Darwin

Post by DarwinStrings » Sun Dec 21, 2008 10:35 pm

Hmmm a bolt on neck. I use a bit of Stainless Steel Glue here and there myself. Leo would be proud.

Jim

User avatar
Hippety Hop
Blackwood
Posts: 175
Joined: Wed Apr 30, 2008 11:18 am
Location: Moorabbin

Post by Hippety Hop » Wed Dec 31, 2008 11:52 pm

Some pictures from last weekend. I shaped the neck using the sanding drum in the drill press, then let Mark have a little scrape & file to level it out.

Image

I had a bit of an accident sanding, and it grabbed the thing off me and had it's way with it. That's how come the heel is shaped the way it is. Just needs sanding. We'll use tung oil to tart it up. Mark wants a palm tree inlay. Pearl trunk with abalone fronds. I'll try to draw something that looks like a palm tree tomorrow.

Image

Mark has been applying a coat of tung oil to the body each night after work, and 2 coats on holidays. This is after 12 coats. I think it's finished now.

Image

Image

Each coat is just a wipe on - wipe off, and he started giving it a light rub with steel wool after 8 coats.

Image

I still haven't got any suitable blackwood for the fretboard & bridge yet. The stuff we've got has no figure in it. The only rosewood I've got is EIR from ebay, which looks woeful.

I'm waiting until A.E.Lewis opens up on 12th Jan. They sell blackwood, so I'll see what they've got. Otherwise, I'll contact Tim.

Finding the right size screws for the bridge is not easy either. I want to counterbore and cover them with 3mm pearl dots.

Cheers Hip
[img]http://planetsmilies.net/not-tagged-smiley-10140.gif[/img][img]http://planetsmilies.net/person-smiley-1062.gif[/img]
Hippus Erectus

User avatar
hilo_kawika
Blackwood
Posts: 144
Joined: Mon Oct 13, 2008 10:29 am
Location: Hilo, Hawaii
Contact:

Post by hilo_kawika » Thu Jan 01, 2009 1:36 am

Hi Hip,

Coming along very nicely.

Question: why do you need screws for the bridge?

aloha,

Dave Hurd
www.ukuleles.com
How to become a millionaire? Start with $2 million and become a luthier...

User avatar
sebastiaan56
Blackwood
Posts: 1279
Joined: Sun Oct 28, 2007 5:23 am
Location: Blue Mountains

Post by sebastiaan56 » Thu Jan 01, 2009 6:31 am

Looking good Hip. Ive been playing with Wattyl Tung Oil as well. The price is right :lol: particularly when you wipe it on.

There was a thread on Tru Oil a while ago, gun vendors sell it, here is the link, viewtopic.php?t=702&highlight=tru+oil
make mine fifths........

User avatar
Hippety Hop
Blackwood
Posts: 175
Joined: Wed Apr 30, 2008 11:18 am
Location: Moorabbin

Post by Hippety Hop » Thu Jan 01, 2009 10:54 am

I had a browse for local suppliers of tru-oil, but after seeing the results of the polymerised tung oil, which is totally idiot proof it seems, Mark & I now think tru-oil is over priced, and we won't be thinking about it ever again.

One day I measured a few ukes to see if their 12th fret was precisely half way between the nut and the saddle. What I found was that each had a greater distance from the 12th fret to the saddle. That night I substituted a lot of sleep for worrying about getting the bridge in the correct position. My solution was to screw the bridge on. Then if it's wrong I can simply make another bridge.

Cheers.
[img]http://planetsmilies.net/not-tagged-smiley-10140.gif[/img][img]http://planetsmilies.net/person-smiley-1062.gif[/img]
Hippus Erectus

User avatar
Localele
Moderator
Posts: 373
Joined: Tue Aug 12, 2008 6:54 am
Location: Corndale,NSW
Contact:

Post by Localele » Thu Jan 01, 2009 12:52 pm

Hip, Don't forget that you have a last chance for accuracy when you do the saddle.If your measurements get you reasonably close which they should either by screw or by glue you then have 3mm to play with as you sand the break point onto the saddle.You could also apply some intonation at the saddle if you want to get carried away with the shaping.
Your probably strumming by now and overcome by the joy of the uke.(Commonly known around the NCUC-North Coast Ukulele Collective as the "Weapon of Mass Affection".
Cheers from Micheal.

Remember the "5P Rule".
Preparation Prevents Piss Poor Performance.

Post Reply

Who is online

Users browsing this forum: Google and 247 guests