Pear/Huon OM

Talk about musical instrument construction, setup and repair.

Moderators: kiwigeo, Jeremy D

Post Reply
User avatar
Dominic
Blackwood
Posts: 1098
Joined: Thu Jan 10, 2008 8:58 am
Location: Canberra

Pear/Huon OM

Post by Dominic » Sat Feb 21, 2009 7:16 pm

Hey, I have put up a few pics of this guitar at various stages and it is finally finished. It is for a mate made mostly of wood a he has been collecting and saving over the years. The sides are native pear with a figured mahogany veneer inside to help keep it together. The sides are book matched to make up the width. The back is 4 piece Huon pine. The neck is WA marri and jarrah. The bindings are the same curly marri as the neck. And the rosette is jarrah burl.


It has challenged me at ever step but it has turned out pretty good
I am very impressed with the sound. It is a level above my other guitars.

Cheers
Dom

Image

Image

Image

Image
You can bomb the world to pieces,
but you can't bomb the world to peace!

User avatar
kiwigeo
Admin
Posts: 10594
Joined: Sat Sep 29, 2007 5:57 pm
Location: Adelaide, Sth Australia

Post by kiwigeo » Sat Feb 21, 2009 9:22 pm

Nice piece of work there Dom. A rather unusual collection of woods but it goes together well. I love the "odd one out" black bridge pin and the tuners.

Cheers Martin

User avatar
Kim
Admin
Posts: 4376
Joined: Wed Sep 26, 2007 8:32 pm
Location: South of Perth WA

Post by Kim » Sat Feb 21, 2009 10:26 pm

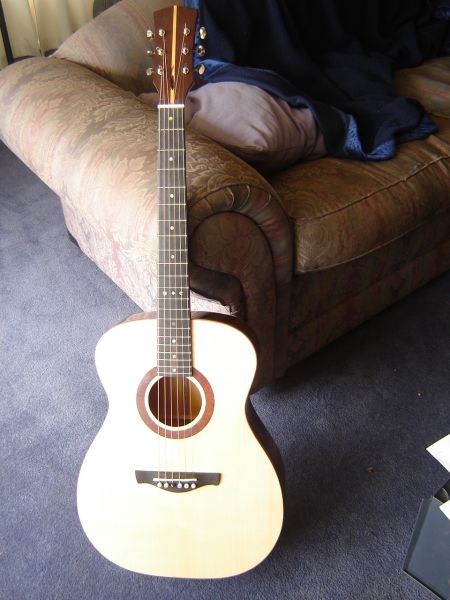
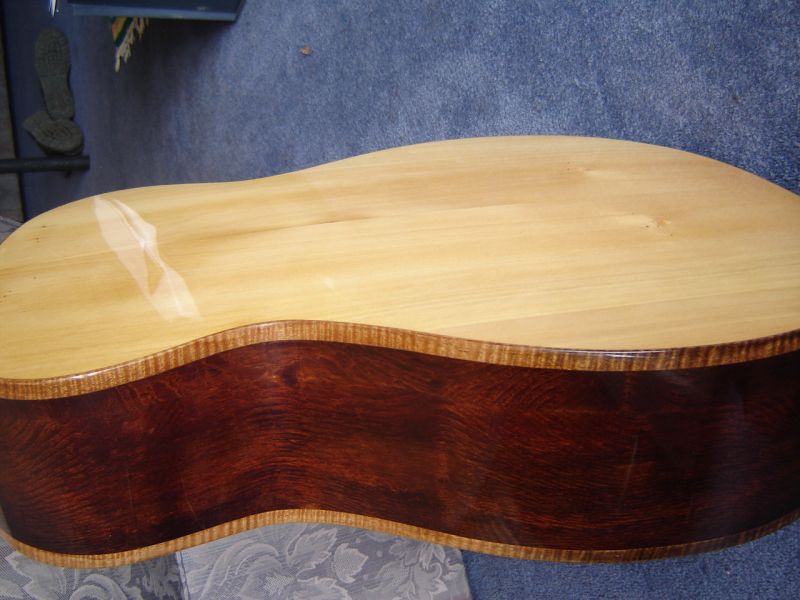
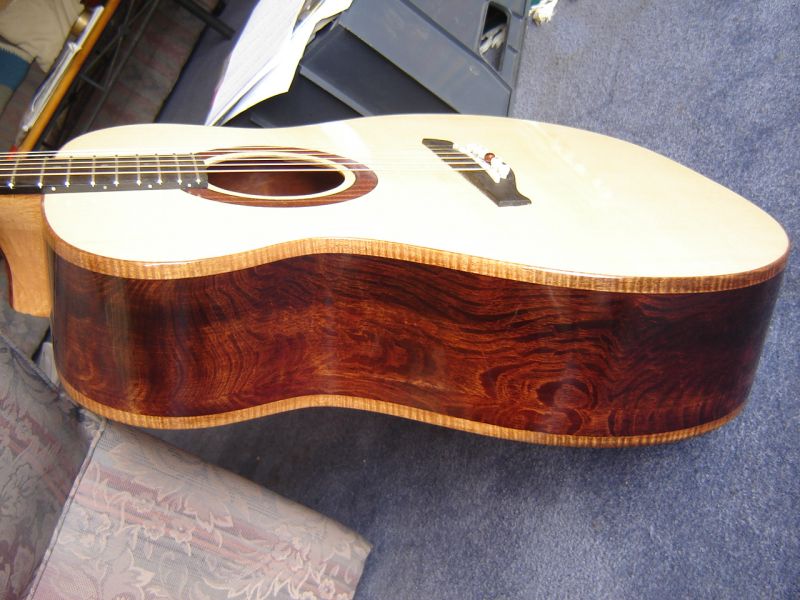
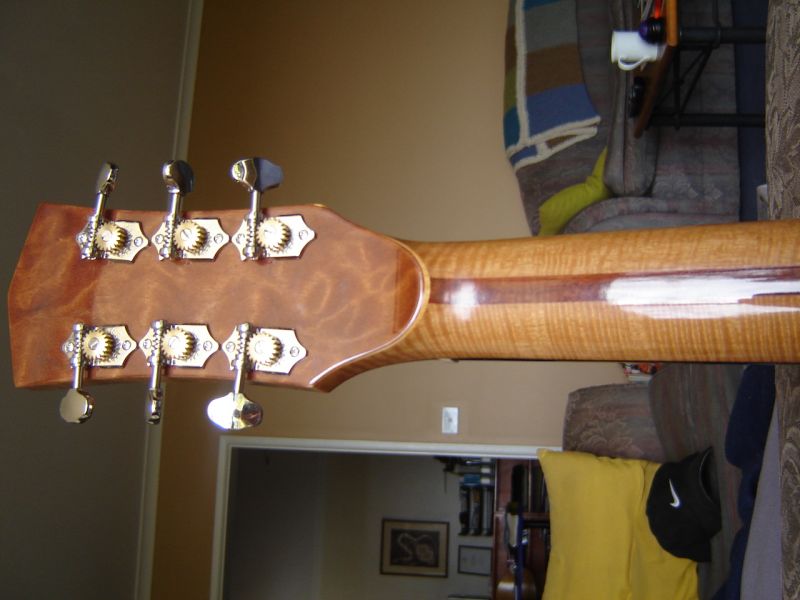
Great work Dom, excellent use of material and a fine looking guitar indeed.

I have some native pear out in the garden shed that I bought from Chris Brady the drum maker about 13 years ago. http://www.bradydrums.com.au/ Chris is a real one off sort of guy and a great bloke to have a yarn with. He had this amazing stock pile of native timbers back then but unfortunately not long after I picked out a few boards of the native pear, he had a big fire at the yard around his factory which completely wiped out all of his many years of hard work building up his stash. But that was long ago and I am sure he has some impressive native woods for his world class drums once again.

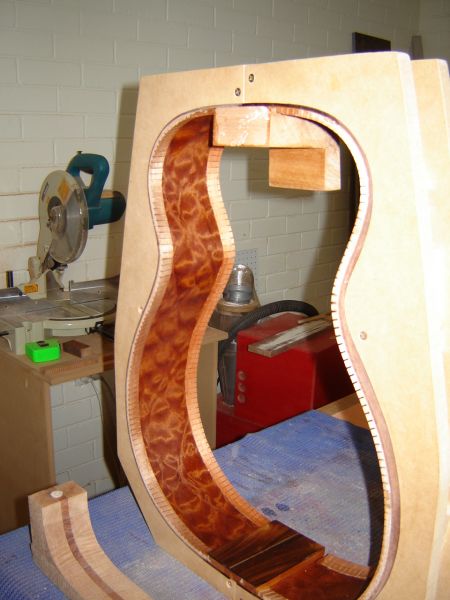
Anyhow, maybe it is time for me to dig those boards out and have a look at what I got, as I remember it was light weight and real pretty with lots of figure. Backing the sides of your mates guitar with mahogany was a clever move and opens the door to many possibilities, thanks for the inspiration M8.

Cheers

Kim

Hesh1956
Blackwood
Posts: 1420
Joined: Thu Sep 27, 2007 9:58 am

Post by Hesh1956 » Sat Feb 21, 2009 11:41 pm

Very cool guitar Dom my friend - I think that the woods go very well together too - nice combo. And the finish looks great as well. Great job! :cl :cl :cl :cl :cl :cl

User avatar
Mark McLean
Blackwood
Posts: 1088
Joined: Thu Apr 10, 2008 2:03 pm
Location: Sydney

Post by Mark McLean » Sun Feb 22, 2009 6:05 am

Very individual with the unconventional mix of timbers. I love the idea of using materials that have been scrounged and found. Beautiful neck. It looks deeper than the average OM - how does that affect the sound?
Mark

User avatar
Dominic
Blackwood
Posts: 1098
Joined: Thu Jan 10, 2008 8:58 am
Location: Canberra

Post by Dominic » Sun Feb 22, 2009 10:24 am

Hey, Thanks everyone.

Martin, I lost a white pin somewhere and had to make do with one dark one. I'll fix that up before I send it home. The tuners are the grover copies of the waverly open back ones. I like them.

Kim, the pear is quite soft but it bent in my fox bender with out problems and was very easy to work. It is just stunning with a finish. Smells nice too. I've got a bit more but not enough for a guitar. The veneer I backed it up with is the same as on the back of the headstock. It made very stiff sides.
I also have enough Huon left to make a full B&S set.

Thanks Hesh, i used my new festool sander and got a great finish for buffing with no hand or wet sanding. I used the platin disks.

Mark, the neck is a little deeper and a little wider than usual but the new owner has big hands and the cury marri was a little bendy so I wanted to leave as much meat as I could. It is also full of CF rods. But it is very comfortable to play.

Cheers
Dom
You can bomb the world to pieces,
but you can't bomb the world to peace!

User avatar
DarwinStrings
Blackwood
Posts: 1877
Joined: Thu Nov 13, 2008 10:27 pm
Location: Darwin

Post by DarwinStrings » Sun Feb 22, 2009 10:31 am

Another cool guitar hits the pages of the ANZLF. What Mark said too Domonic, a collection of bit and pieces nice work.

Jim

The challenge is the fun part

User avatar
Dave White
Blackwood
Posts: 452
Joined: Mon Nov 12, 2007 3:10 am
Location: Hughenden Valley, England
Contact:

Post by Dave White » Sun Feb 22, 2009 9:15 pm

Dom,

Lovely guitar. I love the light top and back separated by dark sides, and the curly marri neck and bindings - that looks a dead ringer for curly koa. I also applaud the use of multi-piece back and sides. What's the top wood?
Dave White
[url=http://www.defaoiteguitars.com]De Faoite Stringed Instruments[/url]

User avatar
Bob Connor
Admin
Posts: 3132
Joined: Mon Jul 09, 2007 9:43 pm
Location: Geelong, Australia
Contact:

Post by Bob Connor » Sun Feb 22, 2009 10:04 pm

An unusual choice of woods but it works really well Dom.
Bob, Geelong
_______________________________________

Mainwaring and Connor Guitars

User avatar
Hippety Hop
Blackwood
Posts: 175
Joined: Wed Apr 30, 2008 11:18 am
Location: Moorabbin

Post by Hippety Hop » Wed Feb 25, 2009 9:38 pm

Hi Dominic. Nice looking guitar.

Could you explain how you went about laminating your sides.

I was thinking of trying the Zootman curly rosewood tops which apparently needs to be laminated.

Haven't seen soft hardwood used on backs before - except maple. Suppose it must be similar.

Cheers Hip.
[img]http://planetsmilies.net/not-tagged-smiley-10140.gif[/img][img]http://planetsmilies.net/person-smiley-1062.gif[/img]
Hippus Erectus

User avatar
Dominic
Blackwood
Posts: 1098
Joined: Thu Jan 10, 2008 8:58 am
Location: Canberra

Post by Dominic » Thu Feb 26, 2009 8:28 pm

Hey Hip, the sides are 2 bookmatched pieces each. You can see where I edge glued them. I used epoxy to do that before bending. The epoxy let go in a few places and the pear is quite soft which led me to use the veneer to add a bit of stiffness.
I just glued up the bent sides and taped the veneer in place then put it back in the bending mold to set. Worked great. I use turn buckles on the ends of the slats on my bender so I can crank it down tight and get out all the air.
Here is a pic of the sides after laminating and kerfing glued in.
Cheers
Dom
Image
You can bomb the world to pieces,
but you can't bomb the world to peace!

User avatar
matthew
Blackwood
Posts: 1192
Joined: Mon Oct 08, 2007 1:16 pm
Location: Sydney, Inner West
Contact:

Post by matthew » Thu Feb 26, 2009 10:42 pm

I'm sorry I don't quite get that, nor see it. You say the sides are made of two pieces bookmatched - how? I can't see that, on either shot of the ribs, at all. Got any clearer shots?

And you use epoxy to edge-glue the sides before bending? I ask because I'm faced with this sort of thing all the time with my blasted 10" ribs ... I've wondered how to achieve multi-piece ribs.

User avatar
Hippety Hop
Blackwood
Posts: 175
Joined: Wed Apr 30, 2008 11:18 am
Location: Moorabbin

Post by Hippety Hop » Thu Feb 26, 2009 11:09 pm

I can see the joins. About 20mm from the back on the lower bout to about 10mm on the upper bout.

Don't quite understand the gluing procedure, but if you clamped them down in the side bender I kinda get the picture. Thanks.

Hip.
[img]http://planetsmilies.net/not-tagged-smiley-10140.gif[/img][img]http://planetsmilies.net/person-smiley-1062.gif[/img]
Hippus Erectus

User avatar
Dominic
Blackwood
Posts: 1098
Joined: Thu Jan 10, 2008 8:58 am
Location: Canberra

Post by Dominic » Fri Feb 27, 2009 10:13 pm

Yep, Hip sees it. If you look in the pic that shows the Huon pine back you can see where the pattern repeats about a ¼ way down from the back. I should really have run the join down the middle of eachy side.

The gluing procedure went like this.

I matched the 4 bits for the 2 sides. Jointed up the edges then glued them up with epoxy. That gave me 2 pieces big enough for sides.

Then I profiled and bent them. I was hoping the epoxy would hold but it came apart in few places. But the glue line remained very clean. So I reglued the 2 pieces of each side at the same time as I glued on the inner veneer them carefully put it back in the bending form.

Once I filled the pores with Zpoxy it came out very smooth.

Bob put up a post doing something similar a while ago.

Dom
You can bomb the world to pieces,
but you can't bomb the world to peace!

User avatar
Stu
Blackwood
Posts: 245
Joined: Sun May 11, 2008 7:15 pm
Location: Melbourne, Australia
Contact:

Post by Stu » Fri Feb 27, 2009 10:18 pm

Well I've got to say I'm impressed with how you pulled that off, Dominic.

I didn't pick it up until now, but that could be due to being dazzled by the eye-candy on show :D

The lams and back strap detail on the neck/headstock are an excellent combination.

Well done, mate. :wink:

Stu

Post Reply

Who is online

Users browsing this forum: No registered users and 359 guests