Lutherier's Workbench

Talk about musical instrument construction, setup and repair.

Moderators: kiwigeo, Jeremy D

User avatar
Arnt
Blackwood
Posts: 134
Joined: Tue Oct 02, 2007 4:13 am
Location: Trondheim, Norway

Post by Arnt » Mon Mar 23, 2009 9:09 pm

Allen wrote: I use 2 pipe clamps that have some light weight ply as the jaws. These are lined with foam. The work bench can have either some threaded bases attached so the pipe from the clamp will thread on, or in my case, some longer pipe and I just drilled holes through the rail on one end of my bench. Very easy to use, and hold the guitar body better than anything else I've come across.
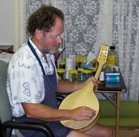
My guitar vise is just like Allen's. One nice thing about using the long pipe clamps is I can extend the vise out from the table if I want to, for even better access to the instrument. Plus I can still use the clamps for cabinet work when I need a couple of extra long clamps (I'm guessing the pipes are about 1,8 m or so). :)

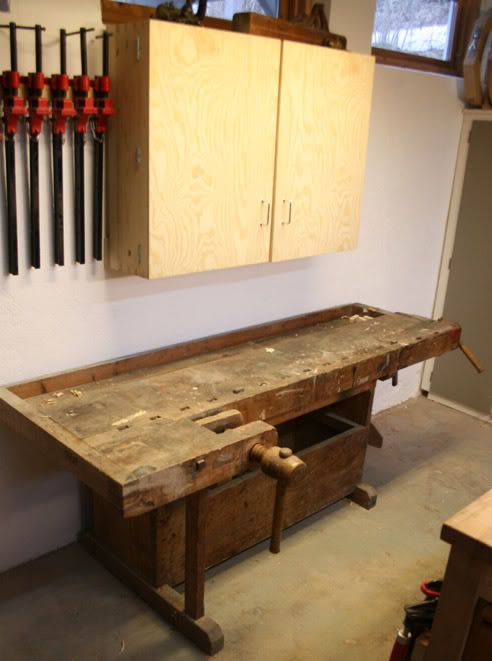
About the general woodworking bench: Here is the one I use now, it is and oldie with all wood vises and so on. They are as common as dirt (or should I say snow) up here, every old geezer with a woodworking shop has one. Yes, I should really shine it up a bit... It is very sturdy and reasonably flat though, once I get around to tightening the moving parts up and planing the top I'm sure it will be even better.

Image


My previous one was another oldie that I made new vises for. It was larger than I needed, so it is now retired to the garage. Building a traditional drawer style tail vise is a lot of work, mine was inspired in part by the Shaker style vise in "The Workbench Book" by Scott Landis.
http://www.amazon.com/Workbench-Book-Cr ... 1561582700

Image


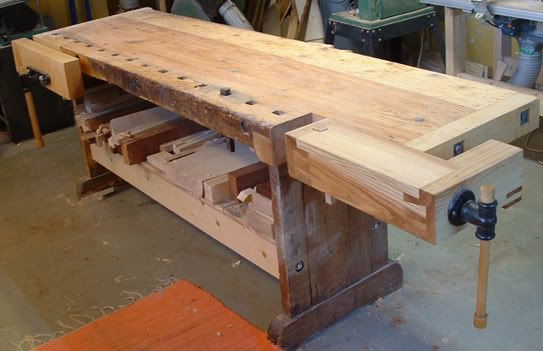
For some reason I built the vise out of ash. Traditional Norwegian benches are almost always made out of birch, which is by far the most common hardwood up here. I wish I'd used birch too, cutting those deep dovetails in ash sure gets old.

Image

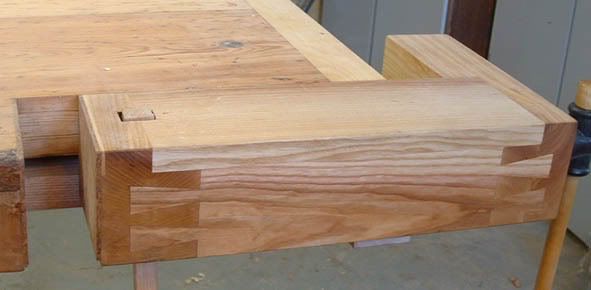
As has been said, these benches aren't really that useful for most luthierie tasks, but they are wonderful for hand planing. In fact, their called "høvelbenk" in Norwegian, which means planing bench. The vises are also quite versatile for many cabinetworking operations, and they are great for holding jigs and fixtures. I wouldn't make one just for that, though...
Arnt Rian,
Norway

Jules93
Beefwood
Posts: 28
Joined: Mon Oct 07, 2019 2:17 pm

Re: Lutherier's Workbench

Post by Jules93 » Tue Feb 11, 2025 8:26 pm

Another question related to workbenches

I need to make myself a more solid bench compared to my old work table which vibrates and moves like crazy but it was all I could aford at the time.

I know I need drawers to store all my hand tools
My measurements to fit my space thinking roughly 700x1400mm.
The main frame would be constructed of 90x45’s including a shelf 2 layers of 18mm MDF (edged with wood) for the Bench top.

I recently refurnished my room and kids rooms with some ikea malm’s drawers They’re pretty heavy and solid so I was thinking if I bought a three drawer one and build it into the frame cause it would fit perfectly (I probably wouldn’t attach the top for it unless I want a gap between.
would it be too heavy for the frame, am
I just better to make my own?

Has anyone done hacks like that before?

Dave M
Blackwood
Posts: 623
Joined: Tue Jul 15, 2014 6:44 am
Location: Somerset UK

Re: Lutherier's Workbench

Post by Dave M » Wed Feb 12, 2025 9:27 pm

Old topic but... There are some great ideas here but a couple of things I might add.

I like an upstand at the back of the bench to push things against but there are times when you want the top surface to be clear so I have made mine movable.

Instead of relying on the frame joints to give stiffness I have 'triangulated' the frame with plywood panels on the ends and a diagonal brace at the back.

Shelves with planes etc whose weight provide further stability.

A supplemental raised surface is good for close work to save ones back. A bit like what Somogyi uses. I also keep the parrot vice dismounted until needed and this too is raised using a box, particularly when carving necks.

Finally the top overhangs the frame at the front and is clear at the sides allowing clamping of things to the top, which I find myself doing a lot.
Attachments
Bench 5.jpg
IMGP5485.JPG
IMGP5484.JPG
------------------
Dave

pkdz
Gidgee
Posts: 6
Joined: Tue Nov 17, 2015 12:18 am

Re: Lutherier's Workbench

Post by pkdz » Thu Feb 13, 2025 4:22 pm

I had great success using a solid core door as a bench top. It was 3'x7'and I was able to get a large and small bench top out of it. I wrapped the edges with hard wood and because it didn't cost me anything I feel free to drill any manner of dog holes or screw down jigs onto the surface.
Paul

User avatar
peter.coombe
Blackwood
Posts: 738
Joined: Fri Oct 15, 2010 2:52 pm
Location: Bega, NSW
Contact:

Re: Lutherier's Workbench

Post by peter.coombe » Sat Feb 15, 2025 10:55 am

All very impressive. I am still using the bench I got from my father, and he got it from his father, so is the bench of my grandfather. Basically is two massive planks of Oregon bolted together with legs that I made after we moved it. I learned woodworking on that bench when I was kid. Can't see any reason to change to anything fancy.
Peter Coombe - mandolin, mandola and guitar maker
http://www.petercoombe.com

User avatar
TallDad71
Blackwood
Posts: 211
Joined: Thu Jan 19, 2017 6:20 am
Contact:

Re: Lutherier's Workbench

Post by TallDad71 » Thu Feb 20, 2025 2:20 am

What a great “lost and found” thread.

Thanks for the book recommendation 16 years ago, I’ve just gone and bought my own Scott Landis copy, it’s wonderful.

I’ve set out to design and build the ultimate luthier’s workbench as a result. I started off by listing all of the operations that we undertake from shooting and planning boards, sanding, installing rosettes, go bar pressing tops and bottoms, bending sides, shaping necks, through to lacquering and buffing. At each stage doing my best to incorporate “features” to make this a dream bench

Imagine my disappointment to discover all that I really need is a good wide flat stain resistant bench with a front vice on one side, a pattern makers vice on the other and bunch of dog holes and a few T-nuts built in for attaching jigs.

There I was thinking, “this time next year I’ll be a millionaire” but no.

All the same it’s going to be beautiful.
Alan
Peregrine Guitars

User avatar
TallDad71
Blackwood
Posts: 211
Joined: Thu Jan 19, 2017 6:20 am
Contact:

Re: Lutherier's Workbench

Post by TallDad71 » Mon Mar 03, 2025 6:59 am

In fact here it is, the timber arrives tomorrow.

So Excited!!!!
Screenshot 2025-03-02 at 19.58.16.png
Alan
Peregrine Guitars

User avatar
Trevor Gore
Blackwood
Posts: 1633
Joined: Mon Jun 20, 2011 8:11 pm

Re: Lutherier's Workbench

Post by Trevor Gore » Mon Mar 03, 2025 9:55 am

TallDad71 wrote:
Mon Mar 03, 2025 6:59 am
In fact here it is, the timber arrives tomorrow....
That looks remarkably like my bench!

Having used mine for ~20 years, here's a few things to consider:

Make both the bench vises double screw (the wide front vise will wrack too much on a single screw). One day, I'll make that change!
Make at least one of the bench vises "wrackable" by design, so you can hold tapered pieces (fret boards and necks) over their full length
The swivel vice does not need to mount to the bench, it can just be mounted onto a large block of wood and be held in one of the bench vises and can be easily mounted elsewhere (using F clamps). I use a Parrot vise which is good for lots of things including nuts, saddles etc..
Arrange the dog holes so you can hold the outside mould using the front vise and dog holes placed about where the swivel vice is (gives three sides access)
If you intend to use the bench for general woodwork too, it is handy to arrange the tail vice so it will pull (via the dog holes) as well as push. But you need to figure out the vise fixings so it will take those pull loads.
If you're going to plane a lot of wood, square dogs work better than round dogs.
It's handy to have power points on the bench legs.

Here are a few random pics:
60.DSCN1517.JPG
122.2006_0122Image0028.JPG
...looks like that was cut with a coping saw (front vise)...

170.DSCF1414.JPG
Tail vise, carving a neck pre BOBO days...

There are lots more pics in the books. Have fun!

User avatar
TallDad71
Blackwood
Posts: 211
Joined: Thu Jan 19, 2017 6:20 am
Contact:

Re: Lutherier's Workbench

Post by TallDad71 » Mon Mar 03, 2025 7:44 pm

That's really interesting what you say regarding the twin vice Trevor.

I had two vices in mind for the front fixing, the twin vice and a quick release single screw model. I went for the latter in the end as it just seemed more convenient to bring the vice out to different depths 100mm for the body height, 5mm for planing edges. I will test it out for racking as it only arrived yesterday. Thank you.

The pattern makers vice is new to me, but already it has proved itself to be a bit of a game changer. Not least because I'm a really tall fella and this vice just bring the work closer to my ever aging eyeballs. That said my new bench is one meter tall so that need is going. I like your suggestion about mounting it on a block, the occasional clamber under the bench to screw it tight will become tiresome.

In terms of square dogs I think I agree. At present all of the 43 dog holes!!! are 19mm round to suit other hardware. All of the dogs are fitted with a spring load underneath so they push up and push to go flush. I chose round as that allow a lot of different angles. Perhaps square would just be more steady. I will have a rethink.

Thanks again for your thoughts.
Alan
Peregrine Guitars

User avatar
Taffy Evans
Blackwood
Posts: 1060
Joined: Wed Apr 30, 2008 6:54 pm
Location: Charters Towers North Queensland

Re: Lutherier's Workbench

Post by Taffy Evans » Tue Mar 04, 2025 9:18 am

Hi Alan, that’s a very nice looking bench, sturdy too. But I think it would be too small for the way I work. I have too many benches some would say.

I have five in my repair area, four in my building area including a mobile go-bar deck, and one long bench in my machine shop. All of these I have made myself over the years, and I must admit they may not be pretty, but they are very suited to the use I give them.
Having so many benches means having too many tools to, to save walking back and fourth from one workshop to another, but I like tools so that keeps me happy.
I can also assemble two island work tables if needed, these take a variety of jigs, many are at different heights, I rarely work sitting down.

Although It is good to work all around a bench at times, in the repair shop mine are up against a wall with tools along the back of the bench. I place the tool back in its place soon after its used, this keeps the bench tidier.
In the build shop I have a shadow board for all the tools, just two or three steps away from any of the four benches. Yep, its pretty cosy in that shop.

I’ll just show a couple of additions I made to some benches, for convenience and space-saving.
IMG_1263.JPG
IMG_1263.JPG (122.66 KiB) Viewed 3882 times
IMG_1262.JPG
IMG_1262.JPG (136.81 KiB) Viewed 3882 times
IMG_1261.JPG
IMG_1261.JPG (158.89 KiB) Viewed 3882 times
Cheers Taff
Taff

User avatar
kiwigeo
Admin
Posts: 10749
Joined: Sat Sep 29, 2007 5:57 pm
Location: Adelaide, Sth Australia

Re: Lutherier's Workbench

Post by kiwigeo » Tue Mar 04, 2025 9:36 am

LOL....was waiting for Taff to chime in!! :D
Martin

User avatar
TallDad71
Blackwood
Posts: 211
Joined: Thu Jan 19, 2017 6:20 am
Contact:

Re: Lutherier's Workbench

Post by TallDad71 » Tue Mar 04, 2025 6:35 pm

Taffy

First of all thanks for sharing, I have been super zooming in on your photos for ideas.

Ten workbenches with an optional two islands, and double-ups of your tools!!!!! You know that if you were talking about booze or cocaine here they'd be a therapy group for your addiction, "Hi, my name is Taffy, its been three days since I bought a workshop tool!" Instead we're all just looking on from our little workshops agog wishing we had more space.

I love your little sharpening station. Certainly the shallow nature of some of the drawers is something I need to incorporate. . I use whetstones so that will take some thinking about. I have a shadow tool wall, however I am less good at returning tools after use.

Your Tormek is on an extendable arm, I don't think I've ver seen that before. Brilliant.

The other thing you seem to have loads of is natural light! Unfortunately I'm typing this from England, and my workshop faces away from the sun. How I wish I could add this feature!
Alan
Peregrine Guitars

User avatar
TallDad71
Blackwood
Posts: 211
Joined: Thu Jan 19, 2017 6:20 am
Contact:

Re: Lutherier's Workbench

Post by TallDad71 » Wed Mar 05, 2025 5:17 am

Taffy Evans wrote:
Tue Mar 04, 2025 9:18 am
Hi Alan, that’s a very nice looking bench, sturdy too. But I think it would be too small for the way I work. I have too many benches some would say.
Trevor Gore wrote:
Mon Mar 03, 2025 9:55 am
That looks remarkably like my bench!
Thank you very much gentlemen. I have taken two ideas from your photos and merged them into something that suits my needs.

A flat pull out draw that acts as a hold for a guitar neck!

In addition I might add another drawer for a whetstone!
Screenshot 2025-03-04 at 18.15.26.png
Regards
Alan
Peregrine Guitars

User avatar
Taffy Evans
Blackwood
Posts: 1060
Joined: Wed Apr 30, 2008 6:54 pm
Location: Charters Towers North Queensland

Re: Lutherier's Workbench

Post by Taffy Evans » Wed Mar 05, 2025 3:08 pm

Hi again Alan, thanks for the comments. Tools, many I have created myself.
In a recent count, I had 97 tools, jigs, and machines, that I could have bought from instrument suppliers but made them myself. Then again there are many, many store-bought tools in my shop.
Here are a few more photos.
The island work table is my fretting jig, to which I attach a worktop when needed.

The three shallow draws also support an extended bench top for when things get too crowded.
SAM_2145.JPG
IMG_1296.JPG
IMG_1296.JPG (155.75 KiB) Viewed 3620 times
1-DSCF2084.JPG
Cheers Taff.
Taff

User avatar
TallDad71
Blackwood
Posts: 211
Joined: Thu Jan 19, 2017 6:20 am
Contact:

Re: Lutherier's Workbench

Post by TallDad71 » Thu Mar 06, 2025 11:08 pm

I could stare at your photos all day Taff.

My latest silliness is now to route out a channel which will hold a light strip, so I can joint back and sound boards more accurately. At present I hold them up to the window. I'm over thinking now!
Screenshot 2025-03-06 at 13.07.38.png
I notice you use carpets for protecting instruments with a degree of finish on them. I used to do that but always found that they clogged up with all manner of dust and gunk. I use these rubber bench stops now and they seem to function well.


https://www.amazon.co.uk/Silverline-Too ... =8-38&th=1
Alan
Peregrine Guitars

User avatar
Taffy Evans
Blackwood
Posts: 1060
Joined: Wed Apr 30, 2008 6:54 pm
Location: Charters Towers North Queensland

Re: Lutherier's Workbench

Post by Taffy Evans » Sat Mar 08, 2025 10:07 am

Hi Alan, those carpet pieces are only used in the repair shop. In the building area, I use bench top covering as you describe when needed.

Overthinking is something I do very well. I find it better to remove unwanted/unnecessary features of a jig after a few uses than it is to use a jig that could have been better if a little bit more thought had been given.

Cheers Taff
Taff

Post Reply

Who is online

Users browsing this forum: Google and 85 guests