Tap tuning classical guitar top

Talk about musical instrument construction, setup and repair.

Moderators: kiwigeo, Jeremy D

Post Reply
User avatar
sebastiaan56
Blackwood
Posts: 1279
Joined: Sun Oct 28, 2007 5:23 am
Location: Blue Mountains

Tap tuning classical guitar top

Post by sebastiaan56 » Thu Mar 26, 2009 5:30 pm

A question for the gurus,

Im starting to tap tune a top, Sitka Spruce, 5mm bow at the bridge. This is WIP shot.

Image

The questions, currently the top of the soundboard taps at a higher frequency than the lower bout with some sustain, the lower bout taps at a much lower frequency with less sustain. Im tempted to keep thinning the fan braces to get more sustain. what would you be looking for?
make mine fifths........

User avatar
kiwigeo
Admin
Posts: 10600
Joined: Sat Sep 29, 2007 5:57 pm
Location: Adelaide, Sth Australia

Post by kiwigeo » Thu Mar 26, 2009 5:48 pm

Hey Seb, is there any arch in the lower bout area?

On my classicals I make my fan braces about half the height of yours and they have a triangular cross section. Heres a pic of the braced up Englemann top of my latest build. Its Graham Hein's Englemann so its quite stiff. I thinned to 0.095" around bridge area and the lower bout grades to 0.085" at the peripheries. Tap tone was lower in the lower bout area but didnt notice much difference in sustain between the two bouts.


Image

User avatar
graham mcdonald
Blackwood
Posts: 472
Joined: Thu Oct 25, 2007 11:57 am
Location: Canberra
Contact:

Post by graham mcdonald » Thu Mar 26, 2009 5:54 pm

Ignore the top bout. I think you are picking up one of the higher resonances there. The fans and the braces across the bottom look a bit massive. I would be tapering them from a couple of inches from each end and maybe even cutting them away from the lower transverse brace and leaving a gap of 5-6mm. It also rather depends how thick the soundboard is. I would be working on no more than 2mm, especially for Sitka.

Can't suggest much more without holding it and tapping it.

graham
Graham McDonald
http://www.mcdonaldstrings.com

User avatar
WaddyT
Blackwood
Posts: 231
Joined: Tue Apr 15, 2008 1:49 am
Location: Charlotte NC
Contact:

Post by WaddyT » Fri Mar 27, 2009 1:01 am

Just for purposes of comparison, here are my first and second tops. The first is about 2.5mm in the center and about 1.8 +/- at the edges around the lower bout tapering to 2.5 at a point just above the waist in the upper bout. Obviously the design is the '73 Romanillos pattern, so there would be differences. The braces are 3mm thick and starting in the center at 6.5mm going down to about 4mm on the outside brace. The finger braces in the upper bout are 3 x 3mm and the closing braces are 3.5 x3.5, as I recall. German Spruce top - pretty stiff.
Image

Here is #2. Same German Spruce from BobC at RCTonewoods. I got too thin on this one in the center, so I figured I'd increase brace sizes slightly. The top is about 2.1 in the center of the lower bout, and tapers to about 1.5 - 1.7 around the perimeter. The fans are from the center out (in mm) 4.5w x 7.5 high, 4.0w x 6.5, 3.5x5.5 and 3x4.5. I can't recall the tap note, but I wrote it down. It was below G1, that much I remember. Somewhere in the D1 to F1 range, but not right on any note. Off by 10 to 20 cents. Finger braces and closing braces are the same as on #1.
Image
Waddy

Build Albums 12 done - 1 in process

Clip for #1 Barrios' "Una Limosna por el Amor de Dios" - Not me playing

User avatar
sebastiaan56
Blackwood
Posts: 1279
Joined: Sun Oct 28, 2007 5:23 am
Location: Blue Mountains

Post by sebastiaan56 » Fri Mar 27, 2009 5:09 am

Thanks guys,

My textbook for the build is Cumpiano but he isnt clear on what to listen for. My understanding is that the upper bout is more about upper register response and the lower about lower register. The bulge is 5mm at the bridge Martin. the soundboard is 2.8mm thick so I'll remove some and take the braces back as well. Thanks for the D1-F1 Waddy, I thought it was in that region when I tapped it this morning.
make mine fifths........

User avatar
WaddyT
Blackwood
Posts: 231
Joined: Tue Apr 15, 2008 1:49 am
Location: Charlotte NC
Contact:

Post by WaddyT » Fri Mar 27, 2009 5:30 am

I bought one of those "Turbo-Tuners" and have been playing with it as I thinned my top and then braced it. I don't really know what it means. I do know that the tap on #2 is lower than the tap was on #1. But that is an ear thing, as I didn't have a way to measure it then.
Waddy

Build Albums 12 done - 1 in process

Clip for #1 Barrios' "Una Limosna por el Amor de Dios" - Not me playing

User avatar
kiwigeo
Admin
Posts: 10600
Joined: Sat Sep 29, 2007 5:57 pm
Location: Adelaide, Sth Australia

Post by kiwigeo » Fri Mar 27, 2009 10:01 am

My tap tuning skills are rudimentary...at the moment I just aim for a resonant sustaining response to a tap around the bridge area.

Hesh1956
Blackwood
Posts: 1420
Joined: Thu Sep 27, 2007 9:58 am

Post by Hesh1956 » Fri Mar 27, 2009 10:31 am

kiwigeo wrote:My tap tuning skills are rudimentary...at the moment I just aim for a resonant sustaining response to a tap around the bridge area.
Right - even though I am a steel string nazi... :D what I shoot for when tapping is making the top ring everywhere below the upper transverse brace. This means the intersections of braces too which you don't have to worry about.

If while tapping along the path of a brace it thuds I profile the brace into a sharp triangle, tap again, if it still thuds I reduce the height and reprofile and tap again. I can't imagine that the fan braces on a classical would respond much differently than tone bars on a steel string when it comes to shaping and removing mass. Wood is wood.

OTOH I have never built a classical but I would like to seeing them as a real challenge to get volume out of.

I'll go stifle myself now.... :D

User avatar
kiwigeo
Admin
Posts: 10600
Joined: Sat Sep 29, 2007 5:57 pm
Location: Adelaide, Sth Australia

Post by kiwigeo » Fri Mar 27, 2009 10:34 am

Hesh....do you notice a difference in tap tones when youre wearing different coloured shorts?? :D

User avatar
sebastiaan56
Blackwood
Posts: 1279
Joined: Sun Oct 28, 2007 5:23 am
Location: Blue Mountains

Post by sebastiaan56 » Fri Mar 27, 2009 11:27 am

Hesh1956 wrote:
kiwigeo wrote:OTOH I have never built a classical but I would like to seeing them as a real challenge to get volume out of.
Thanks Hesh, I will bear your method in mind. Classicals fascinate me, not only for the repertoire but the technical challenge. When Alan carruth says its reasonably straight forward to builf a good one but extremely hard to build an excellent one i get interested,

I wear Khaki shorts myself.... with stains..... in all the right places,
make mine fifths........

pau
Gidgee
Posts: 9
Joined: Sat Sep 27, 2008 5:17 am
Location: Cape Town

Post by pau » Sun Mar 29, 2009 4:51 am

sebastiaan56 wrote:Thanks guys,

My textbook for the build is Cumpiano but he isnt clear on what to listen for. My understanding is that the upper bout is more about upper register response and the lower about lower register. The bulge is 5mm at the bridge Martin. the soundboard is 2.8mm thick so I'll remove some and take the braces back as well. Thanks for the D1-F1 Waddy, I thought it was in that region when I tapped it this morning.
If you're working from the Cumpiano book it's definitely worth checking out his website for corrections. Also he has a number of newsletters about various things too. I haven't read it recently, but somewhere there he says he put the tap tuning into the book because everyone does it, and he doesn't bother with it anymore as no-one could tell him what to listen for.

Paul
Last edited by pau on Sun Apr 05, 2009 9:18 pm, edited 1 time in total.

User avatar
sebastiaan56
Blackwood
Posts: 1279
Joined: Sun Oct 28, 2007 5:23 am
Location: Blue Mountains

Post by sebastiaan56 » Sun Mar 29, 2009 8:25 am

Hi Paul and welcome!

I am aware of Cumpiano's comments. But there is a weight of history and other opinions to consider as well. There are luthiers using Chaldni patterns to tune their instruments fronts and backs. I think Chaldni is the technical evolution of tap tuning. David Hurd recommends developing a database of top stiffnesses (along with other types of data) and proposes methodologies to do so. It seems a more reproduceable method than tap tuning.

The fact that there is variations in bracing patterns and weights in Torres and Ramirez guitars says to me that each piece of tonewood is different and there is benefit to be had by "tuning" as you build. I know tap tuning was also extensively practised by Lloyd Loar. I dont claim a great ear but I can learn as much about an instrument as I build it. To quote the sage "It caint hoirt!"

BTW, I have really cut the bracing back and now have consistent sustain across the soundboard. The pitch variation has also reduced.
make mine fifths........

User avatar
James Mc
Blackwood
Posts: 246
Joined: Sat Dec 08, 2007 7:37 pm
Location: Townsville

Post by James Mc » Sun Mar 29, 2009 7:22 pm

Hey Sebastiaan

Up until a couple of weeks ago, what little experience I had was on fan braced classicals. I suspect that just about every luthier building these things has their own way of tuning the top, so here is my 5c worth from what I learned I the months I spent working with a very old cranky luthier.

Must of his tuning was done in a jig, this was just a simple solidly constructed tapered box with a guitar neck attached. It had a double ½ inch ply top with a hole cut in them 5mm smaller than his standard guitar profile (he had a few of these jigs for smaller guitars etc). Once he had the top braced and bridge fitted he would sandwich it between the tops of the jig and bolt them together. Think of it as a heavy duty backless guitar with the top held in place with a bolted flange. The first level of tuning was done by carving the braces, usually he would carve a bit then flip it over and pluck strings while feeling around the top for vibration then carve a bit more. Sometimes he would sprinkle tea on top to identify what was happening where when a note he wasn’t happy with was played (I never did figure out what the relationship between the tea leave pattern and where he carved or thinned was).

The second level of tuning was dune with a thumb plane and sandpaper. He would spend hours plucking, playing then planing and sanding. He told me that thinning the top was the only way to fine tune the sound and balance.

I’ve tried using sitka as a replacement top on a classical I fixed, it came out a bit flat and quiet, it was also very dead on the nylon strings. I ended up taking the top back off and changing the bracing, I removed the outer fan brace on the treble side and moved the brace next to it to split the difference. I thinned the top down to about 2.2 on average and as thin as 1.6mm around the edges and between the braces on the treble side. In the end it came up ok (not great, more the ‘god it could be better’ side of good) I think the sitka was just too stiff (it was a very fine grained stiff set). I’d suggest hard tension strings with a sitka top to try and overcome that lack of power in the nylon.

The bridge plate on a classical is usually spruce a couple of mm thick with the grain running opposite that of the top. The bridge and bridge plate are another tuning point, removing thickness from them at key locations can make a huge difference to the volume and balance.

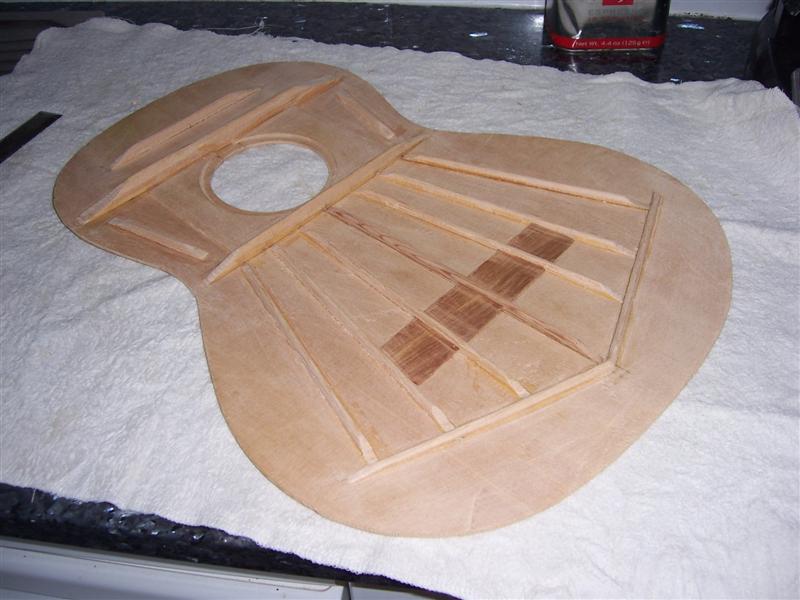
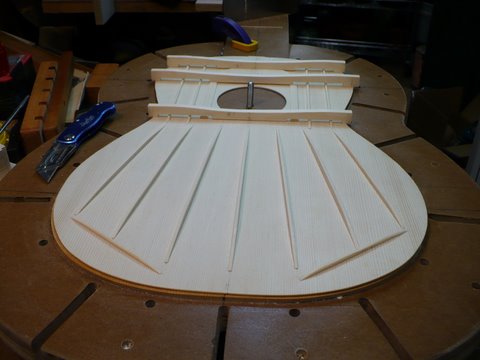
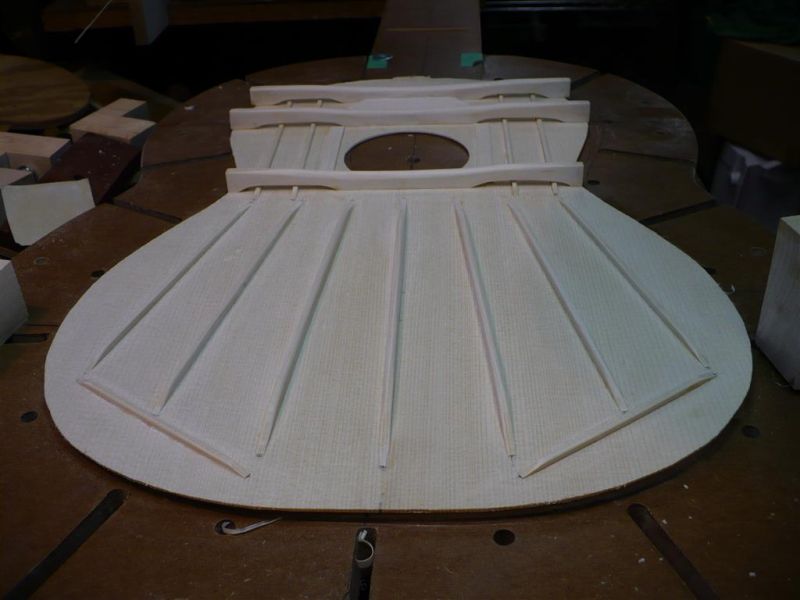
I agree with what other have mentioned, the braces look way heavy. I don’t know what you have used for the bridge plate or how thick it is but if it isn’t a soft wood then I would be thinning it way down between the braces.

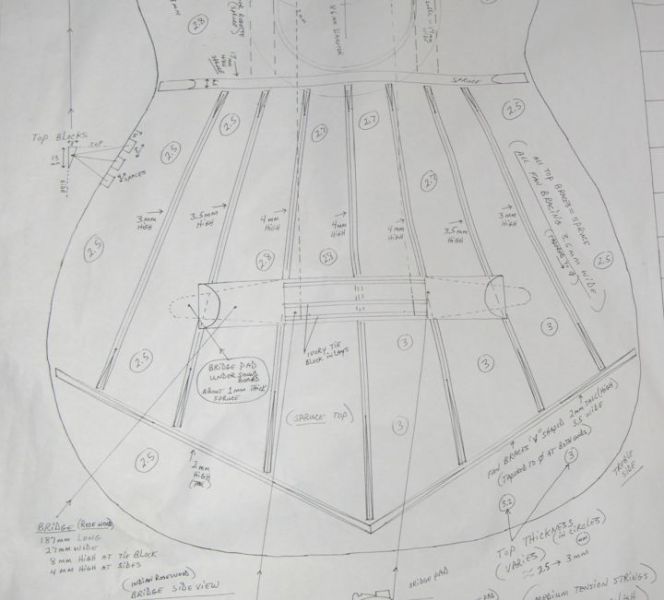
The photo below is from the plan I have that best matches the fan pattern you’re using. The thickness zones on it generally concur with where I’ve thinned when tuning spruce tops (WRC comes out totally different)… I don’t know what planes you are using but you should be able to pick up the brace sizes and top thickness zones from it (but you would need to go thinner with sitka). Hope this helps and if not that provides food for thought.

Cheers
James


Image

User avatar
kiwigeo
Admin
Posts: 10600
Joined: Sat Sep 29, 2007 5:57 pm
Location: Adelaide, Sth Australia

Post by kiwigeo » Sun Mar 29, 2009 8:14 pm

James Mc wrote:
I’ve tried using sitka as a replacement top on a classical I fixed, it came out a bit flat and quiet, it was also very dead on the nylon strings. I ended up taking the top back off and changing the bracing, I removed the outer fan brace on the treble side and moved the brace next to it to split the difference. I thinned the top down to about 2.2 on average and as thin as 1.6mm around the edges and between the braces on the treble side. In the end it came up ok (not great, more the ‘god it could be better’ side of good) I think the sitka was just too stiff (it was a very fine grained stiff set). I’d suggest hard tension strings with a sitka top to try and overcome that lack of power in the nylon.
My first two classicals were Sitka topped and they turned out with a loud but balanced sound. I worked the tops down to 0.085-0.095" and the bracing was light......final brace dimensions determined by flexing top and listening to tap tones. I use Savarez high tension strings on my classicals.....no real reason except they where the strings my classical guitar teacher used 30 years ago.

User avatar
hilo_kawika
Blackwood
Posts: 144
Joined: Mon Oct 13, 2008 10:29 am
Location: Hilo, Hawaii
Contact:

Post by hilo_kawika » Mon Mar 30, 2009 2:33 am

Hi Seb,

The whole tap tone thing on a free top has always been a mystery to me simply because I couldn't really understand how you were supposed to relate tone duration to the assembled instrument quality. That is, you could end up with a free top that rang like a bell and it could either be too stiff to be responsive for more than a few notes or too floppy and end up dished in a few months.

And the whole issue of using specific brace heights for different areas of the top makes the implicit assumption that the stiffness properties of all the braces are the same, which they often are not. Do all of us builders take the time and trouble to measure/estimate individual brace stiffness before gluing them up?

I suppose that the above tap tone issues led me to use the compliance approach in the end. And having the top already glued to the sides before beginning any of the compliance measurements seemed logical to me since that was how the instrument would end up when you were done anyway.

If you still feel compelled to do the "tap thing", Steve Grimes once described his approximate approach for tuning archtop tops, with the top glued to the sides. He would first tap on that portion of the top where the heel block was in order to get a completely solid response. Then he would begin to tap other areas of the top, slowly removing wood until the top began to "tap back" at him. That is, when he tapped the top, he could feel a return springiness that wasn't there when he tapped the area where the tail block was.

aloha,

Dave Hurd
www.ukuleles.com
How to become a millionaire? Start with $2 million and become a luthier...

User avatar
sebastiaan56
Blackwood
Posts: 1279
Joined: Sun Oct 28, 2007 5:23 am
Location: Blue Mountains

Post by sebastiaan56 » Mon Mar 30, 2009 11:30 am

Many thanks for the thoughtful responses guys, there is a lot to consider and I take your point David about the free plate behaving differently to when the edges are fixed. This is my first guitar using spruce as a tonewood so Im learning every time I pick a piece up. Thanks for the drawing James, I will be looking at it this afternoon.
make mine fifths........

User avatar
sebastiaan56
Blackwood
Posts: 1279
Joined: Sun Oct 28, 2007 5:23 am
Location: Blue Mountains

Post by sebastiaan56 » Sun Apr 05, 2009 5:31 am

This link was posted on the Delcamp forum,

http://paulmcnamara.blogspot.com/2009/0 ... acity.html

some more to think about
make mine fifths........

Post Reply

Who is online

Users browsing this forum: No registered users and 100 guests