Ah, Spring

Talk about musical instrument construction, setup and repair.

Moderators: kiwigeo, Jeremy D

Post Reply
User avatar
John Steele
Blackwood
Posts: 152
Joined: Fri Mar 06, 2009 4:58 pm
Location: Wilson, NY. 14172
Contact:

Ah, Spring

Post by John Steele » Tue Apr 28, 2009 10:31 am

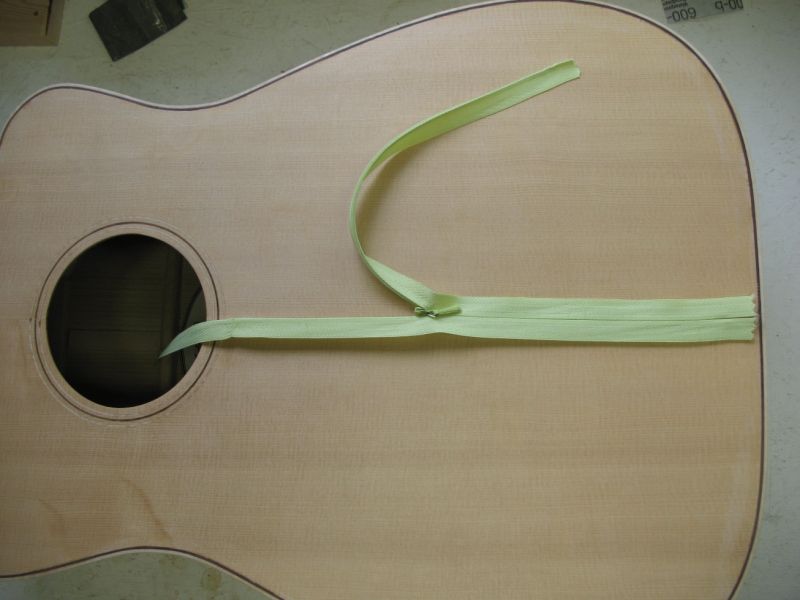
Ok, its been a while since I've been bitten by the humidity bug, but.... I have a build that I was getting ready to route the binding ledges in. Normally, I keep works in progress this far along indoors in a case. I got called away and managed to leave this in the garage for a couple of days just when we had our warmest days of the year and lo and behold shrinkage occured! About 4-5 inches on the lower bout to boot!
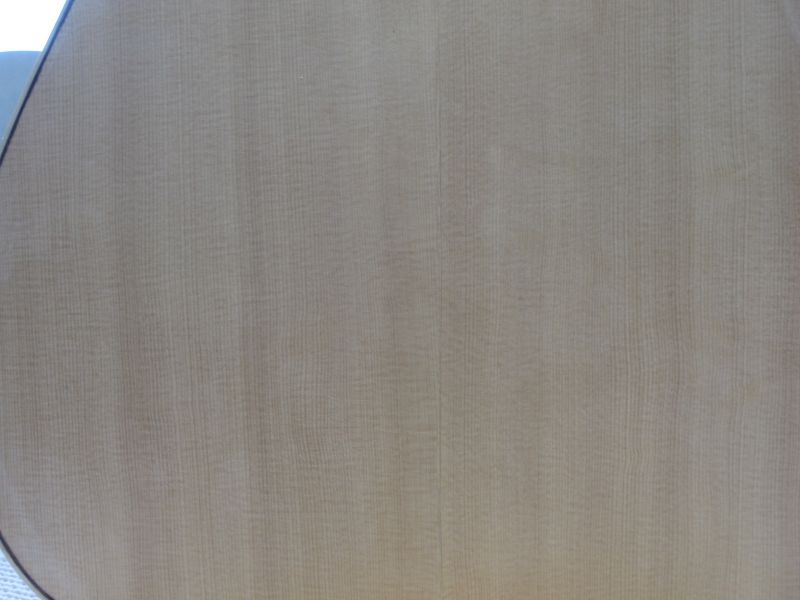
The split is right along the center seam with fibers and such still spanning the seam in places. Right now I am trying to ' re-humidify' in hopes of closing the gap, and then glue (CA?) but I am not hopeful of the outcome. Other than replacing the top, anybody have any thoughts/incantations/secret potions that may salvage it? Image
Did I mention there's beer in it if it works?
"People who say it cannot be done should not interrupt those who are doing it"
George Bernard Shaw

User avatar
Allen
Blackwood
Posts: 5252
Joined: Thu Oct 11, 2007 5:39 pm
Location: Cairns, Australia
Contact:

Post by Allen » Tue Apr 28, 2009 5:08 pm

And every Aussies ears prick up... :D
Allen R. McFarlen
https://www.brguitars.com
Facebook
Cairns, Australia

User avatar
Bob Connor
Admin
Posts: 3132
Joined: Mon Jul 09, 2007 9:43 pm
Location: Geelong, Australia
Contact:

Post by Bob Connor » Tue Apr 28, 2009 5:37 pm

If you did get it re-humidified and it did glue together with CA there would probably be the associated yellow stain that CA so often brings to Spruce.

Personally I'd take the top off and replace it.
Bob, Geelong
_______________________________________

Mainwaring and Connor Guitars

User avatar
hilo_kawika
Blackwood
Posts: 144
Joined: Mon Oct 13, 2008 10:29 am
Location: Hilo, Hawaii
Contact:

Post by hilo_kawika » Wed Apr 29, 2009 12:42 pm

Hi John,

This is an interesting problem. I think the first question I'd ask is under what humidity conditions would the guitar finally find itself? In other words, is the dry condition the normal condition or is the more humid condition the normal condition?

If the dry condition is normal, then you have the chance to do something fun and off the wall. First, glue a backing strip on the inside of the guitar to stabilize the seam. If you can't make the whole thing in one piece, a series of patches may work just as well. Now get out the router and rout out a notch which will fit the inlay of your choice (think back seam inlay). Glue in the "back seam inlay" into the front and you will have done two things: first you'll have resolved the low humidity condition issue; second, you'll have a unique top that will surely attract positive comments for your creativity.

And after all, what have you got to lose? It's only a guitar!

aloha,

Dave Hurd


http://www.ukuleles.com
How to become a millionaire? Start with $2 million and become a luthier...

User avatar
John Steele
Blackwood
Posts: 152
Joined: Fri Mar 06, 2009 4:58 pm
Location: Wilson, NY. 14172
Contact:

Post by John Steele » Wed Apr 29, 2009 2:21 pm

Dave;
'normal' humidity is around 45-55% except in winter where it goes 100%+ with the fog. The top wood has been hanging around for 10-15 years and has been stored well but not at final thickness.. I would have thought it would have reached some sort of equilibrium by now. So much for thinkin'. But I am of the mind that I have nothing to lose at this point. I either (1) pop the top and replace it (drink a couple of beerz to quell the pain) or (2) I attempt to close the gap and re-glue, wait a bit to see if it maintains (drinking beer to pass the time during the interim)if #2 fails I revert to #1. Sounds win/win to me either way. :D
BTW, nice book you wrote. Has given me numerous headaches trying to comprehend the math.
ONLY a guitar? Hmmmm. I see you islanders like to fish for your bait. Very sporty. :wink: :wink:
Thanks all for the thoughts. If I come up with something I'll pass it on
J
"People who say it cannot be done should not interrupt those who are doing it"
George Bernard Shaw

User avatar
Allen
Blackwood
Posts: 5252
Joined: Thu Oct 11, 2007 5:39 pm
Location: Cairns, Australia
Contact:

Post by Allen » Wed Apr 29, 2009 5:00 pm

And David is up for a beer. :lol:

Good solution David. I was also looking at gadget that I think ibex makes for crack repair. One part cuts a tapered wedge out of the instrument, and another tool makes a sliver that will glue back it. I think it may be use more in violins, but it's worth considering.
Allen R. McFarlen
https://www.brguitars.com
Facebook
Cairns, Australia

User avatar
DarwinStrings
Blackwood
Posts: 1877
Joined: Thu Nov 13, 2008 10:27 pm
Location: Darwin

Post by DarwinStrings » Thu Apr 30, 2009 8:58 am

What a bugga. It does look small and maybe tight bond would swell the wood just a little and close the gap if you manage to squeeze some in there, however it may not be trustworthy. The tool Allan is talking about is made to speed up a traditional crack repair, you can do it without the tool by just slicing a wedge out and gluing a wedge back in. Assuming it is in the lower bout, just run from under the bridge to the binding and if you a very careful with your patch selection you can hide it very well.

Jim

User avatar
John Steele
Blackwood
Posts: 152
Joined: Fri Mar 06, 2009 4:58 pm
Location: Wilson, NY. 14172
Contact:

Post by John Steele » Tue May 05, 2009 11:28 am

As an update.... No where near as sweet a solution as the happy face Ozzie posted for his Uke, but a degree of function I guess.
Image

Ok, I went for the basic crack repair. I thought long & hard and since this was a new style I was trying to develop I could not see replacing the top. So I opened the gap and dropped in a tapered Splint (?) and added some cleats inside. It actually looks better in person and is structurally sound. I think I owe someone a beer or two for the idea. Say when.
J
Image
"People who say it cannot be done should not interrupt those who are doing it"
George Bernard Shaw

User avatar
DarwinStrings
Blackwood
Posts: 1877
Joined: Thu Nov 13, 2008 10:27 pm
Location: Darwin

Post by DarwinStrings » Tue May 05, 2009 12:56 pm

'Looks better in person'......... buggered if I can even see it in that picture, where did you run the wedge, all the way from the sound hole rosette or from under the bridge position John?

Jim

User avatar
John Steele
Blackwood
Posts: 152
Joined: Fri Mar 06, 2009 4:58 pm
Location: Wilson, NY. 14172
Contact:

Post by John Steele » Tue May 05, 2009 2:45 pm

Trust me, its there....LOL!
I went from the bottom of the rosette to the binding. Fortunately I had some left over wood from the top to splice in, so I was able to get a good color match. On a side note; While the top had the usual array of clamps to button down the the wedge I happened to give the top the usual 'thump' with a finger while I was moving it out of the way. The big surprise was how the back reacted. It really moved a lot! Very noticeable to the point of I kept tapping to experience it. I have no idea why or what it means but felt funny to have this thing wiggle in my hands like that. The back and sides are Virola.
"People who say it cannot be done should not interrupt those who are doing it"
George Bernard Shaw

User avatar
Allen
Blackwood
Posts: 5252
Joined: Thu Oct 11, 2007 5:39 pm
Location: Cairns, Australia
Contact:

Post by Allen » Tue May 05, 2009 5:27 pm

Very nice repair. I'm sure that down the road, we're all going to have a repair like that to do, and it's good to see that it can be done and look great too.
Allen R. McFarlen
https://www.brguitars.com
Facebook
Cairns, Australia

Post Reply

Who is online

Users browsing this forum: No registered users and 301 guests