curly maple progress

Talk about musical instrument construction, setup and repair.

Moderators: kiwigeo, Jeremy D

User avatar
rocket
Blackwood
Posts: 1210
Joined: Thu Apr 30, 2009 8:43 pm
Location: melbourne,, outer east
Contact:

curly maple progress

Post by rocket » Thu Nov 04, 2010 7:35 pm

You are viewing a re-constructed thread by the ANZLF recovery team. For more information click here.

"Originally Posted on:Mon Mar 08, 2010"


Hi there people, i thought i'd post a progress on that curly maple build.
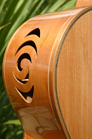
I cut the sides to aproximate width and sanded to thickness, the offcuts from the sides gave me six lengths to use for bindings so i had a bit of a practice of bending the stuff to see how it will go before i actually bend the sides. Well i have to say the small binding profile bent quite well, easier than i expected. A recent post i put up about spotted gum and using it for bindng, well i tried using it for the "F" hole binding, very unsuccessful, so now i've changed my plan and am using the curl maple for binding the the guitar. I've used black and white maple veneer to bind the "F" holes and i'll use the curly maple to bind the rest of the job.
i've got some pics of the belly, andthe "F" holes, and prralell bracing. Cheers Rod.
IMG_0518 (Custom).JPG
IMG_0518 (Custom).JPG (33.53 KiB) Viewed 23718 times
IMG_0522 (Custom).JPG
IMG_0522 (Custom).JPG (48.92 KiB) Viewed 23718 times
IMG_0519 (Custom).JPG
IMG_0519 (Custom).JPG (32.8 KiB) Viewed 23718 times
Last edited by rocket on Sat Nov 06, 2010 7:45 pm, edited 1 time in total.

User avatar
Kim
Admin
Posts: 4376
Joined: Wed Sep 26, 2007 8:32 pm
Location: South of Perth WA

Re: curly maple progress

Post by Kim » Thu Nov 04, 2010 7:36 pm

Ah Rod,

This is coming along real well, looks like you have the top carved out very nicely and the F hole and binding looks very well executed.

Keep it coming m8

Cheers

Kim

User avatar
Allen
Blackwood
Posts: 5252
Joined: Thu Oct 11, 2007 5:39 pm
Location: Cairns, Australia
Contact:

Re: curly maple progress

Post by Allen » Thu Nov 04, 2010 7:37 pm

I tried to do some binding like that on a soundhole recently and found that I have 10 thumbs, all on the left hand. Confused

Your's looks oh so much better and I'm looking forward to more picts.

User avatar
Clancy
Blackwood
Posts: 620
Joined: Wed Dec 17, 2008 10:26 am
Location: Canberra

Re: curly maple progress

Post by Clancy » Thu Nov 04, 2010 7:37 pm

Nice work Rod.
I always cringe before starting the f-hole binding. It's never a simple thing to do.

User avatar
Hippety Hop
Blackwood
Posts: 175
Joined: Wed Apr 30, 2008 11:18 am
Location: Moorabbin

Re: curly maple progress

Post by Hippety Hop » Thu Nov 04, 2010 7:38 pm

You're an artist Rod. Wish I could do that.

User avatar
Nick
Blackwood
Posts: 3642
Joined: Thu Feb 26, 2009 11:20 am
Location: Christchurch, New Zealand
Contact:

Re: curly maple progress

Post by Nick » Thu Nov 04, 2010 7:39 pm

Allen wrote:
I tried to do some binding like that on a soundhole recently and found that I have 10 thumbs, all on the left hand. :?

I replaced thumbs with re-enforced tape Allen, just bind a section at a time :)
Nice job & looking good Rod.
If you are binding the F holes with figured wood, be prepared to break or split a few bits so have more than you need on hand! :wink: What I found helped (my first was bound using curly Maple) was to thin the binding down to 1mm thickness it was a little more 'co-operative' around the tighter curves of the F hole than the 'standard' 0.060". I used a small diameter (about 12mm if I remember rightly?) extension on my heating iron and coaxed it slowly around this, bending a little tighter each time.As you can see there are still a few little area's around the curve that didn't follow a smooth curve on the open face but this can be corrected when scraping/sanding to clean up the top.

highfieldtonewerks
Gidgee
Posts: 9
Joined: Fri Jun 19, 2009 5:09 pm
Location: NW Tassie

Re: curly maple progress

Post by highfieldtonewerks » Thu Nov 04, 2010 7:41 pm

Rod - Audrey Hepburn and Brigitte Bardot come to mind looking at that bit of fiddly work you have done. To put it in more modern - however Riggsy-centric - terms... ummmmm, Jennifer Garner? Salma Hayek? Elle MacPherson? Absolutely beautiful stuff mate.

Just ordered Benedetto's book as we are jazz-ers here in the Riggs household. If we could play like Tuck Andress or Kenny Burrell, we might well sell every last bit of timber we have sitting about the yard and chuck a permanent "sicky" on this guitar building thing.

If we get to the point of needing guidance on an archtop, is it ok to hit you up mate? Hope so... 8)

User avatar
rocket
Blackwood
Posts: 1210
Joined: Thu Apr 30, 2009 8:43 pm
Location: melbourne,, outer east
Contact:

Re: curly maple progress

Post by rocket » Thu Nov 04, 2010 7:41 pm

Thanks for the nice coments you lot, a couple of compilments from experienced builders such as yourselves can give a lot of encouragement to a relative newcommer to this caper, such as myself. Riggsy... flattery will get you everywhere . I would be only too happy to help with any info if another member were to ask, although there plenty of more qualified dudes on the forum that would be just acommodating. Cheers Rod.

User avatar
rocket
Blackwood
Posts: 1210
Joined: Thu Apr 30, 2009 8:43 pm
Location: melbourne,, outer east
Contact:

Re: curly maple progress

Post by rocket » Thu Nov 04, 2010 7:42 pm

Had a RDO today so i had a go at bending those curly maple sides. It went well with only one crack, that is on the inside thank God, just at the bottom of the cutaway. I used a fairly unsofisticated side bender to do that half of the job and used a hot pipe for the other half. I'll post some pics Cheers Rod. P.S. I am very happy with the result.
IMG_0523 (Custom).JPG
IMG_0523 (Custom).JPG (48.92 KiB) Viewed 23717 times
IMG_0525 (Custom).JPG
IMG_0525 (Custom).JPG (40.52 KiB) Viewed 23717 times
IMG_0527 (Custom) (2).JPG
IMG_0527 (Custom) (2).JPG (54.66 KiB) Viewed 23717 times
IMG_0529 (Custom).JPG
IMG_0529 (Custom).JPG (47.55 KiB) Viewed 23717 times
Last edited by rocket on Sat Nov 06, 2010 10:10 pm, edited 1 time in total.

User avatar
Kim
Admin
Posts: 4376
Joined: Wed Sep 26, 2007 8:32 pm
Location: South of Perth WA

Re: curly maple progress

Post by Kim » Thu Nov 04, 2010 7:43 pm

It may just be just the close up Rod but the sides seem very substantial. At the cutaway it is quite common to thin down to around .085", even less sometimes especially on figured wood. Looks like it all turned out well for you anyhow but this could be something to look into to avoid cracks in the future.

Looking good thus far, keep the pics coming as i am sure i speak for all when i say we are enjoying this build.

Cheers

Kim

User avatar
rocket
Blackwood
Posts: 1210
Joined: Thu Apr 30, 2009 8:43 pm
Location: melbourne,, outer east
Contact:

Re: curly maple progress

Post by rocket » Thu Nov 04, 2010 7:44 pm

Thanks for the tip on reducing the thickness in the cutaway area Kim, i'll keep that in mind for the next job. The sides are a bit thicker than usual, 2.47mm rather than 2.3mm, i suppose i'll have a bit more margin when cleaning it up!! Cheers Rod.

User avatar
Allen
Blackwood
Posts: 5252
Joined: Thu Oct 11, 2007 5:39 pm
Location: Cairns, Australia
Contact:

Re: curly maple progress

Post by Allen » Thu Nov 04, 2010 7:44 pm

I read in Bennedetto's book that he takes the cutaway area down to about 1.8 mm ( if my booze addled memory hasn't failed me ). I did that on my venetian cutaway, and it bent on the pipe without a hitch.

User avatar
rocket
Blackwood
Posts: 1210
Joined: Thu Apr 30, 2009 8:43 pm
Location: melbourne,, outer east
Contact:

Re: curly maple progress

Post by rocket » Thu Nov 04, 2010 7:45 pm

Hi there you lot, hope you all had a good weekend, i had a pretty productive one. On Saturday i fitted the linings and braces to to the sides, still in the mould. Sunday, after a bit of a clean up fitted the back, everything is going very nice at the moment, the only hickup so far is some small stains from the bending strap, which is steel, i had used an aluminium strap in between the sides and the steel strap to prevent this fom happening but somehow some stain did appear on the sides.
Oxalic acid is one bleach that is used to remove this sort of stain from timber, has anyone else experienced this ? and if so what method did you use to remove said stain. A couple of progress pics here for you.
Cheers Rod
IMG_0533 (Custom).JPG
IMG_0533 (Custom).JPG (43.4 KiB) Viewed 23715 times
[attachment=1]IMG_0532 (Custom).JPG
Attachments
IMG_0532 (Custom).JPG
IMG_0532 (Custom).JPG (42.07 KiB) Viewed 23715 times
Last edited by rocket on Sun Nov 07, 2010 8:31 am, edited 1 time in total.

User avatar
Allen
Blackwood
Posts: 5252
Joined: Thu Oct 11, 2007 5:39 pm
Location: Cairns, Australia
Contact:

Re: curly maple progress

Post by Allen » Thu Nov 04, 2010 7:45 pm

The only staining I've had has been on Blackwood. That ugly geen and black that you get form heat, wet and steel. Luckily it wasn't so deep I couldn't sand it out. Lesson learnt though. Not tried any bleaching method, so no help there.

Those progress picts are looking spectacular. Rare to see a body fit a mold so spot on.

User avatar
rocket
Blackwood
Posts: 1210
Joined: Thu Apr 30, 2009 8:43 pm
Location: melbourne,, outer east
Contact:

Re: curly maple progress

Post by rocket » Thu Nov 04, 2010 7:46 pm

Hi there all! I've just closed up the sound box of this one, very happy with it so far. Thought you might be interested in the spool clamps i knocked up, very easy, didn't cost much and very effective. Cheers Rod
IMG_0536 (Custom).JPG
IMG_0536 (Custom).JPG (55.95 KiB) Viewed 23715 times
IMG_0534 (Custom).JPG
IMG_0534 (Custom).JPG (41.7 KiB) Viewed 23715 times
IMG_0535 (Custom).JPG
IMG_0535 (Custom).JPG (44.91 KiB) Viewed 23715 times
Last edited by rocket on Sun Nov 07, 2010 8:34 am, edited 1 time in total.

User avatar
Nick
Blackwood
Posts: 3642
Joined: Thu Feb 26, 2009 11:20 am
Location: Christchurch, New Zealand
Contact:

Re: curly maple progress

Post by Nick » Thu Nov 04, 2010 7:47 pm

Looking good so far Rod, that Maple is going to come up lovely I can see that already. Now comes the meat & three veg part of the meal....the recurve! (After trimming obviously :oops: )

User avatar
graham mcdonald
Blackwood
Posts: 472
Joined: Thu Oct 25, 2007 11:57 am
Location: Canberra
Contact:

Re: curly maple progress

Post by graham mcdonald » Thu Nov 04, 2010 7:47 pm

A couple of points to think about for the next one.

Your tone bars probably don't need to be as long. They are there for controlling the stiffness of the soundboard more than they are structural reasons, and you want the thinner edges to be able to flex. Running the braces right up to the linings will inhibit that.

You might also find some problems with the edge thickness once you have trimmed the top and back to the sides. When carving arched plates it is best to make the sides, block and lining assembly first and then cut the top and back outline pretty close (like 1mm) to it. Then cut a 10-12mm wide ledge (as you have done) and leave that there until after the binding have been installed. That ledge acts as a useful guide to the router or whatever you are going to use to cut the binding ledges. I suspect that you are not going to have much of that ledge left when you trim the plates to the outline and the recurve will be very close to the edges. With those fairly wide reverse linings you really wanted the shallowest part of the recurve a bit further inside

I do like your elegant spreader idea for holding the sides into the mould and your f-hole binding.

cheers

User avatar
rocket
Blackwood
Posts: 1210
Joined: Thu Apr 30, 2009 8:43 pm
Location: melbourne,, outer east
Contact:

Re: curly maple progress

Post by rocket » Thu Nov 04, 2010 7:48 pm

Graham, thanks for your helpful comments, much apreciated, boy you're very observant. With the ledge around the perimeter i had allowed for the excess to be trimmed off and still have about 8mm of ledge left, however a couple of spots are down to 5mm, still enough for the router to sit on. But i think your suggestion of building the sides first and marking the outline plus 1 mm on the plates would be a far more accurate way to go, i'll definitely keep that in mind next time, thanks. Cheers Rod.

vandenboom
Blackwood
Posts: 414
Joined: Sun Oct 26, 2008 2:27 pm
Location: Melbourne (Ringwood), Australia

Re: curly maple progress

Post by vandenboom » Thu Nov 04, 2010 7:48 pm

Graham McDonald wrote:
A couple of points to think about for the next one.

When carving arched plates it is best to make the sides, block and lining assembly first and then cut the top and back outline pretty close (like 1mm) to it. Then cut a 10-12mm wide ledge (as you have done) and leave that there until after the binding have been installed. That ledge acts as a useful guide to the router or whatever you are going to use to cut the binding ledges.
Graham - I haven't been through this process yet, but it will be happening in the next week or two. To leave this ledge, is is correct to assume that you are not really tackling the recurve much at all at this stage??
Frank

User avatar
graham mcdonald
Blackwood
Posts: 472
Joined: Thu Oct 25, 2007 11:57 am
Location: Canberra
Contact:

Re: curly maple progress

Post by graham mcdonald » Thu Nov 04, 2010 7:49 pm

There is a body of thought, especially in the violin building world, that the best shape for an arch is a curtate cycloid curve. It is easily googleable and there are even on line calculators that will draw them for you. If you calculate curtate cycloid curves for the transverse arching shapes, it will bring in the shallowest point of the recurve towards the centre rather more than most people carve them. I see pics of a lot of arch-top guitars and mandolins where the recurve is quite close to the edge and it often means that the scoop up to the binding is rather severe. It also makes it hard to leave a 10-12mm ledge around the edge, which isn't critical, but having the ledge there makes it easier to cut the binding rebate. On a mandolin the shallowest part of the recurve is around 15mm in, and on a guitar bodied bouzouki, about the same size as a classical or 00 guitar around 25mm in. That means you can establish the shallowest part of the recurve on the outside shape, but comfortably leave the edges square with the ledge. It also means that when you start work on the graduations on the inside, the thinnest part under the recurve can be easily worked on and still avoid the flat area which will be glued to the linings.

There might be acoustic implications having the recurve further in or out, but I don't know of any experimental work in this area. Again in the violin world there is a lot of consideration given to the shape of the arching, but it doesn't seem to have spilled over into the mandolin/guitar side of things. There it is mostly either a Loar or a D'Angelico pattern, but there are those who do experiment. There are some arch-top guitar builders who are using very shallow recurves and carving the insides to control the sound and it seems likely that the recurve itself doesn't have much effect, more the minimum to maximum thicknesses.

cheers

User avatar
rocket
Blackwood
Posts: 1210
Joined: Thu Apr 30, 2009 8:43 pm
Location: melbourne,, outer east
Contact:

Re: curly maple progress

Post by rocket » Thu Nov 04, 2010 7:50 pm

Hi there people, a bit of an update on the curly maple job. Sound box closed, binding rebates cut, truss rod installed, dovetail cut, neck extension fitted, headstock ears on. Some pics. Cheers Rod

IMG_0537 (Custom).JPG
IMG_0537 (Custom).JPG (52.76 KiB) Viewed 23714 times
IMG_0538 (Custom).JPG
IMG_0538 (Custom).JPG (52.13 KiB) Viewed 23714 times
IMG_0539 (Custom).JPG
IMG_0539 (Custom).JPG (47.59 KiB) Viewed 23714 times
IMG_0540 (Custom).JPG
IMG_0540 (Custom).JPG (60.52 KiB) Viewed 23714 times
IMG_0541 (Custom).JPG
IMG_0541 (Custom).JPG (36.34 KiB) Viewed 23714 times
Last edited by rocket on Sun Nov 07, 2010 8:59 am, edited 1 time in total.

User avatar
Kim
Admin
Posts: 4376
Joined: Wed Sep 26, 2007 8:32 pm
Location: South of Perth WA

Re: curly maple progress

Post by Kim » Thu Nov 04, 2010 7:51 pm

Rolling along beautifully there Rocket, the binding stairs look nice and crisp. 8)

Must also add that having Graham's considered input here is very valuable. Lucky forum the ANZLF.

Cheers

Kim

User avatar
christian
Blackwood
Posts: 338
Joined: Wed Oct 20, 2010 10:31 am
Location: Bay of Islands NZ
Contact:

Re: curly maple progress

Post by christian » Thu Nov 04, 2010 7:51 pm

Hey Rod,

The guitar is looking fantastic !!!
about the stain on the timber,i had this happen recently on some maple sides too,I raided the laundry cupboard for some Touvit Forte stain remover.
just dampened the affected area with water,left it for a few minutes applied some of the paste to a damp rag and rubbed it on,then washed it off it worked a treat. if your sides are a coursly sanded it may be a little harder but the rest should sand out no problem.Not sure if you can get Touvit Forte where you live its on an infomercial here in NZ.
I ended up lightly lacquering my side bender to eliminate the problem,seems to have worked.

Cheers,

Christian

User avatar
Nick
Blackwood
Posts: 3642
Joined: Thu Feb 26, 2009 11:20 am
Location: Christchurch, New Zealand
Contact:

Re: curly maple progress

Post by Nick » Thu Nov 04, 2010 7:52 pm

Coming together nicely Rod. What binding combination are you going with?
Might want to 'degum' your binding bit though, looks like it's burning even on the soft spruce.

User avatar
rocket
Blackwood
Posts: 1210
Joined: Thu Apr 30, 2009 8:43 pm
Location: melbourne,, outer east
Contact:

Re: curly maple progress

Post by rocket » Thu Nov 04, 2010 7:52 pm

hi there Nicko,,,, i'm using bwb purfling and curly maple binding, i'm getting a bit excited now. Not sure if i should finish it in a clear or add a bit of colour, i'm thinking a bit of a burst but i don't want to drown out the awsome figure i have in the back and sides. What does an artisan of your standing think? Cheers Rod.

Post Reply

Who is online

Users browsing this forum: No registered users and 88 guests