We've been using a Dremel and the Stewmac rosette jig but the dremel is too underpowered for some hardwoods (particularly Blackwood) and the bearings have too much play in them which means the rosettes are not always perfectly round.
So I got a 1/8" to 1/4" collette from Stewmac for about 10 bucks so I can use a 3/64" spiral downcut bit in our mini-trimmer.

The purflings that we got from Gurian measure a little more than 3/64" across which is absolutely crucial in how this jig works.
I made a base for the mini-trimmer out of perspex and drilled two holes to cut the inside and outside circumferences of both the wood for the rosette AND to rout the soundbaord to accept the rosette.
In the pic below you can see a series of holes to accept the 5mm centring pin.
The inner two holes are to cut the rosette for an 0-18, the centre two holes are for a dready and the other holes are for an extra purfling line outside the rosette at varying widths.

Rout the inner and outer circumferences a tiny bit shallower than the depth of the purfling.

This rosette is getting some mollusc in it so I used the dremel for this part.
I don't want to have to re-adjust the mini-trimmer.


Then run the piece of wood through the belt sander untill the rosette falls out. (nice out of focus pic there but it's the only one I took

Next I attack the soundboard. Use the mini-trimmer and the same centreing holes that I used for the rosette. Note that there is no need to change any adjustments on the mini-trimmer. Because the router bit is the same width as the purfling it'll leave enough space for me to put an inner and outer ring around the rosette.

Once I've routed the inner and outer parts I'll hog out the centre with the dremel.

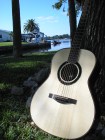
Ending up with this.

I use cyanoacrylate to glue the rosette in place so I need to seal it with some shellac otherwise the spruce around the rosette will eventually turn yellow. These purfs are sqeaky tight so I probably couldn't use Titebond as it'd swell the wood too much and they wouldn't fit.

After putting an an outer purfling ring it looks like this.


The purfs in this were Koa/Maple/Koa which were an absolute bollocks to get in. They are a tiny, tiny bit wider than Gurian's fibre purfs so I had to run them through the drum sander to get them to fit (and still they broke)
I found that giving the purfs a light sand with 320 grit helped to seat them a little easier.
What I like about this is that you don't have to measure and you don't have to think. ie you can do it quickly and repeateably and cheaply.
I've done seven soundboards since I made this jig on Friday (in between other stuff) so I'm fairly happy with how it speeds things up. (watch out Hesh - I'm on to ya)
You don't have to adjust the bit depth or change radius for different cuts so it's virtually impossible to stuff up.
So it's perfect for idiots like me.
If you want a different size rosette just drill a few more holes.
I made about three rosettes in a scrap piece of spruce trying out different
router bits until I found one that worked for my purfling.
Hope this all makes sense
Bob