Ukulele repair

Talk about musical instrument construction, setup and repair.

Moderators: kiwigeo, Jeremy D

Post Reply
jeffhigh
Blackwood
Posts: 1536
Joined: Thu Feb 07, 2008 5:50 am
Location: Caves Beach, NSW
Contact:

Ukulele repair

Post by jeffhigh » Wed Mar 19, 2008 9:02 am

So not wanting to take over Alan's thred about his lovely uke,
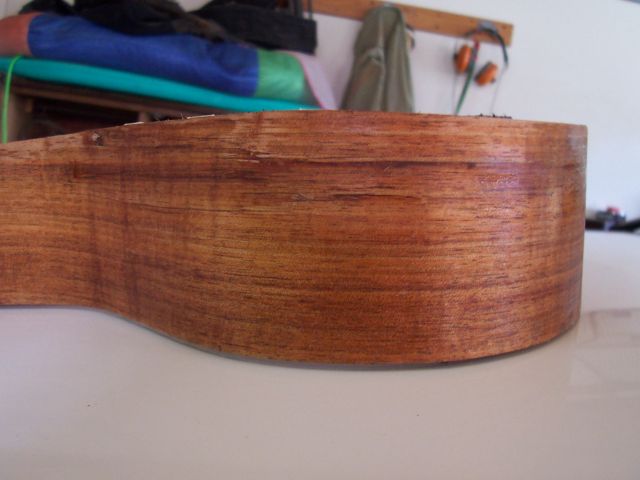
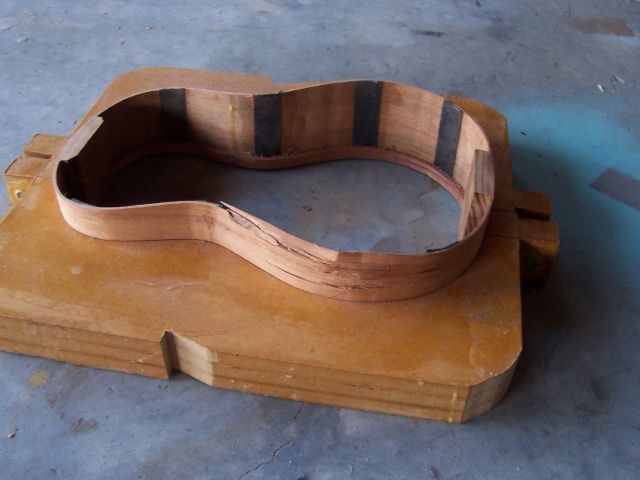
here is a picture of mine after suffering a car accident (driven over by wife)
I am going to use this as an opportunity to practice my repair skills
Image

User avatar
sebastiaan56
Blackwood
Posts: 1279
Joined: Sun Oct 28, 2007 5:23 am
Location: Blue Mountains

Post by sebastiaan56 » Wed Mar 19, 2008 9:19 am

Jeff,

Im curious to see what responses you will get, my gut feel is to go to Crazy Johns, pick up a couple of 10 packs of CA and then to the bottlo for a couple of six packs. Its gonna be a long weekend.

Sebastiaan
make mine fifths........

User avatar
kiwigeo
Admin
Posts: 10594
Joined: Sat Sep 29, 2007 5:57 pm
Location: Adelaide, Sth Australia

Post by kiwigeo » Wed Mar 19, 2008 9:27 am

Looks like youll need more than super glue to patch up that damage. I'd replace the whole side. But thats just one amateurs opinion.

BTW watch out buying the cheap arse CA from Crazy Johns, ya get what you pay for with glue. Try and get the Hot Stuff CA glues..they come in a range of viscosities.

I agree with the advice on heading off to the bottlo for a six pack. A six pack of Stellas is a standard part of my repair kit. They get taken immediately after the f***k up. Of course the actual repair job starts at least 12 hours after taking the medicine.

jeffhigh
Blackwood
Posts: 1536
Joined: Thu Feb 07, 2008 5:50 am
Location: Caves Beach, NSW
Contact:

Post by jeffhigh » Wed Mar 19, 2008 9:39 am

I agree with replacing the side BUT....
The concept of this particular instrument is to do it as cheap as possible using leftover wood and I don't have a spare side plus i am intrigued to see what I can achieve with a repair.
I was surprisingly calm when my wife told me what had happened, she was more upset than me and I had to assure her it was my fault for leaving it there

User avatar
Kim
Admin
Posts: 4376
Joined: Wed Sep 26, 2007 8:32 pm
Location: South of Perth WA

Post by Kim » Wed Mar 19, 2008 4:48 pm

Carefully push things back into place and fibreglass the inside with light chopped mat, when it goes off, CA the outside.

Cheers

Kim

User avatar
Kim
Admin
Posts: 4376
Joined: Wed Sep 26, 2007 8:32 pm
Location: South of Perth WA

Post by Kim » Wed Mar 19, 2008 4:54 pm

jeffhigh wrote: I was surprisingly calm when my wife told me what had happened, she was more upset than me and I had to assure her it was my fault for leaving it there
Jeff, tell your wife not to worry about your subdued response and that she should treat the situation like any other delayed telecast. Normal transmission will resume next heated argument :lol:

Cheers

Kim

User avatar
Allen
Blackwood
Posts: 5252
Joined: Thu Oct 11, 2007 5:39 pm
Location: Cairns, Australia
Contact:

Post by Allen » Wed Mar 19, 2008 6:50 pm

I think that this is going to be great practice. I say take the opportunity to hone your repair skills.

I absolutely destroyed a side by bending too aggressively and I used it as an opportunity to try repairing it and learn some things. I used HHG and small cauls with baking paper to stop gluing things that I didn't want to stick. I took it one small section at a time. The repair ended up taking about a week in total. Each day I'd glue and clamp up another small section. Mostly dry time for the glue to totally cure, but now that it is done, I simply can't see where the damage was. It gave me a lot more confidence in knowing that it has to get pretty bad before it can't be repaired. One never knows when you'll need that skill.
Allen R. McFarlen
https://www.brguitars.com
Facebook
Cairns, Australia

User avatar
James Mc
Blackwood
Posts: 246
Joined: Sat Dec 08, 2007 7:37 pm
Location: Townsville

Post by James Mc » Wed Mar 19, 2008 9:35 pm

Hi Jeff
I seem to have a lot of nice timber that isn’t long enough or wide enough to use for sides. So I’ve often wondered if it would be possible to make two or three piece sides? The join could either run the full length or splice two shorter bits together along a diagonal. With this thought in mind for this repair, maybe cut away the worst of the damaged timber from the top of the waist to near the bottom of the tail block on both sides, you could be decretive about it and curve the cut so it flattens out at the tail block (kind of guitar shape) . Then find a bit of contrasting timber bend it up, trim it to fit and glue it in place. Turn the repair into a feature rather than trying to hide the damage.

Just a thought

James

jeffhigh
Blackwood
Posts: 1536
Joined: Thu Feb 07, 2008 5:50 am
Location: Caves Beach, NSW
Contact:

Post by jeffhigh » Thu Mar 20, 2008 6:29 am

I am currently thinking I will repair it as best I can, some of the cracks I am sure I can get an invisible repair and then in the centre where the fibres are too mashed I will greate some sort of decorative element. :D

jeffhigh
Blackwood
Posts: 1536
Joined: Thu Feb 07, 2008 5:50 am
Location: Caves Beach, NSW
Contact:

Post by jeffhigh » Sat Mar 22, 2008 4:31 pm

And Back together again.
Area moistened with turps.
Image

User avatar
ozziebluesman
Blackwood
Posts: 1529
Joined: Wed Oct 10, 2007 9:12 am
Location: Townsville
Contact:

Post by ozziebluesman » Sat Mar 22, 2008 4:53 pm

Brilliant Jeff. No tyre or skid marks showing either!!! :lol:

Cheers

Alan

User avatar
Allen
Blackwood
Posts: 5252
Joined: Thu Oct 11, 2007 5:39 pm
Location: Cairns, Australia
Contact:

Post by Allen » Sat Mar 22, 2008 6:52 pm

That's looking great. A little more work and some purfs and you'll be hard pressed to spot it.
Allen R. McFarlen
https://www.brguitars.com
Facebook
Cairns, Australia

jeffhigh
Blackwood
Posts: 1536
Joined: Thu Feb 07, 2008 5:50 am
Location: Caves Beach, NSW
Contact:

Post by jeffhigh » Sat Mar 22, 2008 8:23 pm

Yeah, it has come out better than I thought it would.
The camera flash actually makes the picture look worse than in person.

And the before picture was NOT how it looked initially, the whole corner above the mold was bent over horizontal with only the cloth tape holding it together

Post Reply

Who is online

Users browsing this forum: Google and 255 guests