Building a kitset dreadnought

Talk about musical instrument construction, setup and repair.

Moderators: kiwigeo, Jeremy D

Post Reply
seeaxe
Blackwood
Posts: 768
Joined: Thu Dec 18, 2008 7:20 pm
Location: Auckland NZ

Building a kitset dreadnought

Post by seeaxe » Wed Aug 25, 2021 7:58 pm

There may be people lurking here wondering if they could build a guitar themselves. If there are they have probably considered a kitset guitar from someone like Stewmac. I'm building one of these for a friend, so I thought Id post my thoughts and build as I go. He bought the kit with the idea with the idea of building but, being a family man with a full time day job and two little kids, was never going to have the time. He offered it to me but I dont play steel strings anymore and have far too many guitars anyway, so I offered to build it for him. Should be fun.

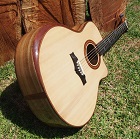
This is actually the second time I have built one of these, my second guitar for No2 son was the same kit and it turned out very well, apart from me putting the fret markers in the wrong place, fretboard all glued on before I noticed. Live and learn.

As I said above Ill post my thoughts as I go. I'm cheating a bit cos I've got a fully fledged workshop with most of the killer tools, so ill comment on how it would have been done if you didnt, so someone with minimal toolage can see how it could work.

This kit comes with a very good set of instructions, there's even a dvd you can buy (which is just a video version of the instruction booklet)

So off we go.

The kit comes in a big cardboard box, top and back are joined together and the sides are bent, so some tricky stuff is avoided, you don't need a thickness sander (a pretty important (and expensive) tool if you are going to build guitars from scratch). The kit comes with a pair of pieces of thick cardboard, cut to the interior shape of the guitar, to use as an inner form. You are supposed to use this inner form and make a simple plywood outer clamp to hold the thing in shape while you build it. This is the way I did it last time and, from that experience, I recommend anyone building this kit to make themselves a proper wooden mould to build in.

Building a mould takes time but its not difficult. Its main benefit is that you can be pretty sure you will have all the sides square and its much easier to keep it in shape, especially as the bent sides typically "creep" out of shape in the box. I used scrap pine from pallets for the mould however to do that you would need some way to get the wood to the right and consistent dimensions. (thicknesser, table saw)
I have used MDF in the past as its a consistent thickness but there's a lot of waste. Pine is much lighter and easier to work with.
If anyone wants to know how to build a mould sing out and I can describe it here.

First bits out of the box were the sides and they went into the mould for a trial fit, they didn't fit very well.
20210824_103517.jpg
While (using the timber mould) I could have forced them into shape using the blocks an turnbuckles its never a good idea as you are fighting the thing from the get go, so I used my Ibex bending iron to put the sides back into the right shape. The mould is made from the drawings that come with the kit so I know its the right shape. If you don't have a bending iron then I recommend you get onto the kit as soon as it arrives, to minimise this potential problem.

That's better.
20210824_113308.jpg
As you can see the end blocks are premade and supplied, you just have to glue them in. They need to be square to the top of the guitar, especially the head block as it has the rebate for the neck and if you if dont get it right the neck will be wonky. It's hard to check because if you try to use a square, the curved sides make that difficult. One thing that helps is that the prebent sides have square ends so you can centre the block on where they join to get it pretty close. With the head block glued, the sides in the mould and pushed out by the blocks and turnbuckles to exactly match the form, there's actually a small gap between the ends of the sides at the tail block. If you don't build using a mould and use the inner form supplied with the kit , this wont happen, but its OK anyway as the gap will be covered by the tail graft.

So here's the tail block getting glued in. Easy to get to everything this way. A decent bench and a vice are pretty important tools. People do build these on their kitchen tables, I take my hat off to them.
20210824_135435.jpg

Once the head and tail block are glued in , you can put the kerfed linings in.
20210825_094721.jpg
Before I put these in, I used a radius dish to get the sides close to the right curvature. The kitset uses a stick sander (you make yourself) which does a pretty good job but I found last time that by the time I have the right curvature I had sanded away a good chunk more of the kerfing than I wanted to. If you get the shape right first then there is less sanding of the kerfing required. Radius dishes can be made yourself or bought and are quite useful but they are bulky and probably not worth it if you are only going to build one guitar.

While that lot is drying out, I started on the soundboard. First job is to glue in the rosette. All the grooves are there and the rosette is pre-made. Fairly straightforward stuff. I recommend a light sand of the grooves and the rosette pieces and a trial fit before glueing. The rosette pieces are fragile. I have learnt by experience that the less glue that ends up not where it should not be, the easier it is to clean up. Hence the masking tape.
20210825_150341.jpg
That's as far as I've got.

I have no idea whether there is any interest in this and its going to take a lot of effort at this level of detail. So what I will do is continue to post pictures and if anyone is interested in finding out more about any of the steps, they can sing out and ask questions. Others can chip in with their thoughts too if they want to.

Cheers
Richard

User avatar
Mark McLean
Blackwood
Posts: 1080
Joined: Thu Apr 10, 2008 2:03 pm
Location: Sydney

Re: Building a kitset dreadnought

Post by Mark McLean » Fri Aug 27, 2021 5:35 pm

Well I am enjoying it so far. I have some friends who have seen my guitars and are keen to try it themselves, and I had thought of recommending a kit to them. Seeing you go through it will give me a good idea how to guide them. So, if you are up for doing all of the work of posting, I promise I, for one, will be watching and learning.

Snail
Wandoo
Posts: 17
Joined: Thu Jul 29, 2021 12:54 am

Re: Building a kitset dreadnought

Post by Snail » Sun Aug 29, 2021 8:36 am

Hi Richard,

I for one, am very interested in your experience with this kit. I am really looking forward to your updates.

Thanks

Daniel.

Dave M
Blackwood
Posts: 594
Joined: Tue Jul 15, 2014 6:44 am
Location: Somerset UK

Re: Building a kitset dreadnought

Post by Dave M » Mon Aug 30, 2021 1:28 am

Richard I am certainly following. I think that any build thread throws up a gem or two to help ones own build process.

Cheers Dave
------------------
Dave

seeaxe
Blackwood
Posts: 768
Joined: Thu Dec 18, 2008 7:20 pm
Location: Auckland NZ

Re: Building a kitset dreadnought

Post by seeaxe » Mon Aug 30, 2021 6:28 pm

Once the rosette was in it was time to start bracing but checking the top thickness I found it was 3.2 to 3.5mm. The plans say 2.5mm.So I queried it with Stewmac and they said "up to you" but leave them a bit thicker as a typical beginner fail is to oversand them. I put it through the thickness sander and took it down to 2.5mm.

I finished putting the side splints in the rims/sides
20210830_100303.jpg
Yesterday I made up the main cross brace and today I put that and the rest of the bracing on the sound board. I did all that in the house with the heating turned up as the weathers a bit shitty here atm.
20210830_191930.jpg
One trick you need to learn (if you havent already) is the drinking straw trick. Its THE best way to clean up glue from a joint, does a wonderful job. You scoop up the glue and then cut the very end with the excess glue in it, off and into the bin, then go again. Cut at an angle and you get a little point. Only problem is I think they are going to ban plastic drinking straws.... :o
20210830_192312.jpg
Ill tidy it up tomorrow.

Main X brace joint.....doesn't say much about this in the instructions, just "notch them into one another". I know this as a half-housing or dado joint. Normally for rectangular sections, you cut through both pieces to halfway, invert one, push it together and glue it. However the premade braces come profiled so you have a big gap either side of the top of the upper brace.

Now, views probably differ on this but here's my thinking for what its worth.

The purpose of these main braces is to support the top. The strings pull on the bridge and try to tip it forwards, the braces and the top resist that. This puts the braces under bending stress. At the location of the joint, which is between the bridge and the soundhole, the string pull is trying to make the top cave in and behind the bridge its getting pulled up wards.

Because of this joint, the two parts of the X brace will behave very differently. The brace that has the bottom half cut out but is continuous across the top will have something like 8 times the capacity of the brace that has the top half cut out. Older guitars used to have a bit of cloth glued over the joint. Personally I cannot see what that achieves. Maybe old Martin D28s sound the way they do because these two braces are different, I dont know. Whatever, the fact that the problem is easily fixed is enough for me to want to fix it. When I make my own braces I leave the section rectangular at the joint and cap the joint with a piece of spruce similar thickness to the sound board. Both braces will then have roughly the same stiffness and strength. In the case of the kit, I cant do that as the braces are already profiled.

So what I did was to glue some strands of Carbon Fibre across the top of the joint. I haven't done any numbers but I hazard a guess that those strands will have something like the same tensile strength as the wood that was removed to make the joint. They can be skinny as they are always in tension, as result of the string pull pushing the top down in front of the bridge. Doesn't look very pretty, I have to say.
20210830_202230.jpg
You can ignore all of this if you like, it will still work. What will happen is that most of the load will be carried by the stiffer of the two braces and that's what happens on any guitar when nothing is done to cap the weaker brace. They still work and sound fine. Whether its better or not, who knows. Welcome to the world of lutherie!!
Richard

Snail
Wandoo
Posts: 17
Joined: Thu Jul 29, 2021 12:54 am

Re: Building a kitset dreadnought

Post by Snail » Fri Sep 03, 2021 8:24 am

Making good progress Richard.

I wasn't aware of the straw trick - when I first saw it, I thought 'that is not going taste great' :oops:

seeaxe
Blackwood
Posts: 768
Joined: Thu Dec 18, 2008 7:20 pm
Location: Auckland NZ

Re: Building a kitset dreadnought

Post by seeaxe » Sun Sep 05, 2021 8:37 am

moving right along..
The top goes on the sides. If you think you might like to build another guitar (or 2, or 3 or 4), consider building a go-bar deck. There are lots of plans on line, I use a shelf above the bench, its not quite wide enough but it does the job. Go bars allow you to get at the joints very easily and clean up plus they are very powerful. You can do it without one but they make a difficult job a lot easier.
top on.jpg
The main braces go on the back. There's a centre strip to go on, the kit provided that in 5 bits so I did the main braces first and used a caul which spanned over the braces to get the centre strip lined up straight, with more go bars for pressure. Bear in mind everything you do at the upper end of the back is visible through the sound hole...
back bracing under way.jpg
I use a pair of turnbuckle spreaders to push the sides out and keep them square against the mould. They come to bits and can be removed through the soundhole when the box is closed. The kit uses a couple of cardboard forms to keep the shape, but you have to be very careful when you glue up to make sure the sides are square everywhere. That can be quite tricky in my experience.
ready for back.jpg
More go bars
back on.jpg
Et voila. Out of the mould. Next job is to trim off all the overhangs. If you are brave you can do this with a router and flush trim bit. If you do, it will be a quicker and usually neater finish but bear in mind these edges get cut off anyway when you do the binding. If you use a router pay close attention to which way the cutter turns. When you trim make sure when you move the router, the cutter is ALWAYS travelling towards the body of the guitar and pushing the wood into the body. This is called a "climb cut" as the bit is trying to pull you along as you work.

You can of course trim the excess off by hand. I would use a small plane if your chisel skills are not strong, but you still have to use a chisel in the waist area as the plane cannot reach there.. Whatever you use take a minute or two to make sure it is sharp. This is one of those jobs that can easily lead to disaster, if you pull a chunk of the top off by accident.
out of the mould.jpg
Trial fit of the bolt on neck. Because I used my radius dish instead of the recommended method in the instructions (its quicker) I have oversanded the upper end at the top a little, so the neck is a little proud. Not ideal but I can fix that pretty easily. You might be able to see that in the photo. So probably not quicker in the end!!! You never stop learning.
neck trial fit.jpg
Another thing to maybe consider is making a troji. This holds the guitar at a convenient height while you work on the sides. You can make it out of scrap (MDF in this case) and some sponge, it works really well and saves your back a bit. Otherwise you find yourself holding it with one hand while trying to scrape/sand with the other
troji.jpg
When you bend thin pieces of wood, they distort. The side splints will fix some of this but there's usually some levelling to be done on the sides. A cabinet scraper is the killer tool for this. Learning to sharpen one of those takes time but is a skill worth learning. One of those tools that does certain jobs so much better than anything else, they will appear again when you do the binding. Also useful for seeing how much you need to take off. A word of warning, if your sides are so distorted that there is 2mm to remove...dont!. Remember the sides are only 2.5mm thick. You will just have to live with it. Also the distortion will vary over quite short distances so keep checking at the location to see whether you still need to take any material off. This bit takes (me) ages.
sides not flat.jpg
This is what that looks like from the top. You can see where the scraper is not contacting the wood and it will feel rough compared to where the scraper has been. It will be difficult to finish the guitar (as in varnish, lacquer, whatever) without fixing that. It will stick out like the proverbial. You can see I have to opposite problem at the waist with the edges much lower than the centre.
sides not flat 2.jpg
Once you have scraped everything flat or have taken off as much as you dare, then you can sand the sides. The scraping makes this part much much easier, if you try to do it all with sandpaper, it will take forever and it probably wont be very flat when you have finished.

Buy yourself a good mask, a proper one with replaceable filters, not one of the paper or N95 jobbies, you are trying to stop dust getting in, not bugs getting out.
sanding sides.jpg
Richard

seeaxe
Blackwood
Posts: 768
Joined: Thu Dec 18, 2008 7:20 pm
Location: Auckland NZ

Re: Building a kitset dreadnought

Post by seeaxe » Thu Sep 09, 2021 7:44 pm

Moving right along.....

glue on headplate
headplate on.jpg
Whack some frets in
frets in.jpg
Glue the fretboard on the neck.
fretboard on.jpg
Owner opted for wooden binding instead of the plastic stuff that comes with the kit.
I reminded myself why its a good idea to tape two pieces of binding together, with the purfling on the inner face, before heat bending it to shape. Luckily I have enough spare that I could bin this bit. Pic taken AFTER I attempted to glue it back together - was never going to work.
delam binding.jpg
Tidy up the neck and fretboard edge.
tidy up neck and fretboard.jpg
Put in the end graft ready for cutting the binding channels.
end graft ready for binding.jpg
Fairing out the heel and neck, not finished yet. I want to leave some stuff for the owner to do. We were supposed to be building this together.
fairing out the neck.jpg
Couldnt resist a mock up at the end of the day.
mock up 2.jpg
Richard

Snail
Wandoo
Posts: 17
Joined: Thu Jul 29, 2021 12:54 am

Re: Building a kitset dreadnought

Post by Snail » Fri Sep 10, 2021 1:57 am

Looking good Richard :)

User avatar
WJ Guitars
Blackwood
Posts: 372
Joined: Thu Jan 26, 2017 4:28 pm
Location: Sutherland NSW
Contact:

Re: Building a kitset dreadnought

Post by WJ Guitars » Fri Sep 10, 2021 9:08 am

The kit project Richard is moving along very well. I like your comments explaining the pros and cons when working on the sides.

Wayne

seeaxe
Blackwood
Posts: 768
Joined: Thu Dec 18, 2008 7:20 pm
Location: Auckland NZ

Re: Building a kitset dreadnought

Post by seeaxe » Sun Sep 12, 2021 4:03 pm

Yesterday afternoon I cut the binding channels. One of my least favourite jobs, mainly cos of the stress involved. If things go wrong at this point it can be terminal. By this time I have always lost track of how many hours I have spent, but it will be weeks in this case.

In the Stewmac kit instructions it tells you to put your guitar on a dustbin outside, hold it with one hand and cut the channels with a laminate trimmer in the other hand. Good luck with that. I have never done a perfect set of bindings yet after about ten goes, there's always something that could be better.. I cannot imagine doing it without cutting clean channels first. If you are going to have a go freehand then find some way of doing many cuts before the final one so that if things start going wrong then you have at least a chance or if you are lucky two, to correct it.

I don't know how many others use them but I use the ball bearing rebate cutter method. I bought the cutter and a few bearings from Stewmac first and it didnt take very long before I had ordered ALL the bearing sizes available. I still find combinations of binding and purfling that I don't quite have the right size bearing for. You can get round this by using a smaller bearing (deeper cut) and putting layers of tape on it, to get between the sizes.

Next thing is to make sure the router/laminate trimmer is vertical when you make the cuts. This is important as the binding channel will be way wrong in places if you just rest the router base on the back or top, as its curved in most places, especially the back. It follows that you have to also have your guitar body level. In my opinion you have no hope of keeping it vertical freehand, there's just too much going on to concentrate on that. A big angry router bit is spinning at 22,000 rpm next to your precious guitar and you are trying not to soil your pants if this is the first time you are doing it. Plus you need to do climb cuts all the way around to stop the router tearing out wood, so if you are not careful the router will grab and move itself.

To address the many issues here I built myself a jig to hold the router vertical, basically a copy of the commercial ones, but made of scrap wood. It has a bevel under the router base to account for the fact that parts of the back and top are not flat. I built a cradle for the guitar to sit in that slides around under the fixed router. That way you have a whole guitar to hold instead of a little (but very powerful) router. It works for me.

In short, I would see if you can find someone to help you with this bit of the job. If you cant find anyone, give consideration to cutting them by hand. It will take a lot longer and wont be as neat but there's less chance of ruining your guitar.

Anyhoo, lecture over !! on with the pictures
Ready to cut the binding channels
ready to cut binding channels.jpg
Once I had cut the binding channels I need to clean up around the end graft. The router needs to leave the graft itself higher than the rest of the channel so that the purfling can be mitred. To do this you tape a piece of same purfling on to the back (and the top!) so that when the router passes it lifts up exactly the right amount. The clean up was tricky because the grain of the rosewood is going in the wrong direction to approach from the outside with a chisel. You can avoid all this hassle by not having purfling on the binding. ( The kit has plastic binding, no purfling)
end graft prep.jpg
Building a guitar seems to produce a prodigious amount of scrap wood. Resist the urge to tidy up and throw it out. There are so many times you can use that wood to make a quick and dirty jig. Throw it out when you are finished. I used a piece of scrap to make a tiny sanding block. I used this to clean up the binding and purfling channels and get rid of any furry edges. This made me ridiculously happy for some reason, I've no idea why but when that happens I just enjoy the moment.
mini sanding block.jpg
Result!
nice clean channels.jpg
OK now I'm ready to start binding
masked up to limit glue spread.jpg
Actually I wasn't ready as I hadn't cut the many bits of tape I needed to tape the binding to the body as I went. I cut 20 and ran out. I need about 30 bits per side. Its just tape, don't try to save money here.

And I forgot the rubber bands as well. But it got done. A thought - The first time you do this is the time you are most likely to stuff something up. So do the side that will be at the bottom of the guitar when you are playing it first, i.e. the treble side. If you do stuff something up, at least you wont be looking at it when you are playing.
first side on back.jpg
A little while later I had the second side done.
second side on back.jpg
End of the day, I made a quick inspection, found a few gaps and applied some CA glue so that when I clean these up later I have started the filling process. Tomorrow I move to the front and have herringbone purfling as well as binding to put on. Wish me luck!.
back ready for clean up.jpg
Richard

seeaxe
Blackwood
Posts: 768
Joined: Thu Dec 18, 2008 7:20 pm
Location: Auckland NZ

Re: Building a kitset dreadnought

Post by seeaxe » Thu Sep 16, 2021 7:26 pm

Closing out this thread for a while now as I'm leaving the rest of it until the owner can come and do stuff. I think most of the really difficult bits are done. Binding went ok.
front binding and hbone purfling ready.jpg
hbone on.jpg
hbone closeup.jpg
tidied up body.jpg
tidied  up back.jpg
That's it for a while. Thanks for looking.
Cheers
Richard

User avatar
kiwigeo
Admin
Posts: 10580
Joined: Sat Sep 29, 2007 5:57 pm
Location: Adelaide, Sth Australia

Re: Building a kitset dreadnought

Post by kiwigeo » Thu Sep 16, 2021 8:28 pm

Thanks alot Richard for the posts.....please post up some pics of the finished instrument when the owner gets done with same.
Martin

Snail
Wandoo
Posts: 17
Joined: Thu Jul 29, 2021 12:54 am

Re: Building a kitset dreadnought

Post by Snail » Fri Sep 17, 2021 9:11 am

Thanks Richard, I appreciate the effort of posting all of this up.

I, for one, would be really interested to see how it turns out!

Dave M
Blackwood
Posts: 594
Joined: Tue Jul 15, 2014 6:44 am
Location: Somerset UK

Re: Building a kitset dreadnought

Post by Dave M » Sat Sep 18, 2021 2:32 am

That herringbone is seriously neat. Did you have to separate down the centreline to get it round the curves?

Dave
------------------
Dave

seeaxe
Blackwood
Posts: 768
Joined: Thu Dec 18, 2008 7:20 pm
Location: Auckland NZ

Re: Building a kitset dreadnought

Post by seeaxe » Sat Sep 18, 2021 5:38 am

Thanks Dave but all the credit goes to Stewmac. It comes formed perfectly to shape. It more or less lay perfectly in the rebate as it came. Made things very easy.

Which is really the point of a kitset like this. I think the Stewmac kits are excellent quality and value. They're perfect for a beginner as you are more or less assured of a good sounding instrument, even if you dont get the aesthetics right.
Richard

Post Reply

Who is online

Users browsing this forum: No registered users and 61 guests