Building a Weissenborn

Talk about musical instrument construction, setup and repair.

Moderators: kiwigeo, Jeremy D

User avatar
Allen
Blackwood
Posts: 5252
Joined: Thu Oct 11, 2007 5:39 pm
Location: Cairns, Australia
Contact:

Building a Weissenborn

Post by Allen » Sat Oct 04, 2008 5:29 pm

Most of the last few weeks has been spent building a side bender, body molds and jigs. I've finally got to the point where I can start to cut up some tone wood instead of MDF. :D

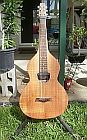
Not being rigged up for a Weissenborn, and there's not much info available, it's been a little bit of a learning curve. So I'll try and document some of this build for others to follow. I'm no expert, so don't take any of this as Gospel. I reserve the right to change my mind about any of this as I go along.:wink:

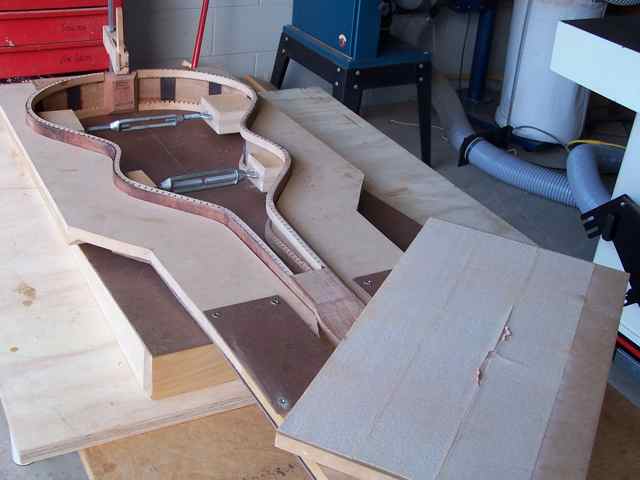
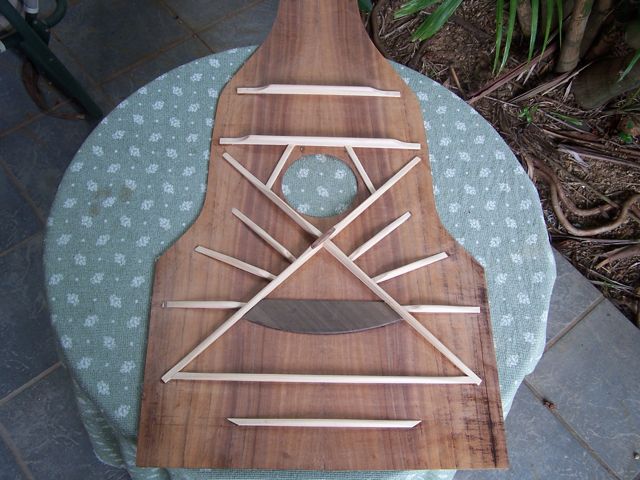
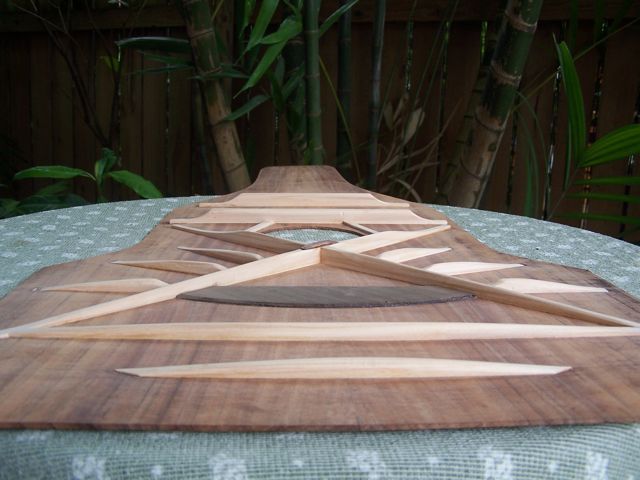
Being too large for my radius dishes, I built a building board similar to one I saw on Christophe Grellier's web site. Along with a body mold and bending form.

Image

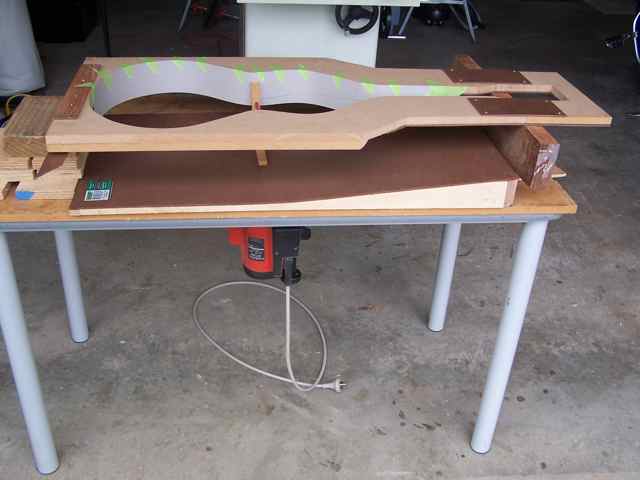
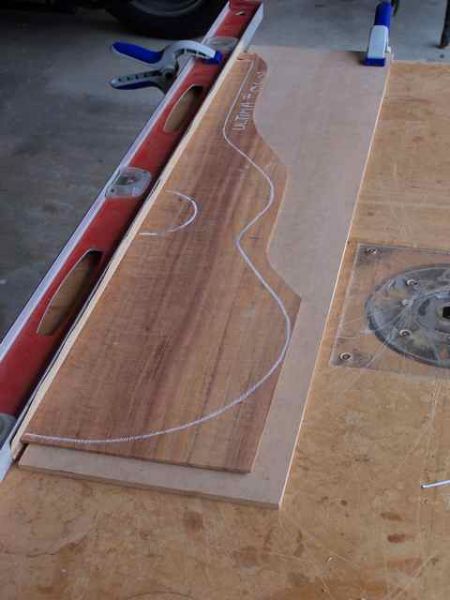
I have it propped up above the work board so that it's level in both directions, in order to make a template for profiling the sides.

Image

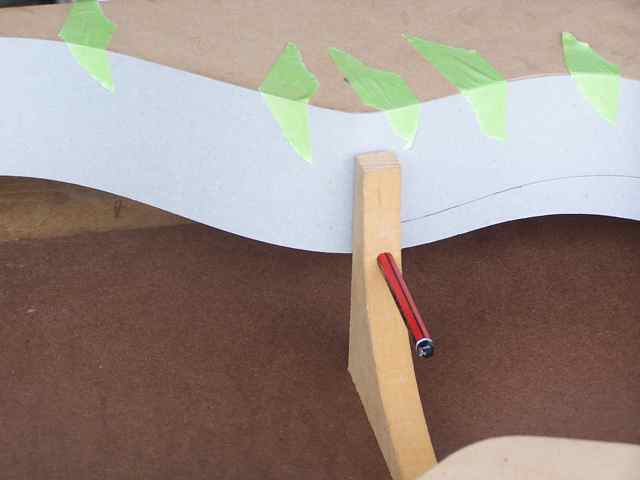
I attached a 3" wide piece of poster board to the mold. Note that the top edge is level with the top of the mold. Then I made a little jig to hold a pencil to trace the profile onto the poster board.

Image

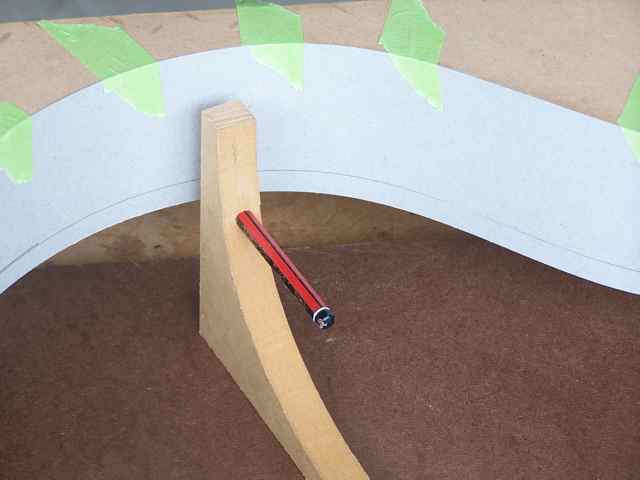
I just cut out the shape with a scalpel and then used the template to lay out the side profile.

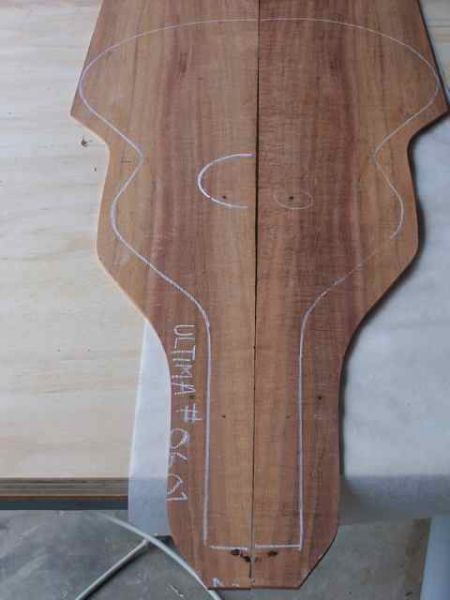
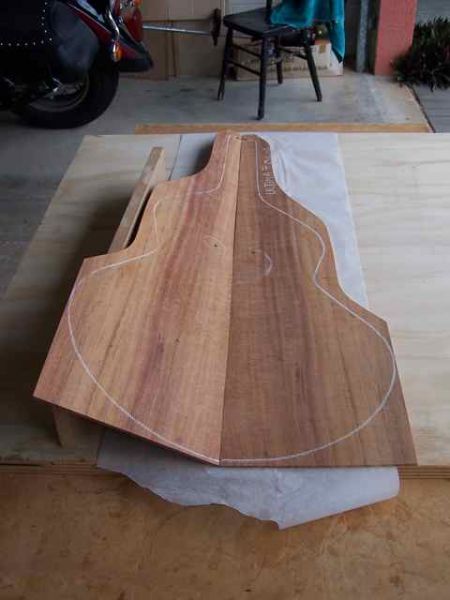
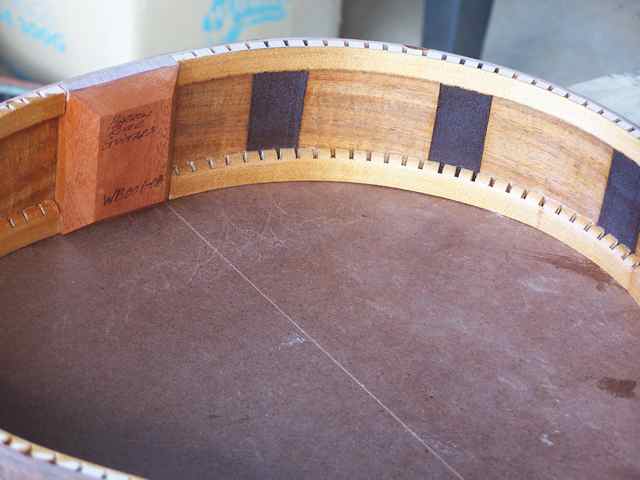
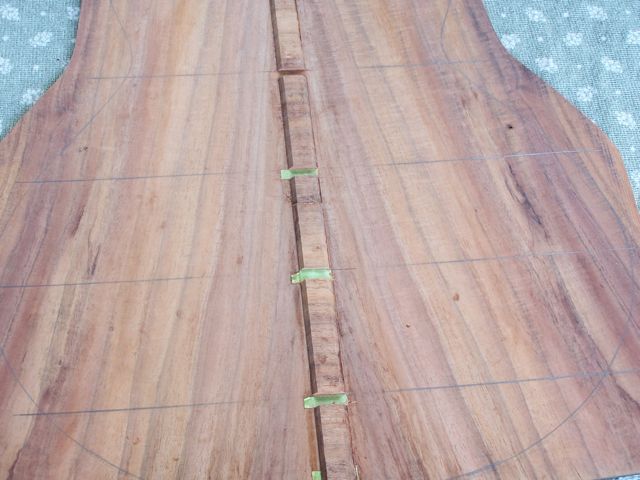
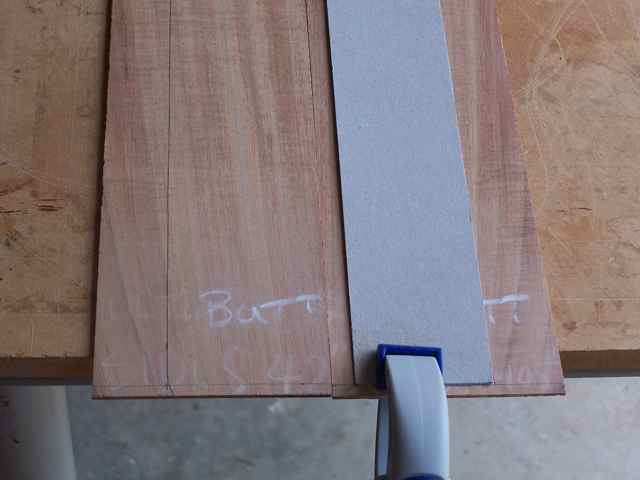
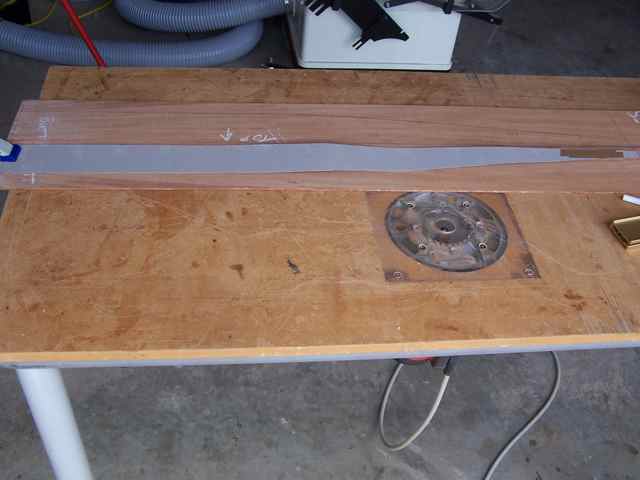
The sides are run through the table saw to give a nice straight edge for the top, and side depth is registered from this edge. On this instrument its 3" deep at the butt, and 1" at the headstock joint. You need to take the top and back thickness into account when you do your layout. I also bend my sides registered off of the butt joint, so I've squared a line off a few mm in from the edge to give me a little wiggle room in case the side slips a little in the bender.

Image

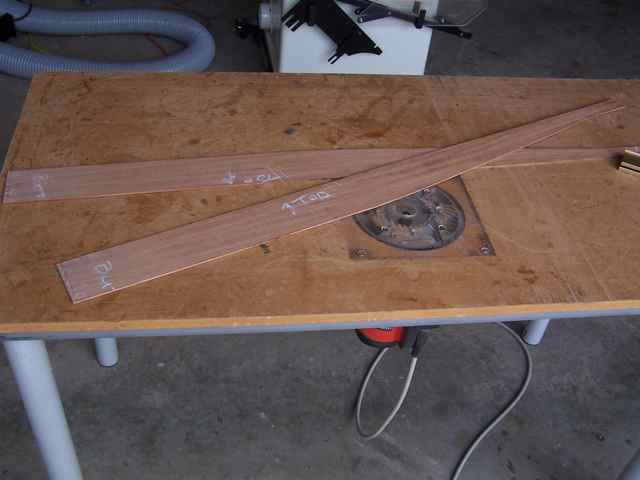
Mark off the depth at the butt, and at the head stock. Lay on the template and pencil in the line.

Image

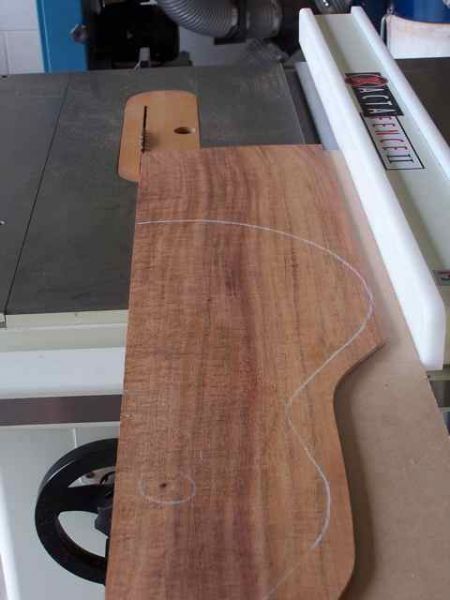
Cut the sides to the correct profile.

Image

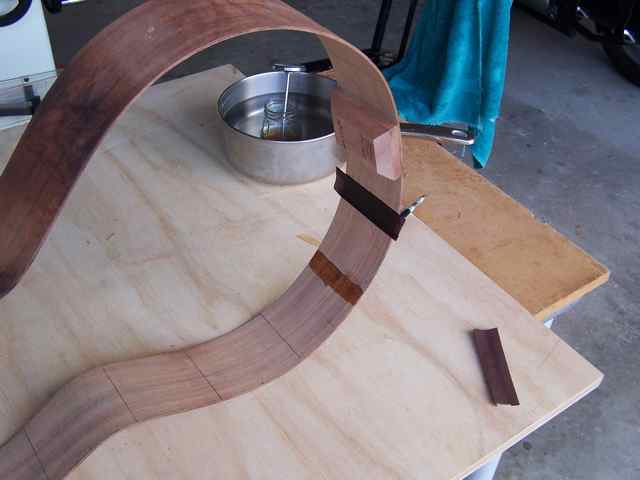
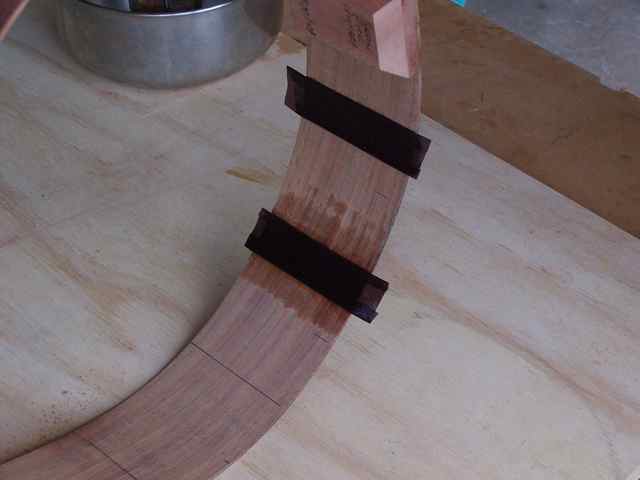
Load the first side into the side bender and proceed as usual.

Image

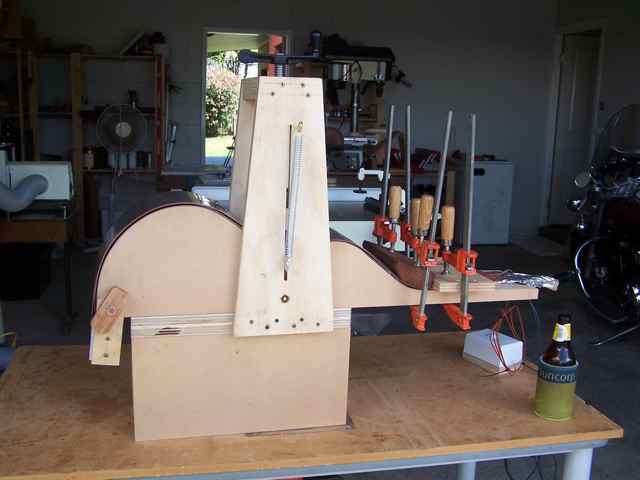
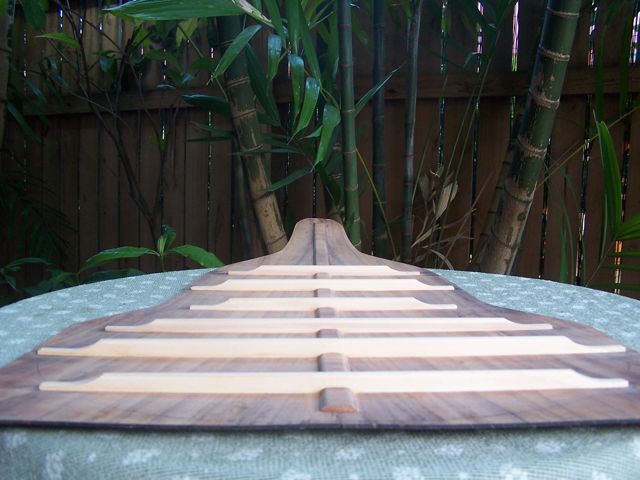
This was the first time to use my new side bender, and it works a treat. To bend Weissenborn sides I'm going to need to come up with a little easier way to bend the upper bout / neck area. Perhaps something along the lines of the press for a Venetian cutaway. This method worked, but it takes more hands than I have. :lol:
Allen R. McFarlen
https://www.brguitars.com
Facebook
Cairns, Australia

User avatar
ozziebluesman
Blackwood
Posts: 1529
Joined: Wed Oct 10, 2007 9:12 am
Location: Townsville
Contact:

Post by ozziebluesman » Sat Oct 04, 2008 5:59 pm

Good on ya Allen! I'm looking forward to watching this one evolve.

Cheers

Alan

ps Wish I had that bender machine of yours when I bent my weissenborn copy sides. What an experience!

User avatar
Allen
Blackwood
Posts: 5252
Joined: Thu Oct 11, 2007 5:39 pm
Location: Cairns, Australia
Contact:

Post by Allen » Sat Oct 04, 2008 6:17 pm

Then you don't want to know that to bend a side all I did was load up the slats. Turn the timer and blanket on full for 3 minutes, turn the heat off for about a minute while I got the butt attached and started to crank the waist down. Karen and I started with the upper bout clamping, and I turned the heat back on. Gently started to snug every thing up, and let cook for another 3 minutes. :shock:

Turned off heat. Cooled down to just warm. Then hit it again with full power for 5 minutes and cooled off. Came out of the bender perfect with just a touch of spring back. :D The other side is going to be in over night. Will post more pictures tomorrow.
Allen R. McFarlen
https://www.brguitars.com
Facebook
Cairns, Australia

User avatar
Kim Strode
Blackwood
Posts: 215
Joined: Fri Oct 19, 2007 8:11 am
Location: Daylesford Victoria, Australia

Post by Kim Strode » Sat Oct 04, 2008 6:56 pm

Great start Allen - I will be watching this build with great interest. I finished building the mould, jigs and bending form for a Weissenborn in early March - even had all the timber delivered from Tim.

Unfortunately fate took over, with a heart attack in April, followed by 'by-pass' heart surgery three weeks ago. My guitar building days were obviously placed on hold and today was the first day I poked my head into the workshop to see where I left things.

Your timing is great, as it should allow me to learn from you and follow on soon after.
Kim Strode
Daylesford, Australia

User avatar
Allen
Blackwood
Posts: 5252
Joined: Thu Oct 11, 2007 5:39 pm
Location: Cairns, Australia
Contact:

Post by Allen » Sat Oct 04, 2008 7:09 pm

You're a brave man indeed to follow my lead.

Hope that I don't make too many mistakes then. :wink:
Allen R. McFarlen
https://www.brguitars.com
Facebook
Cairns, Australia

User avatar
Dominic
Blackwood
Posts: 1098
Joined: Thu Jan 10, 2008 8:58 am
Location: Canberra

Post by Dominic » Sun Oct 05, 2008 10:39 am

Hey Allen, this thread is going to be a great help for a friend at work who is keen to make one. He was going to order a kit from Tim so his sides will be bent but we will follow your effort closely.

Martin, note the beer in the last photo.

Cheers
Dom
You can bomb the world to pieces,
but you can't bomb the world to peace!

User avatar
Allen
Blackwood
Posts: 5252
Joined: Thu Oct 11, 2007 5:39 pm
Location: Cairns, Australia
Contact:

Post by Allen » Sun Oct 05, 2008 7:12 pm

I don't own a really long jointing plane, and these plates needed some trimming to get them close. The back set actually had a much larger gap than this one, but I didn't have the camera at the time.

Image

If you have access to a table saw it's really easy to trim boards like this to get a joint that is virtually ready for glue. First off you need a board that is wider than the one you want to trim. Here I used some 6 mm MDF. Then I used a few pieces of double sided carpet tape to glue the top to the MDF. Take note that the lower bout has very little extra to still be inside the body shape. The neck has heaps of room.

Image

I set the fence to just kiss the edge in the lower bout, but took about a blade with by the time it was up at the head stock. I used a piece of MDF to hold the top set down flat to the board underneath so that I'd get a nice clean cut. Couldn't take that picture while I was cutting though.

Image

The joint was almost perfect. Just needed a light rub against a straight edge with some sandpaper glued on.

Image

Propped up ready for the "Tape" joining method.

Image

There are a few small pieces to keep the pieces registered to each other, then long strips tacked down really good on the ends.

Image

Apply glue to both edges and press down onto a flat work surface. Be sure to have some non stick paper underneath. Notice that I use a syringe to apply the Titebond. I find that it's much easier to put just the right amount on the very narrow edge of the plates.

Clean up glue squeeze out and then flip the plates over carefully. Clean up squeeze out on this side and stretch tape across this side as well. Make sure that the edges are nice and even. Then weight down and let dry. I use a very large slap of granite countertop material.

Image

Making the end block requires it to have a slight radius to match the curve in the lower bout. I held up my radius gauges and found that it was very close to 16'. Just what my fret board sanding beam is.

Image

Glue in the end block and the head stock.

Image

Sorry, I didn't take any pictures of building the head stock. The Stew Mac plans don't really show how the head stock joint should be designed. I made a tenon that has the same taper as the neck has, and it needs to be full depth of the neck. Mine is just a tad shy of full depth at the sound hole end. I might need to shim, but I'll wait until the linings are in and the back is profiled. I might get away with it.
Allen R. McFarlen
https://www.brguitars.com
Facebook
Cairns, Australia

User avatar
Taffy Evans
Blackwood
Posts: 997
Joined: Wed Apr 30, 2008 6:54 pm
Location: Charters Towers North Queensland

Post by Taffy Evans » Mon Oct 06, 2008 9:00 am

HI Allen
Looks like you are steeming ahead with the lap steel project, it's all looking good.
Looking back I remember having the same challenges as yourself, first building a bender with little or no info, and then working out the forms and jigs to build a hollow neck lap steel.

I've built two now and followed two different commercial plans, with the next one I'll put my own stamp on it. but too much on at the moment.
Taff

User avatar
Allen
Blackwood
Posts: 5252
Joined: Thu Oct 11, 2007 5:39 pm
Location: Cairns, Australia
Contact:

Post by Allen » Mon Oct 06, 2008 6:38 pm

I've got both the Stew Mac Plan and the MMIF one. Both are pretty sketchy on details, and it takes a lot of looking at all the details to realize the one bit of info you want isn't there. :shock:

I'm glad I didn't start out building one of these as my first instrument. I think once you are reasonably competent at building a regular acoustic guitar, then these are perhaps a bit easier, but with such scant information available from others who've built them, it's a bit of a shot in the dark for someone starting out.
Allen R. McFarlen
https://www.brguitars.com
Facebook
Cairns, Australia

Richard
Myrtle
Posts: 75
Joined: Tue Feb 19, 2008 7:12 pm
Location: Brisbane
Contact:

Post by Richard » Tue Oct 07, 2008 9:36 pm

Looking good so far.

The lack of info out there about them can be daunting, but I think with a good working knowledge of normal acoustics it shouldn't be a problem. The fundamentals are all the same.

You should find that once the box is closed the tricky stuff is behind you. The lack of neck angle, fretting, action etc. means there isn't a whole lot of fiddly stuff that needs doing.

User avatar
Allen
Blackwood
Posts: 5252
Joined: Thu Oct 11, 2007 5:39 pm
Location: Cairns, Australia
Contact:

Post by Allen » Wed Oct 08, 2008 6:48 pm

Next up is installing the side reinforcement tapes and the linings.

First up the fabric tape reinforcements.
Image

I used a small square to mark off the spacing around the rims. The reinforcement tape is just your standard bias tape that is used in making garments. Comes in all kinds of colors, so you can pick something that compliments the color of your wood if you like.

I heat up the hide glue and use a small brush to lay down a thin layer where the fabric tape will be installed. Then lay the tape in place and then brush some more glue over the top. Clean the edges with warm water and move on to the next.

Image

Let dry over night, then trim the daggy ends flush with the rims.

I make my own linings. These are Kauri Pine, and are the first time that I've made reverse linings. I usually make solid linings, but this was taking too much time, and with a new table saw, I was keen on trying my hand at making these. I spent about 1 hour and made enough for 6 instruments.

Image

This was pretty standard stuff. Make up more hide glue, I make it fairly thick for this application and give it a quick burst in the microwave to heat up around 180 degrees. This was a tip that I saw on Frank Ford's site. The glue isn't affected by this high of a heat for such a quick burst. It gives you a little more working time, and you only heat up as much as your going to need.

Brush on the glue and clamp up. Crack open a beer. Call the wife and show her what a great job you've done.
Allen R. McFarlen
https://www.brguitars.com
Facebook
Cairns, Australia

User avatar
Allen
Blackwood
Posts: 5252
Joined: Thu Oct 11, 2007 5:39 pm
Location: Cairns, Australia
Contact:

Post by Allen » Thu Oct 09, 2008 6:38 pm

After work today, I had about an hour free time, so got the linings leveled with a flat board with some 80 grit stick-it paper glued on.

Image

Then a bit of a clean up of the interior of the rims and linings, and then a couple of coats of shellac to seal the hide glue that was used on the reinforcement tape. Good practice in all climates, but essential in the tropics, otherwise you'll stand a good chance of having mold growing on the exposed glued surface.

Image
Allen R. McFarlen
https://www.brguitars.com
Facebook
Cairns, Australia

User avatar
Kim Strode
Blackwood
Posts: 215
Joined: Fri Oct 19, 2007 8:11 am
Location: Daylesford Victoria, Australia

Post by Kim Strode » Fri Oct 10, 2008 8:27 am

You're doing a great job Allen, it's all great knowledge for my next project.

Keep up the good work!
Kim Strode
Daylesford, Australia

User avatar
Allen
Blackwood
Posts: 5252
Joined: Thu Oct 11, 2007 5:39 pm
Location: Cairns, Australia
Contact:

Post by Allen » Sat Oct 11, 2008 6:03 pm

I decided on a rosette and binding theme. Managed to finds some nice Queensland Maple for the bindings, and went with a rosette that keeps to the classic look of the vintage instruments at first glance, but has just a bit of a difference, that if you're looking, you'll spot it.

Image

It's maple / koa / maple purflings and the wood in the inlay is end grain Monterey Cypress. When the Cypress is wet up, it turns a rich golden brown, that makes it blend in quite close to the color of the Blackwood. So it ends up looking a bit like the 3 concentric rings that were on some of these instruments.
Allen R. McFarlen
https://www.brguitars.com
Facebook
Cairns, Australia

User avatar
Allen
Blackwood
Posts: 5252
Joined: Thu Oct 11, 2007 5:39 pm
Location: Cairns, Australia
Contact:

Post by Allen » Wed Oct 15, 2008 9:18 pm

The top has been braced and braces shaped.

Looking at both sets of plans that I have, and taking Richard's comments about how he lightens up the braces on his instruments, I changed the bracing to sizes similar to what I do on my standard build acoustics.

X-brace is 7 X 12 mm instead of the 10 X 10 mm that is called for in the plans. Lower ladder braces started out at 7 X 10 mm and shaped partially before glueing down. Upper transverse braces are a full 7 X 12 mm and finger braces are 7 X 10 mm but shaped a fair bit. Bridge plate is Qld. Walnut.

I'm also building this with my standard 25' radius on the top instead of a true flat top as the plans call for. Everything in front of the sound hole is flat though. Don't want to complicate fitting the fret board.

Image
Image
Image
Allen R. McFarlen
https://www.brguitars.com
Facebook
Cairns, Australia

User avatar
Craig
Admin
Posts: 1090
Joined: Wed Sep 26, 2007 10:08 am
Location: N.S.W. in the bush

Post by Craig » Wed Oct 15, 2008 10:24 pm

I know sweet fanny all about these instruments Allen , but your work sure looks good to me . That beautiful rosette " belongs" to that top. A Great choice of colours and design ,perfect for the Blackwood.
Craig Lawrence

Ron M.
Wandoo
Posts: 10
Joined: Thu Oct 16, 2008 11:01 am
Location: USA

Post by Ron M. » Thu Oct 16, 2008 11:11 am

Hi everyone,
Ron M. from OLF. You guys & ladies look like your having fun over here, so i figured i join in.

Interesting approach to the bracing Allen, particularly the tone bar braces. I agree, that rosette is cool.

User avatar
ozziebluesman
Blackwood
Posts: 1529
Joined: Wed Oct 10, 2007 9:12 am
Location: Townsville
Contact:

Post by ozziebluesman » Thu Oct 16, 2008 12:08 pm

Hey Ron welcome to the forum. There are some very interesting builds going on here!

Allen, this guitar is absolutely outstanding. I am looking forward to having a play on this one!

Cheers

Alan

Ron M.
Wandoo
Posts: 10
Joined: Thu Oct 16, 2008 11:01 am
Location: USA

Post by Ron M. » Thu Oct 16, 2008 1:53 pm

ozziebluesman wrote:Hey Ron welcome to the forum. There are some very interesting builds going on here!

Allen, this guitar is absolutely outstanding. I am looking forward to having a play on this one!

Cheers

Alan
Hey Alan,
There are some very interesting builds going on here, like the Resonator hollowneck that Josh built, very nice. Thanks for the warm welcome Alan.

Nice forum you have here Bob.

Ron M.

User avatar
Kim
Admin
Posts: 4376
Joined: Wed Sep 26, 2007 8:32 pm
Location: South of Perth WA

Post by Kim » Thu Oct 16, 2008 3:12 pm

Hi Ron, welcome to the ANZLF :D

josh_cain
Sassafras
Posts: 47
Joined: Wed Sep 24, 2008 9:20 am
Contact:

Post by josh_cain » Thu Oct 16, 2008 5:50 pm

Ron M. wrote: There are some very interesting builds going on here, like the Resonator hollowneck that Josh built, very nice. Thanks for the warm welcome Alan.
Ron M.
thanks, Ron!
Josh.

User avatar
Allen
Blackwood
Posts: 5252
Joined: Thu Oct 11, 2007 5:39 pm
Location: Cairns, Australia
Contact:

Post by Allen » Thu Oct 16, 2008 6:33 pm

Welcome to the forum Ron.

The bracing is the standard pattern from Stew Mac's plans except for down sizing the width, and increasing the hight. And making it a 25' radius dome behind the sound hole.

The bridge patch is a little larger than called for in my plans, but there is a note in the plans about the bridge patch changing is size over the years to a larger one when the bridge became smaller.

Alan, when she's all finished you better put the barbie on. I'll bring the wine, and we can have some fun. 8)
Allen R. McFarlen
https://www.brguitars.com
Facebook
Cairns, Australia

User avatar
Allen
Blackwood
Posts: 5252
Joined: Thu Oct 11, 2007 5:39 pm
Location: Cairns, Australia
Contact:

Post by Allen » Thu Oct 16, 2008 6:47 pm

On the back, I've used off cuts of the Blackwood for the centre strip. I also follow a tip that I got from Hesh about using a bit of masking tape where the braces will land so that when I cut the notch for the brace, the center strip just pops out.

Image

Image

The back is built with a 25' radius as is the top. The plans call for a flat back, but with the wild humidity fluctuations here, I wanted some dome built in for a bit of a safety margin

Image

The back braces are 7 mm X 12 mm instead of the 10 X 10 mm called for in the plans.

Image
Allen R. McFarlen
https://www.brguitars.com
Facebook
Cairns, Australia

User avatar
Allen
Blackwood
Posts: 5252
Joined: Thu Oct 11, 2007 5:39 pm
Location: Cairns, Australia
Contact:

Post by Allen » Sun Oct 19, 2008 5:31 pm

Got a bit more accomplished over the weekend. First off I had to build a larger Go-Bar deck to accommodate a Weisenborn sized instrument. While I was at it I built a rolling trolly cabinet for it to sit on that is 900 mm tall so I can stand and work at a more comfortable height while doing brace ups.

I primed the mating surfaces with thinned hide glue yesterday in anticipation of glueing up today. Then first thing this morning I got everything in position, did a few dry runs of getting everything clamped up. Then heated up the glue and went for it.

Honestly, it really isn't that hard at all to use hide glue for this operation. And if you have a good hair dryer or heat gun to warm the joint after you have it clamped to re-melt the glue, then this is a really simple operation.

Image

Image

Back is being glued on now.
Allen R. McFarlen
https://www.brguitars.com
Facebook
Cairns, Australia

Ron M.
Wandoo
Posts: 10
Joined: Thu Oct 16, 2008 11:01 am
Location: USA

Post by Ron M. » Sun Oct 19, 2008 11:24 pm

It's coming along nicely Allen. Seems that you're putting this one together fast.

Ron M.

Post Reply

Who is online

Users browsing this forum: No registered users and 250 guests