My Latest Guitar

A place where you can let us see your finished instruments in all their glory.

Moderators: kiwigeo, Jeremy D

Post Reply
User avatar
jb2060
Sassafras
Posts: 43
Joined: Fri May 01, 2009 8:35 pm
Location: Sydney
Contact:

My Latest Guitar

Post by jb2060 » Sun Aug 09, 2009 7:42 pm

Hi All,

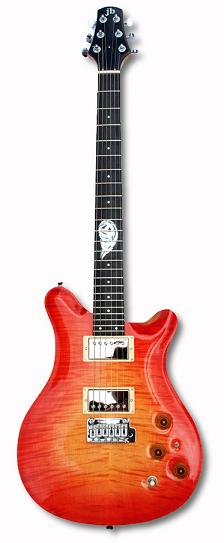
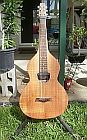
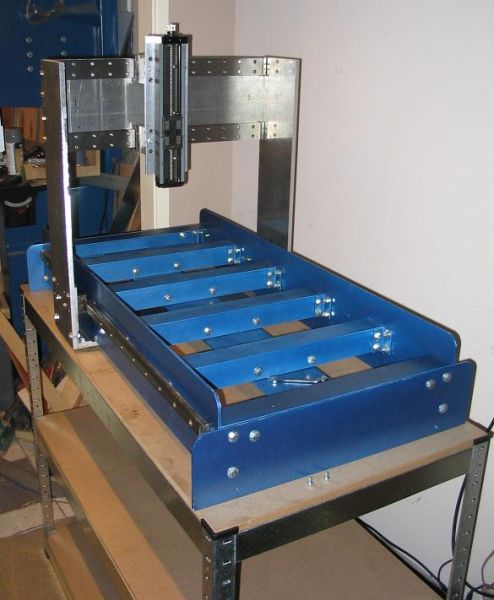
Although the greater majority of you are Acoustic builders I thought you may be interested in some photos of my latest guitar - as I have used CNC for this model. I have been refining this shape and have recently made some minor design changes to the top contour.

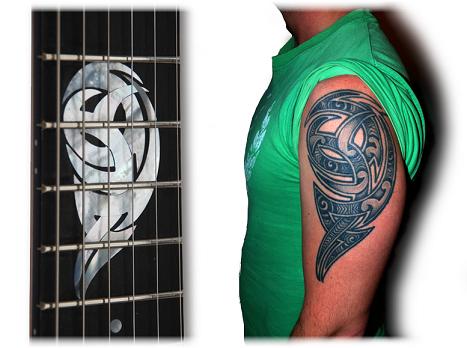
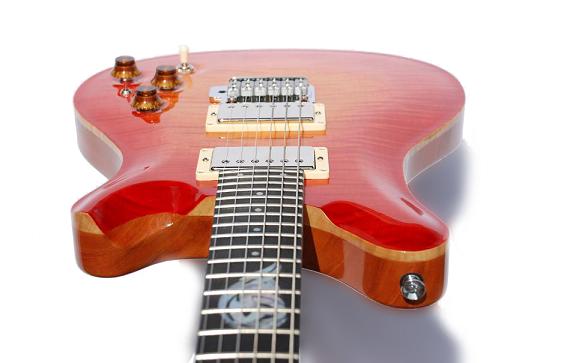
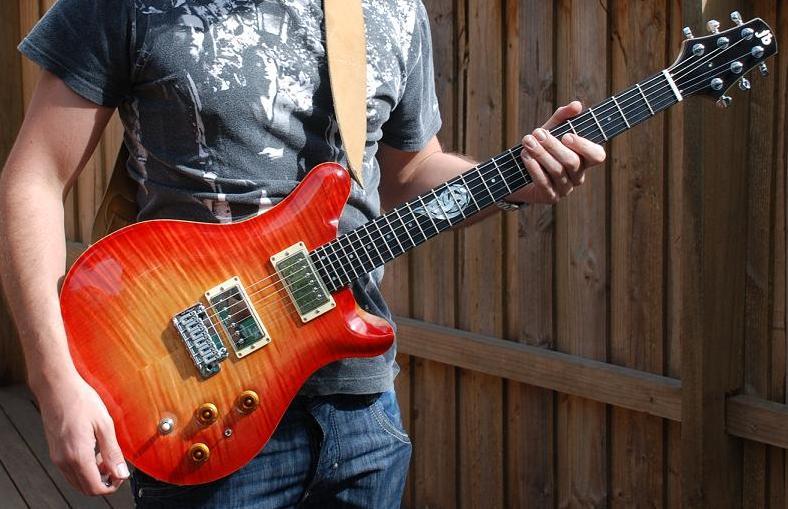
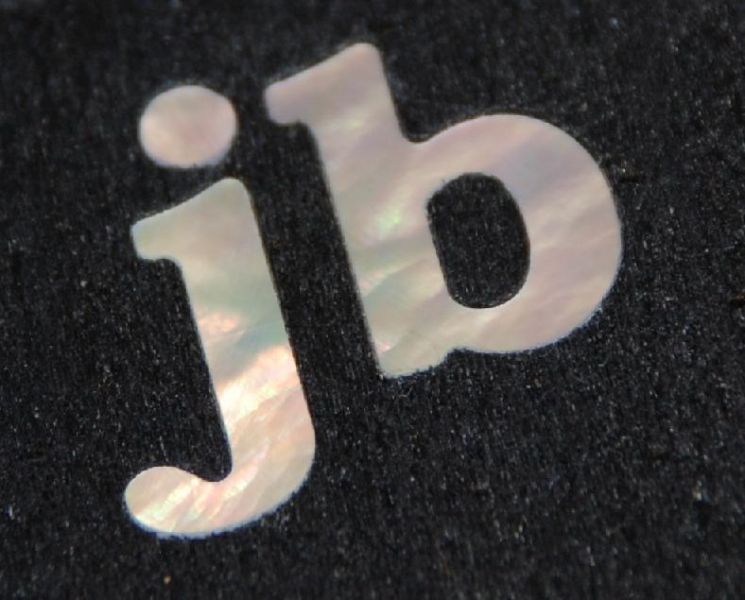
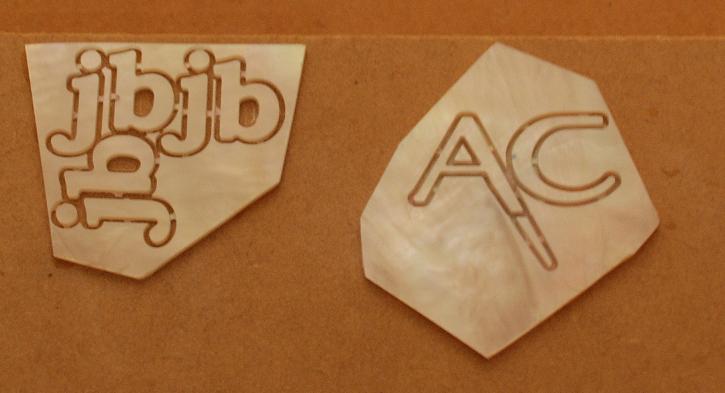
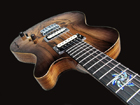
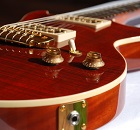
I have some YouTube clips of the guitar in action. Jordan is the new owner and I custom built this for him. The 12th fret inlay features a MoP design of the tattoo on his left arm. We wanted to try and really personalise the guitar and decided this was the best way. The guitar also features a L.R.Baggs Piezo Tremolo bridge. I tried to do something a little bit different with the burst finish to make it a little bit more intense.

http://www.jbguitars.com.au/youtube.html

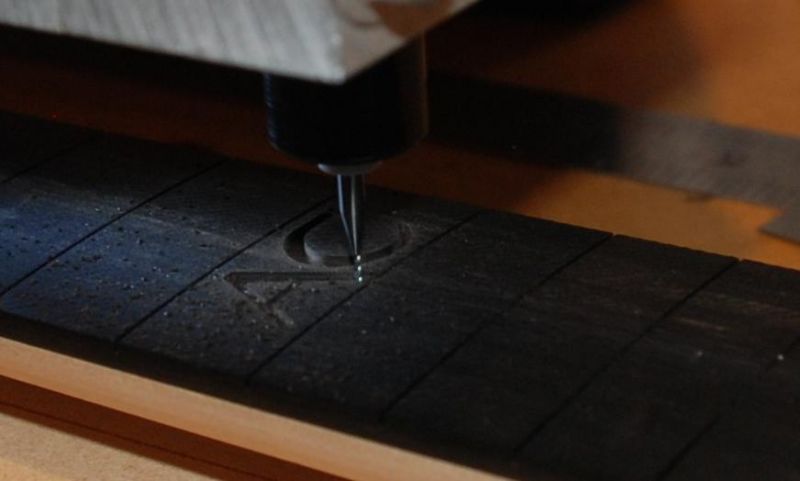
You will also see in the clip a video of a top being carved by CNC. I have only recently started carving my tops this way. I designed the top in 3D CAD and the carve took about an hour and a half (sped up to 4 mins on the clip). The base profile and curves for the neck were also CNCed. I have been using CNC for my guitars for a few years now but only for 2D profiling pocketing and Inlay work.

I have another Artist model guitar in progress at the moment which will be shipped off overseas to it's new owner in few weeks. I will post photos of that one too when done. You can see the stain (greenish) being applied on the YouTube link. This Guitar has the CNCed top.

I am always keen to get feedback (whatever the flavour) so please let me know what you think.

Image
Image
Image
Image
Jason Brouwers
Sydney

seeaxe
Blackwood
Posts: 768
Joined: Thu Dec 18, 2008 7:20 pm
Location: Auckland NZ

Post by seeaxe » Sun Aug 09, 2009 7:56 pm

That looks great Jason, nice to see a few electrics on the forum.

I assume thats a maple top? What wood did you use for the body?

Cheers
Richard

User avatar
jb2060
Sassafras
Posts: 43
Joined: Fri May 01, 2009 8:35 pm
Location: Sydney
Contact:

Post by jb2060 » Sun Aug 09, 2009 8:29 pm

Thanks Richard,

Yes the top is AAAA maple, the body is mahogany, neck is rock maple and the fretboard is ebony.
Jason Brouwers
Sydney

User avatar
Allen
Blackwood
Posts: 5252
Joined: Thu Oct 11, 2007 5:39 pm
Location: Cairns, Australia
Contact:

Post by Allen » Sun Aug 09, 2009 8:45 pm

Welcome to the forum Jason. Nicely executed design, and colors really compliment the package.

Can I ask why you use CNC over shaping by hand? Never having used CNC and loving the hands on feel of working wood, I'm curious about the motivation of taking that path. Is it productivity, or mathematical accuracy and exact repeatability that is the primary goal?
Allen R. McFarlen
https://www.brguitars.com
Facebook
Cairns, Australia

User avatar
kiwigeo
Admin
Posts: 10587
Joined: Sat Sep 29, 2007 5:57 pm
Location: Adelaide, Sth Australia

Post by kiwigeo » Sun Aug 09, 2009 9:02 pm

Do you make the all the owners of your guitars get tatoos to match the fretboard inlay?

User avatar
jb2060
Sassafras
Posts: 43
Joined: Fri May 01, 2009 8:35 pm
Location: Sydney
Contact:

Post by jb2060 » Sun Aug 09, 2009 10:12 pm

Hi Allen,

Thank you. Firstly may I say that I really admire your work. I have been reading the forum for a while and always enjoy your input and the quality of your guitars.

I have shaped many of my guitar tops by hand and do enjoy the process. I guess we are all a bit different in our approach. I started out building my guitars totally by hand (the odd power tool got a run) and then got fasinated by CNC. I got to to the point where I studied the web for months before deciding to build my own CNC machine - which was a great (and challenging) process in itself. I then taught myself 2D CAD and CNC GCODE apps to be able to use the machine. I then evolved this to learn 3D CAD, which has been the most challenging part.

You have accurately highlighted 3 reasons why I use CNC - repeatability, accuracy and productivity - I also like the science of this process. If I can see an idea in head and I can draw it in 3D, then I carve it on my machine. This is particularly relevant for inlay. I have also started digitising my hand carved necks (the really good ones:-) ) so I can try and reproduct these with the CNC - this is still a work in progress. I have to say that my spokeshave, planes, files, chisels and cabinet scraper all still get a good run in my workshop.

thanks, Jason

Kiwigeo - that's a really good idea ! and a really good way to turn my mistakes into "Features" :-)
Jason Brouwers
Sydney

User avatar
Allen
Blackwood
Posts: 5252
Joined: Thu Oct 11, 2007 5:39 pm
Location: Cairns, Australia
Contact:

Post by Allen » Mon Aug 10, 2009 5:40 am

I understand completely the challenge of building and operating something like a CNC machine. And I sure could see the benefit of it in my circumstances for small bits like inlay and bridges. Doesn't seem like enough hours in the day for all the things I'd like to try though.
Allen R. McFarlen
https://www.brguitars.com
Facebook
Cairns, Australia

User avatar
Nick
Blackwood
Posts: 3641
Joined: Thu Feb 26, 2009 11:20 am
Location: Christchurch, New Zealand
Contact:

Post by Nick » Mon Aug 10, 2009 8:17 am

Nice Guitar Jason, not a fan of the red top but that's just me (I'm just not a red person!). I can still see a well executed build underneath with some nice expert touches such as the inlay and the binding 'skip' on the cutaway scoop. Did you mask the edge to give you your 'binding'?

Oh.....and welcome to the forum, good to have you show your work for us, hope there's many more!
"Jesus Loves You."
Nice to hear in church but not in a Mexican prison.

User avatar
jb2060
Sassafras
Posts: 43
Joined: Fri May 01, 2009 8:35 pm
Location: Sydney
Contact:

Post by jb2060 » Mon Aug 10, 2009 6:53 pm

Nick,
Thanks - colour is such a personal thing. My latest guitar is a green/blue colour - I wouldn't choose this for myself but it is fun to see it come together.

Allen,
I must admit that I don't get a lot of joy out cutting inlay by hand, but I do really enjoy designing and cutting on the machine. Sometimes it feels like I don't even need glue to hold the MoP in place. The pocket can be with no offset to the MoP. Here are so photos to show what I mean

Image
Image
Image
Jason Brouwers
Sydney

User avatar
Allen
Blackwood
Posts: 5252
Joined: Thu Oct 11, 2007 5:39 pm
Location: Cairns, Australia
Contact:

Post by Allen » Mon Aug 10, 2009 7:36 pm

So you're going to be the "Go To" guy for all the info needed to get one of these up and running? :D
Allen R. McFarlen
https://www.brguitars.com
Facebook
Cairns, Australia

User avatar
ozziebluesman
Blackwood
Posts: 1529
Joined: Wed Oct 10, 2007 9:12 am
Location: Townsville
Contact:

Post by ozziebluesman » Mon Aug 10, 2009 7:51 pm

G'day Jason,

Beautiful guitar mate. I build by hand and that's a big challange with good results but i will never get spectacular lines, joins shapes and inlays like you have achieved with the cnc machine. Congratulations, a stunning instrument.

Cheers

Alan
"Play to express, not to impress"

Alan Hamley

http://www.hamleyfineguitars.com/

Hesh1956
Blackwood
Posts: 1420
Joined: Thu Sep 27, 2007 9:58 am

Post by Hesh1956 » Mon Aug 10, 2009 9:19 pm

WOW - she's a real looker! Beautiful guitar Jason and welcome to the ANZLF.

What is the finish - it's beautiful and very glossy.

User avatar
jb2060
Sassafras
Posts: 43
Joined: Fri May 01, 2009 8:35 pm
Location: Sydney
Contact:

Post by jb2060 » Mon Aug 10, 2009 11:13 pm

Allen,
Sure, Happy to help on the CNC side of things. I have no doubt you have got all the other stuff covered. :-)

Alan,
Thanks mate you are very kind.

Hesh,
Many thanks also. The first 3 photos show the guitar finished with shellac (blonde dewaxed). I used water based stains for the burst. The final photo is after it was resprayed with precat lacquer. I should have done this first up as Jordan is a heavy user of his guitar and the shellac just wasn't holding up. The shellac did provide a wonderful base for the lacquer though. I like the idea of finishing my guitars in shellac due to its more organic nature and the fact that it will wear (out) nicely over time. I think it is a good thing for guitars to show battlescars after many years of being played - in saying all that, I will likely lacquer most of my future guitars.
Jason Brouwers
Sydney

User avatar
Kim
Admin
Posts: 4376
Joined: Wed Sep 26, 2007 8:32 pm
Location: South of Perth WA

Post by Kim » Mon Aug 10, 2009 11:22 pm

Welcome to the ANZLF Jason,

Very nice work, I love the PRS influence and the finish looks every bit as good, again, very well done. Also the shell work is impressive, it certainly looks like you have CNC well and truly nailed. Did it cost a great deal to set up??

Cheers

Kim

User avatar
jb2060
Sassafras
Posts: 43
Joined: Fri May 01, 2009 8:35 pm
Location: Sydney
Contact:

Post by jb2060 » Tue Aug 11, 2009 9:10 pm

Kim wrote:Welcome to the ANZLF Jason,

Very nice work, I love the PRS influence and the finish looks every bit as good, again, very well done. Also the shell work is impressive, it certainly looks like you have CNC well and truly nailed. Did it cost a great deal to set up??

Cheers

Kim
Hi Kim,
Thanks - It is a bit PRS like but it does have a bit of Strat influence too (ie. no neck angle and strat style bridge).

The cost was mostly in time - the actual cost was about $2000 for the parts of the CNC machine - some of it was scrap aluminium etc. About another $1000 in Software to generate and run the Gcode and about $1000 for the 3D drawing package. Here are some photos of the machine I built. It was a bit of a challenge working with Metal rather than wood and it was very strange to have metal shavings in workshop.

Image


Cheers, jbImage
Jason Brouwers
Sydney

User avatar
Stu
Blackwood
Posts: 245
Joined: Sun May 11, 2008 7:15 pm
Location: Melbourne, Australia
Contact:

Post by Stu » Tue Aug 11, 2009 9:48 pm

I think it's a brilliant way of incorporating some of the more laborious and repeatable tasks into a build scenario. Kudos for going out there and setting up for it and going through the learning curve of programming as well. Well done Jason.

It seems alot cheaper than I expected to kit out for this type of thing. :wink:

cheers, Stu

Post Reply

Who is online

Users browsing this forum: No registered users and 17 guests