J.F. Custom Signature Model in Multi-scale

A place where you can let us see your finished instruments in all their glory.

Moderators: kiwigeo, Jeremy D

User avatar
Cam
Myrtle
Posts: 95
Joined: Sat Feb 28, 2009 3:37 pm
Location: Townsville

Re: J.F. Custom Signature Model in Multi-scale

Post by Cam » Sun Oct 31, 2010 7:43 pm

One of the best all year!

The shape's not really my thing, but the wood combo and the maple on the top, wow :shock:

What finish did you put on it?

User avatar
Stu
Blackwood
Posts: 245
Joined: Sun May 11, 2008 7:15 pm
Location: Melbourne, Australia
Contact:

Re: J.F. Custom Signature Model in Multi-scale

Post by Stu » Sun Oct 31, 2010 7:44 pm

guitarcam wrote:
One of the best all year!

It has been a pretty short year to date, Cam :D

This certainly is more than just a guitar, with such amazing technicalities
and smooth ergonomic practicalities in the rear carves and multiscale
functionality, this JF signature guitar surely is one to be marvelled.

(May have slightly O.D'd on the big words sorry)

Totally jaw-dropping work , Jeremy. :cl

User avatar
Nick
Blackwood
Posts: 3642
Joined: Thu Feb 26, 2009 11:20 am
Location: Christchurch, New Zealand
Contact:

Re: J.F. Custom Signature Model in Multi-scale

Post by Nick » Sun Oct 31, 2010 7:47 pm

oz tradie wrote:
It has been a pretty short year to date, Cam :D

This certainly is more than just a guitar, with such amazing technicalities
and smooth ergonomic practicalities in the rear carves and multiscale
functionality, this JF signature guitar surely is one to be marvelled.

(May have slightly O.D'd on the big words sorry)

Totally jaw-dropping work , Jeremy. :cl

You been reading that dictionary again haven't you Jeremy? :lol: :lol: :lol:

Asquared
Gidgee
Posts: 4
Joined: Sat Oct 30, 2010 11:23 pm

Re: J.F. Custom Signature Model in Multi-scale

Post by Asquared » Sun Oct 31, 2010 7:47 pm

Hi Jeremy,

Great work, I'm quite inspired. Can you provide more details on how you set up the magnetic covers. I presume some small RE magnets set into the body (or the cover?) with a metalic inset in the cover. Given those RE magnets are strong, how do you get the cover off? I can't see any means to grip it (control cover) in the photos. I'm wondering if you have a concealed cut away in the edge of the cover to allow a finger nail or prying device to get under it. And what about the T/R cover?

Thanks
Andrew

User avatar
J.F. Custom
Blackwood
Posts: 779
Joined: Fri May 01, 2009 9:13 pm
Location: Brisbane
Contact:

Re: J.F. Custom Signature Model in Multi-scale

Post by J.F. Custom » Sun Oct 31, 2010 7:51 pm

Hi again and sorry for the slow replies everyone.

Cheers Dom, your comment is appreciated.

GuitarCam, thanks for your honesty. :wink: Artistic sense is a very personal thing, thanks for the compliment too. It had been a pretty short year at that point though... Hmmm...

As for the finish, well, part of the story (Australian Wood Review) required me to attempt to make building the guitar accessible to newcomers. This was difficult as I wanted a lacquer finish but many new builders are not going to have compressors and guns, nor are they going to rush out and buy them for a first build. As a compromise therefore, I tried the Mirotone Spraylac aerosol packs. Mirotone make a great pre-catalyzed lacquer that many on here use and this is the same product; albeit pre-mixed and only in satin or semi - no full gloss. I used the semi and although the results were acceptable, I was never fully satisfied with them. New builders will tick all the requirements for protection and appearance so it is a viable option, but I found the application frustrating. I obviously could not adjust spray pattern, flow rates, mix ratios etc and had to work with what it was. As I say, it took a bit of work but the results were ok, as in the photos. I am fussy though and as a result, I stripped the whole thing back and have re-sprayed with my gun in Durobond Guitar Lacquer. Will be cutting back and buffing in a number of days now. Hopefully it was worth the effort!

Stu; what can I say? Thanks mate Cool Such an eloquent use of our language :D :wink: But coming from such a specialist electric builder and spray finishing expert, thats high praise.

Nick, I think you meant Stu... :roll:

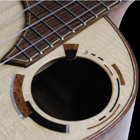
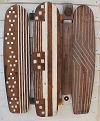
Hi Andrew. I took a couple of shots to better explain it for you. I'm glad you are inspired. Yes you are correct - small rare earth magnets. I set four into the electronics cavity cover and four deep countersunk into the cavity rim rebate too. It is overkill really. There is a small notch but buggered if you could lift it with a fingernail. Yes you need to put a tool of some type into the notch then it simply pops off. Much less fuss than screws. As for the truss cover, I in a fashion not too dissimilar to Stu (Oz Tradie) above I believe, use the rod itself as the attraction for the magnet. I make my truss cover in the same fashion as if it were to be screwed as normal or variations thereof, likewise the access hole in the headstock. Then I make another block of wood a bit like a keel on a boat, countersink a magnet into it and place it into the access hole. I then cut off the excess in the same plane as the peghead. Finally I surround it with some tape to protect the surface, apply some epoxy and place my truss cover over it. Leave it set for 24 hours then the whole piece just comes out with fingernail pressure. Enough to hold it in place perfectly, but slide off with ease. Pictures say it better though.

Back of the cavity cover with four magnets, tool notch and shielding paint and truss cover top in some beautiful Gidgee.
img~
img~


Truss cover bottom magnet setup and truss access hole in head stock.
img~
img~

I hope that is clear enough and helps.

Finally, Bob I know you asked but if anyone else is interested, I should have a decent recording in the coming weeks so I'll post one up when available.

Cheers all,

Jeremy.

User avatar
Kim
Admin
Posts: 4376
Joined: Wed Sep 26, 2007 8:32 pm
Location: South of Perth WA

Re: J.F. Custom Signature Model in Multi-scale

Post by Kim » Sun Oct 31, 2010 7:52 pm

J.F. Custom wrote:
As a compromise therefore, I tried the Mirotone Spraylac aerosol packs. I was never fully satisfied with them. New builders will tick all the requirements for protection and appearance so it is a viable option, but I found the application frustrating. I obviously could not adjust spray pattern, flow rates, mix ratios etc and had to work with what it was.
Cheers all,

Jeremy.

Jeremy,

A tip i have used to get better results with aerosol paints is to sit the can in a bucket of hot water for a while, not boiling, but pretty hot all the same. The heat thins the paint and increases the pressure in the can. This produces a much finer and more predictable spray pattern. You leave the can to heat up in the bucket, remove it in a few minutes when its hot being sure to wipe down the outside with a clean dry rag to remove any water, and start spraying.

As the pressure in the can drops with use, the droplets in the spray pattern begin to increase in size. When you notice this happening, you simply pop the can back in the hot water for a while and the pressure will build again. If the job is big enough to warrant it, have a few 'numbered' cans on the go at the same time, one in your hand, two and three in the bucket of water heating up ready for use.

Do this at your own risk of course but I have done so many times and never had an issue.
59109_2_468.jpeg
59109_2_468.jpeg (51.19 KiB) Viewed 13065 times
Cheers

Kim

User avatar
jb2060
Sassafras
Posts: 43
Joined: Fri May 01, 2009 8:35 pm
Location: Sydney
Contact:

Re: J.F. Custom Signature Model in Multi-scale

Post by jb2060 » Sun Oct 31, 2010 7:53 pm

Jeremy,

I somehow missed this thread first time around. That is a really wonderful looking guitar - just tremendous. I love the back contours and the inlay. Would love to hear some sound/video files too.

great job, jb

Peter T
Kauri
Posts: 34
Joined: Fri Oct 15, 2010 10:04 pm
Location: Melbourne

Re: J.F. Custom Signature Model in Multi-scale

Post by Peter T » Sun Oct 31, 2010 7:54 pm

J.F. Custom wrote:


As for the finish, well, part of the story (Australian Wood Review) required me to attempt to make building the guitar accessible to newcomers.

This is making guitar building accessible for newcomers!!!?

This is top of the line, state of the art!
Thats like Schumacher teaching a 16 year old kid to drive in an F1!

Love your work.

And thanks to jb for posting. This beauty was before my time and I would have missed it.

User avatar
J.F. Custom
Blackwood
Posts: 779
Joined: Fri May 01, 2009 9:13 pm
Location: Brisbane
Contact:

Re: J.F. Custom Signature Model in Multi-scale

Post by J.F. Custom » Sun Oct 31, 2010 7:57 pm

Hi again!

Sorry for the late pick-up on this thread; particularly busy at present.

Thanks Jason and Peter for the comments, it's appreciated.

I hope it wasn't too over the top for the article Peter. I just felt that with the amount of information available in books and online (such as here), there wasn't much point to me doing a 'standard' electric build for it. I just thought I'd provide information on that which can be a little more difficult to come by and hopefully inspire some potential builders to take it up and branch out a bit. Hopefully I managed to keep it accessible nevertheless.

Thanks Kim. :) I took the approach of standing the cans in the sun for a couple of hours prior to spraying. This I'm sure would have the same effect, albeit much more slowly. Your method is more direct and I had not thought of it. Given the photo you included... I think I'll stick to my compressor and gun! :wink: Oh and btw, even though the finish from the cans was ok, the re-spray was well worth the effort. The Durabond Guitar Lacquer off the gun went beautifully.

As for the sound/video... Very frustrating. I had it all organized with a talented seven string player and got within a fortnight of the date when I received a call to say he was relocating at short notice interstate due to family reasons! Unfortunately, our paths weren't able to cross in the weeks between so another opportunity missed. Hence why I have not posted anything. Perhaps opportunity will still present, I still have the unit after all...

Thanks again everyone.

Jeremy.
Last edited by J.F. Custom on Mon Nov 29, 2010 10:03 pm, edited 1 time in total.

User avatar
J.F. Custom
Blackwood
Posts: 779
Joined: Fri May 01, 2009 9:13 pm
Location: Brisbane
Contact:

Re: J.F. Custom Signature Model in Multi-scale

Post by J.F. Custom » Mon Nov 29, 2010 10:01 pm

And the final revival is done. :gui Defibrillators can go back on the shelf for now and again, thanks to those that helped.

Unfortunately it would appear I have 'lost' or at least, temporarily misplaced some of the original images. These posted now are what I currently have on hand and will have to do unless I can relocate more... Must be a disc somewhere... This includes those still missing further down the page in reply to some questions unfortunately - sorry.

Kim, that is one cool pic you have posted there! :D 8)

Thanks all.

Jeremy.

User avatar
Dennis Leahy
Blackwood
Posts: 872
Joined: Wed Oct 10, 2007 12:32 am
Location: Duluth, MN, US
Contact:

Re: J.F. Custom Signature Model in Multi-scale

Post by Dennis Leahy » Tue Nov 30, 2010 4:59 pm

Oh this guitar just knocks me out!

Did I mention that if I can ever muster the skill, I'm going to steal that 12th fret binding/vine treatment? Don't worry, it'll take me a few decades to acquire the skill set.

Dennis
Another damn Yank!

User avatar
P Bill
Blackwood
Posts: 521
Joined: Mon Oct 18, 2010 8:31 am
Location: Cedar Vale, Qld Australia

Re: J.F. Custom Signature Model in Multi-scale

Post by P Bill » Thu Dec 02, 2010 9:37 am

Seriously beautiful guitar Jeremy .This one slipped by till now. A lot of effort with gidgee, well done.I love the detailing at the 12th fret.
"Were you drying your nails or waving me good bye?" Tom Waits

Bill

Post Reply

Who is online

Users browsing this forum: No registered users and 89 guests