
Pre-Bending Herringbone
Pre-Bending Herringbone
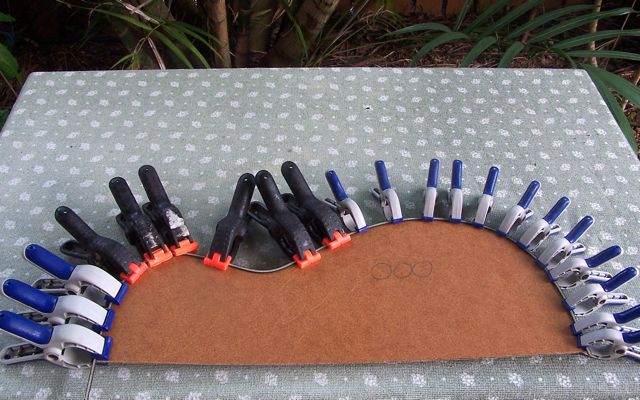
I've seen people ask more times than I can count how to get herringbone, or other wide purfling glued in without problems. I'm getting ready to install some, so thought I'd take a picture, as they say a good one is worth a 1000 words. So I'm going to shut up now.

-
sebastiaan56

- Blackwood
- Posts: 1279
- Joined: Sun Oct 28, 2007 5:23 am
- Location: Blue Mountains
This is where my rosette effed up, any suggestions for tighter, ie rosette, curves?Allen wrote: It bends easy, but wants to roll as it bends. I think this is what gives people fits when trying to use Herringbone. By clamping it flat as you go, it takes the bend and holds it shape once you're ready to install.
make mine fifths........
I route a template in some MDF and coax the herringbone into it. Place flat weight over it and let sit over night. Pop out the next day and install. You could use a heat source like hair drier to help you out, but I've never found it necessary.
To install, hot hide glue works a treat on herringbone. Warm and slippery seems to really help in getting them to sit in like they're suppose to.
To install, hot hide glue works a treat on herringbone. Warm and slippery seems to really help in getting them to sit in like they're suppose to.
-
John Maddison

- Blackwood
- Posts: 356
- Joined: Tue Jun 03, 2008 11:15 pm
- Location: Albany, Western Australia
- Contact:
Hi Allen
Cheers
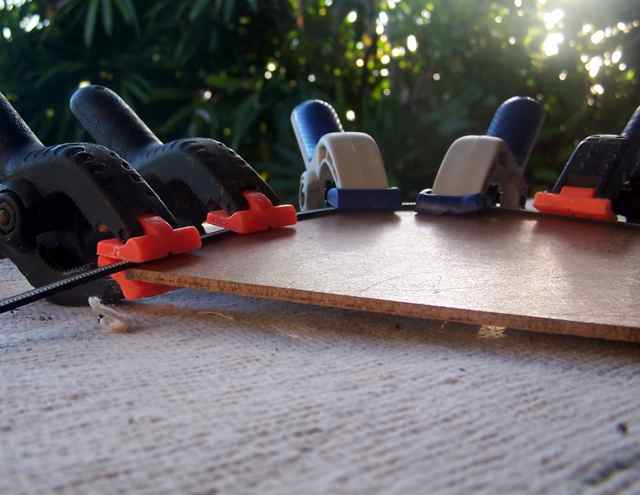
Can you take an end-view pic of the herringbone binding close-up at this selected part of the mold, just for a closer look?I route a template in some MDF and coax the herringbone into it.
Cheers
Last edited by John Maddison on Mon May 18, 2009 11:08 am, edited 1 time in total.
John M
John, there isn't a rebate on this mold, if that is what you are thinking. This is just my template for sizing tops, and backs. It's only some 3 mm press board. The Herringbone is only sitting on the top of it. Held in place with the spring clamps, so that it doesn't roll over as it's bent around the form. Once it sits like that for a few hours, or over night, it keeps its shape no worries at all. I'll take a picture later, as it's still dark out here right now.
The quote you have was for Sebastiaan that had asked about rosettes. That was where I have a piece of MDF with a mock up of the rosette routed out. Just like the top, but less delicate.
The quote you have was for Sebastiaan that had asked about rosettes. That was where I have a piece of MDF with a mock up of the rosette routed out. Just like the top, but less delicate.
-
John Maddison
- Blackwood
- Posts: 356
- Joined: Tue Jun 03, 2008 11:15 pm
- Location: Albany, Western Australia
- Contact:
-
sebastiaan56
- Blackwood
- Posts: 1279
- Joined: Sun Oct 28, 2007 5:23 am
- Location: Blue Mountains
Nice job Allen!!! 
Sebastiaan my friend another way to bend herringbone into tight curves such as a cut-away is to split the herringbone with a razor blade and treat is as two pieces. I learned this from John How when I wrongly told someone on the OLF that I didn't think that one could coax herringbone around a cut-away.
Sebastiaan my friend another way to bend herringbone into tight curves such as a cut-away is to split the herringbone with a razor blade and treat is as two pieces. I learned this from John How when I wrongly told someone on the OLF that I didn't think that one could coax herringbone around a cut-away.
-
sebastiaan56
- Blackwood
- Posts: 1279
- Joined: Sun Oct 28, 2007 5:23 am
- Location: Blue Mountains
I'm not sure and I was just looking at it and wondering the same thing. It looks like you could slice a side off or split it down the middle. If it is split down the middle the alternating pattern may get out of sync.sebastiaan56 wrote:You mean down the middle Hesh?
John How is a great guy and I am sure he would tell anyone interested in his method how he does it. If anyone wants to contact him let me know and I'll contact him and either ask him if I can pass on his contact info or request that he stop by the ANZLF and enlighten us all.
-
Nick

- Blackwood
- Posts: 3641
- Joined: Thu Feb 26, 2009 11:20 am
- Location: Christchurch, New Zealand
- Contact:
I'd be a starterHesh1956 wrote: John How is a great guy and I am sure he would tell anyone interested in his method how he does it. If anyone wants to contact him let me know and I'll contact him and either ask him if I can pass on his contact info or request that he stop by the ANZLF and enlighten us all.
"Jesus Loves You."
Nice to hear in church but not in a Mexican prison.
Nice to hear in church but not in a Mexican prison.
-
Ron Wisdom

- Blackwood
- Posts: 420
- Joined: Sat Sep 29, 2007 1:18 am
- Location: Arkansas, USA
-
sebastiaan56
- Blackwood
- Posts: 1279
- Joined: Sun Oct 28, 2007 5:23 am
- Location: Blue Mountains
That was the prompt for my questionHesh1956 wrote:I'm not sure and I was just looking at it and wondering the same thing. It looks like you could slice a side off or split it down the middle. If it is split down the middle the alternating pattern may get out of sync.
Consider the request requested......John How is a great guy and I am sure he would tell anyone interested in his method how he does it. If anyone wants to contact him let me know and I'll contact him and either ask him if I can pass on his contact info or request that he stop by the ANZLF and enlighten us all.
make mine fifths........

Page 46 of Jim William's book 'A guitar Makers Manual' has a diagram showing he splits down the centre. It also has text which suggest:
1 Split in the direction of the pattern.
2 Use a dull knife.
3 Stay on the same side of the centre white stripe.
4 Tape each piece of herringbone to the bending form so that it adapt to its required shape.
5 Do not allow to dry completely before using.
Personally I think Allen's method is simpler. In the past I have used a series of panel pins nailed into some MDF which follow the inside line of the form. The herringbone is soaked a little in warm water and then gently eased into place and set to the pins clamping in between in much the same way Allen has shown.
Cheers
Kim
I did that the first time I used herringbone Kim, and while it worked, it was a pain in the ass to do, and it still wanted to roll over on the really tight bends. This method takes no more time than putting that many spring clamps around your template. No soaking, no heat, and in shape, clamped flat in around 2 minutes or less.
For a really tight Venetian cutaway, if you use the really fine Herringbone, it would be easier to disguise any out of sync patter, I've tried breaking this stuff down the middle, and it's a no go. It comes from Gurian. Perhaps other makes are easier to get apart.
For a really tight Venetian cutaway, if you use the really fine Herringbone, it would be easier to disguise any out of sync patter, I've tried breaking this stuff down the middle, and it's a no go. It comes from Gurian. Perhaps other makes are easier to get apart.
-
Mark McLean

- Blackwood
- Posts: 1086
- Joined: Thu Apr 10, 2008 2:03 pm
- Location: Sydney
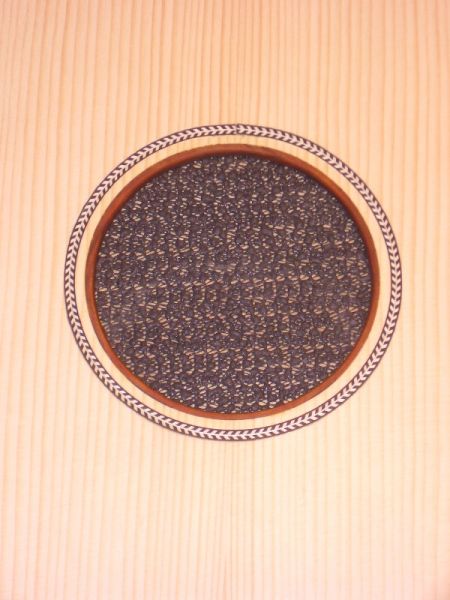
I recently put this herringbone rosette in my number 2 build. I didn't realize that it might be a problem to bend (ignorance is bliss). I spritzed it with some water and bent it on a slightly warm pipe. It bent perfectly without any rolling and I glued it into the channel right away with no drama. I also had a go at a cocobolo soundhole binding to match the binding on the edges and that worked out pretty well also (one small gap that I will need to fill before finishing). Maybe this was the luck of the beginner.
Who is online
Users browsing this forum: No registered users and 41 guests