Inlay

Got a new way of doing something? Or maybe an old method that needs some clarification.

Moderators: kiwigeo, Jeremy D

Post Reply
User avatar
Craig
Admin
Posts: 1090
Joined: Wed Sep 26, 2007 10:08 am
Location: N.S.W. in the bush

Inlay

Post by Craig » Tue Mar 25, 2008 10:51 am

Kim Strode asked me ( in Martin's 12 string tuner spacing thread ) about my inlay procedure Rather than hijack Martin's thread , I have opened this thread.
As I don't consider myself to be a full-on inlay artist ,I don't feel qualified to do a full-on tutorial , but rather than 'fob-off " I'll give a brief run-down on how I do it . Not saying it's the best way ,but it seems to suit me O.K.

I advised Kim to first check the archives on some of the American forums for a starter.

First , draw your inlay carefully on white paper. Next trace the individual pieces onto tracing paper. Now cut these pieces out precisely with a scalpel .
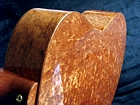
You can now place these see through pieces onto your shell to find the right colour /shell movement . Glue these tracing paper cutouts to your shell with rubber glue ( selley's Quick-Grip ) ,others use P.V.A..

Once the glue is dry , cut these pieces a little oversize with a jewelers saw on a jewelers saw table ( pictures on StewMacs site ). After which you can file to their exact outline with needle files . A dremmel with StewMac base clamped upside down to your table , works well with a little drum sander thingy , for larger areas.

Check these pieces on your original master plan for fit . When you are happy with them , Glue them to their respective positions on you headstock or whatever, with a smear of rubber glue on one side only. Wait until the glue dries completely.This is where others prefer P.V.A. , as the rubber glue can move if your not careful.

Scribe around the shells outline with a scalpel or new pointy exacto blade.

Remove the shell piece with either a little turps or gradually lifting by getting the scalpel under an edge.

Excavate the area with a dremmel and downcut spiral bit . Check very closely that you have excavated to the scribed line . In nearly every case ,I find I have missed a bit ! . :?

Trial fit the piece , but don't push hard to make it fit or you will break the piece when trying to remove it :?

When you have it fit O.K. ,place the shell in the excavation and prepare some wood dust from scrap of the surrounding wood. Rub this in and around the shell leaving a small ridge of dust around the shell.

Wick some C.A. to these ridges . I use a piece of wound guitar string as a " wicker " . It seems to retain the C.A. but lets go of it when the dust soaks it up

Level and your done . If you have missed a bit ,go over it again with the C.A. and dust.

A word of warning here :
There have been times where I have had such an exact fit that there hasn't been much of a gap between the shell and surrounding wood. The C.A. and dust bridged it leaving me a little pissed off :lol:

Epoxy and dust layed into the excavation doesn't do this ,and finds all the tiny gaps to ooze out of . It doesn't give such a good matching colour as the C.A. method however.

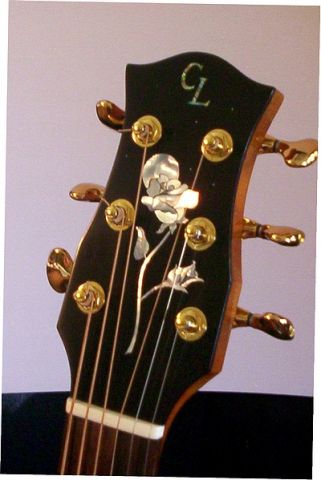
If you were to do a multipiece inlay like my 32 piece Rose . It is better to assemble and glue together the shell pieces( on glass with waxpaper underneath) before scribing/excavating.

Hope this helps you a little Kim.


Image


Cheers Craig Lawrence

User avatar
Craig
Admin
Posts: 1090
Joined: Wed Sep 26, 2007 10:08 am
Location: N.S.W. in the bush

Post by Craig » Wed Mar 26, 2008 9:10 am

Kim,
Another few tips :

Some folk rub chalk into their scribe lines to make them more visable while excavating.

Shell dust ain't good for the lungs, so wear a dust mask . I'm afraid I'm guilty here . I hate wearing them , as it makes me feel like I'm about to head off on a mission into deep space :lol: . they just inhibit me, and I figure because I'm only doing a little inlay , it shouldn't affect me,,,,,,WRONG ,WRONG, WRONG ! :lol:

Keep your saw and file strokes at a nice 90 degree. This will make for a better fit into the excavation .

The very best inlayers can almost use their saw only to cut to shape , without using needle files. I haven't "arrived" there yet but can get pretty close. Lay a large cloth between your table and your lap to catch any little pieces you are working on when they go flying ! :?

Ebony is easier to inlay than rosewoods or spruce , in that the C.A. and dust becomes almost invsable. Rosewoods are a little more visable with spruce being tougher still.

The upside down Dremmel with stew mac router base clamped to your table works good but I must stress that it is a dangerous practice . IT CAN BITE !. I put small steel burrs in the thing at times , but it s better to use needle files as they are slower and more controllable. B.T.W. I have my Dremmel connected through an old sewing machine pedal ( NO, it doesn't make it sew ! :lol: ) , but makes for a good on/off and speed contoller.

Trial fitting your piece into the excavation can be a trial ! :lol: I try to keep my excavation really tight to the scribed line , and so end up doing many trial fits ,nailing where it is still binding . You have to think about it at this stage . It not fitting properly in one area may be because it's too tight in another area ( pushing it to the left or right etc.).

Cheers , Craig

bassbuilderman
Gidgee
Posts: 6
Joined: Tue Jun 09, 2009 7:10 pm

Post by bassbuilderman » Sat Jun 27, 2009 11:37 pm

I hope this is the right place to ask....
I've just bought a set of trapezoid inlays from MOP supplies, and want to inlay them Gibson Standard style into a 12"radiused Stewmac Rose wood or Ebony fretboard.

Are there any issues or things to look out for using a radiused fretboard? I'm expecting the curve to present some problems scribing, centre-ing.

BBM

User avatar
Craig
Admin
Posts: 1090
Joined: Wed Sep 26, 2007 10:08 am
Location: N.S.W. in the bush

Post by Craig » Mon Jun 29, 2009 8:22 am

G'day BBM ,
I've never inlayed the block type neck inlay sets , but if I had, I would be inlaying them prior to radiusing the fretboard. If you were to route for the inlays now using the fretboard to register against , you'll end up with the bottom of the excavation being radiused also. The shell pieces being flat , I suppose you could just fill that void with epoxy when you glue them in . Check you have enough shell thickness to begin with as you will end up leveling quite a bit of the shell to match your 12 inch radius.

Another way would be to place a flat board on top of the radiused neck for the router to register against ( with a template type hole in it ). This would give you a flat bottom on the excavation . Again, check the thickness of the shell is thick enough to handle the radius . In both cases , set the depth of the inlay ( at the crown of the fretboard ) to be the same as the shell thickness.

Others who have inlayed these sets maybe able to help further
Craig Lawrence

Post Reply

Who is online

Users browsing this forum: No registered users and 34 guests