
I have just recently used Zpoxy to grain fill my EIR guitar and it seems to be pretty good stuff.
Past experience building high end fishing rods in which epoxy is used extensively had taught me the great importance of getting the mixture correct. Quite a few years ago I had built a beautiful rod for deep sea jig fishing, I threw everything at it including the best and most expensive silicon carbide runners etc and then spent hours binding it all together and applying the best rod art with cotton I could muster.
Once the binding, including a very intricate and impressive butt wrap had been completed and level filled, it was time to spin on some epoxy. This is done using a rotisserie and a heat gun to thin the mix and as the rod slowly rolls around all the air is expelled from the bindings.
Well you know where this is heading. Despite having numerous builds under my belt that had worked out very well, I messed up the epoxy mix and it ruined the entire job. The rod still functioned brilliantly, the fish did not seem to mind a bit, but the epoxy remained far too soft and it soon yellowed and became very cloudy masking all of my hard work. Disappointing to say the least but then the hardest lessons are the last forgotten.
Anyhow, that in mind, I was not happy using digital scales which jumps to the nearest gram or eyeballing by volume into a medicine cup to measure out a small mix. Truth be known, any epoxy should really be mixed using 3 containers, one to carefully measure out part "A" another for part "B" and then they get decanted into a third where the you mix thoroughly. This method ensures that the mixture remains fairly equal because it allows you to fine tune each part for maximum accuracy before they are combined, it also leaves around the same amount of residue behind in each measuring cup when you decant so the end mix should be quite close to correct.
Well I guess pouring epoxy into cups like this is just fine when you need a good size mix. The accuracy of a larger quantity is of course less affected when only a few drops more of one part or the other are added to the mix. But what if your only need enough to grain fill part of a guitar and require only 10ml or less total per coat? Get this mix wrong and you will have a real mess on your hands. Even trying to carefully measure with cough mixture cups can be a PIA when dealing with these smaller amounts because quite often, the 2 parts of the epoxy will have a different viscosity. You may find that the fluid of part "A" can take a while to level out in the measuring cup and reach the edge where the markings are, whilst the fluid of part "B" may be so thin that it creeps up the side of the measuring cup due to surface tension and obscures the markings, this combined is sure to cause an inaccurate reading.
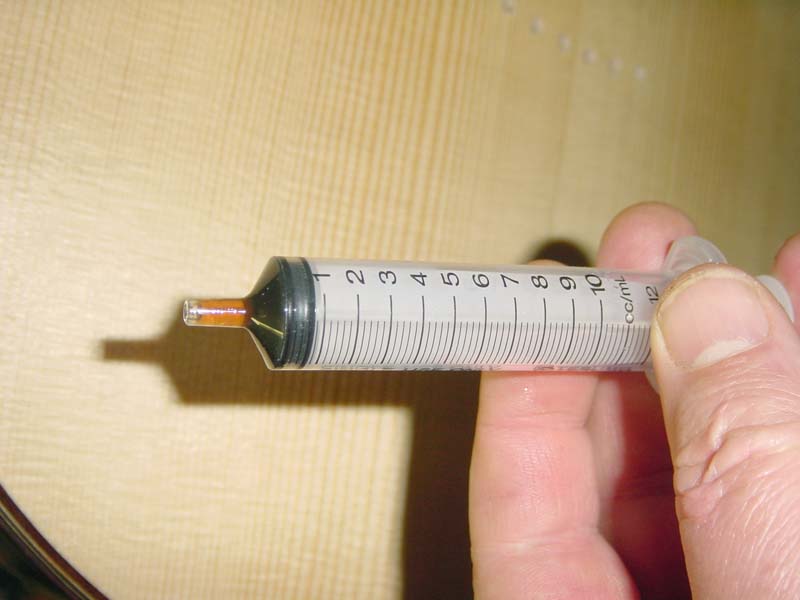
Enter the 10ml syringe, they are readily available, cheap, accurate and require no clean-up.
In this image you can see by the reddish hardener from an earlier mix still in the neck of this syringe, this is not a problem because I make sure to keep the same syringe for use with only that component of the Zpoxy. In actual fact, this residue fluid is an advantage as it has displaced the air between the tip of the syringe and it's piston below. We need to remember throughout this process that for the most accurate results, air needs to be kept to a minimum, a little is OK, but do try to be careful.
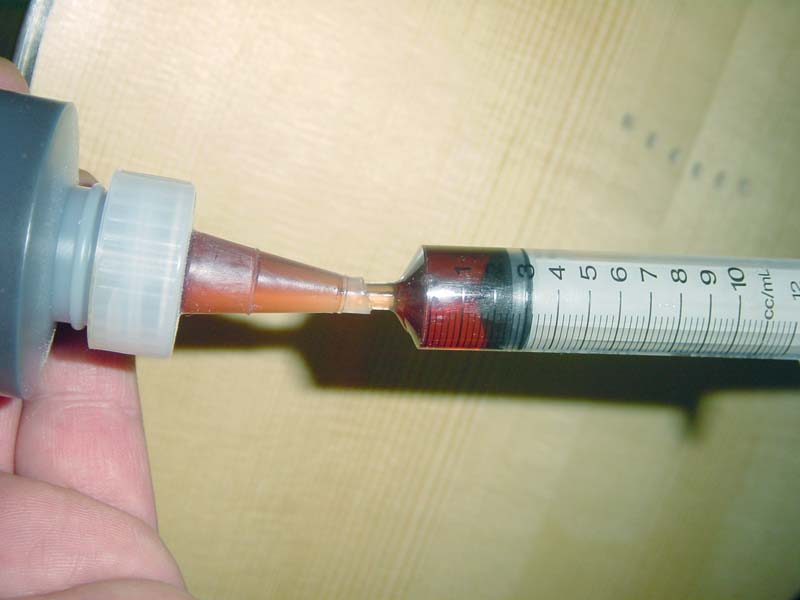
Now if there is any trick to this method, it's in how well you trim the top from your Zpoxy bottles when you first cut the tips away. We need to make sure that the tips are opened only enough to allow a nice air-tight friction fit when the tip of our 10ml syringe is inserted into the bottle. This is not that critical as the tip of the syringe is tapered but it is a consideration. This next image shows us two things of interest, firstly it gives an indication of how much I trimmed from the top of my bottles to achieve this air-tight fit, but it also shows how I have turn the bottle on it's side allowing fluid to move up the tip and expel as much air as possible just before I mate the syringe into the bottle.

In this next image we can see the fluid being 'gently' drawn down into the syringe. The key word here is 'gently'. If you go at this too impatiently, you run the risk of drawing in air from the friction seal you have made between the syringe and the bottle. Don't worry too much at this stage if you do get a little air into the syringe, just keep the syringe angled and continue to go slowly so any small bubbles that enter will gather at the shoulder of the syringe. If you do happen to see a large air bubble coming down the neck of the bottle and about to enter the syringe, just stop drawing in the solution and wait a few seconds holding the Zpoxy bottle upside down allowing the offending bubble to rise back up through the liquid into the bottle.
Continue to "gentle" draw down until you have a little more solution in the syringe than you require, lets say 1ml. Then with the tip of the bottle still pointing down, bring the syringe into a straight and vertical position and watch carefully as any air which may have been trapped at the shoulder of the syringe now makes it's way up into the neck of the syringe. At this point, gently depress the piston of the syringe watching as the upper ring of the piston comes back up toward the mark indicating the actual amount you require.
This last step will ensure that the unwanted air held at the tip of the syringe is injected back into the Zpoxy bottle leaving what should be a reasonably air free mix in the syringe. As soon as the upper lip of piston reaches the desired making on the syringe, gently pull the tip of the syringe from the bottle at the same time tipping the bottle into the upright position to prevent any drips.
Repeat this process using a clean 10ml syringe marked for use with the second part of the mixture and then inject both components into a clean mixing cup to be stirred thoroughly before application.
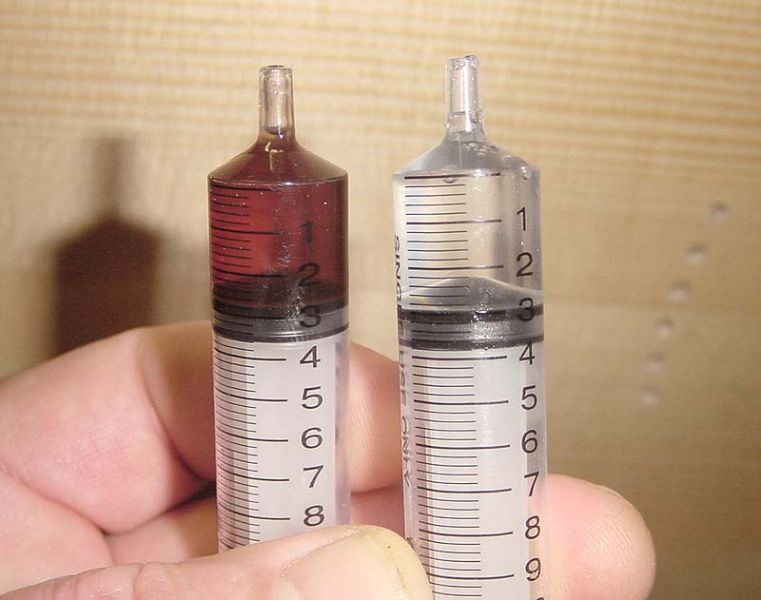
What you see in the above image made a total of 6ml of filler (no shit Sherlock) which was just enough to complete the second coat on my guitar neck and one of it's sides. This worked out very well because it is impossible to grain fill the body of a guitar with epoxy in one application without making a complete mess of it. I apply filler firstly to one side and the back of the guitar with a mix just a little larger than that shown above. I then make a second mix to finish the guitar body and complete the neck, in this way I get very little wastage. Best of all with this measuring system, I get absolutely no nightmares waiting to find if I got the mix right or not.
Hope this helps,

